POTD- PROJECT OF THE DAY: What Did You Make In Your Shop Today?

POTD for me was mundane. Needed to prune my apple tree. Before I put in my garden. Over the years the tree had grown and overhung over a corner of the garden. The branches had gotten so tall that there was no way to pick apples from the ground, even with a fruit picker tool. Thinned out some of the growth and used a step ladder to trim back the outside stuff. Climbed up the tree and went after the central stuff. Got quite the work out. Have about 2/3 of the branches cut up, 1/3 left to go. Picture of me in the tree before going to town.
image.jpeg

Edit: By popular demand, here is the after picture.
PXL_20240525_174231469.jpg
Today, I'm still a little weary, but, wow, slept like a rock last night.
End edit.

We saved well over $500 doing this, but the price I'm paying right now are some rather sore muscles, and probably some sun burn. Mostly used a lopper, but had to resort to saws on the thicker stuff. Didn't want to climb with a chainsaw, but ended up using my old Milwaukee Sawsall for a couple of branches. I disconnected the cord when climbing and even that was a bit tricky due to the weight of the saw and the tight quarters. But got it done. Now the tree is no higher than can be reached by a fruit picker when standing on the ground. Cleared out a lot of crossing branches and suckers. A good days work.
 
Last edited:
POTD for me was mundane. Needed to prune my apple tree. Before I put in my garden. Over the years the tree had grown and overhung over a corner of the garden. The branches had gotten so tall that there was no way to pick apples from the ground, even with a fruit picker tool. Thinned out some of the growth and used a step ladder to trim back the outside stuff. Climbed up the tree and went after the central stuff. Got quite the work out. Have about 2/3 of the branches cut up, 1/3 left to go. Picture of me in the tree before going to town.
View attachment 491192
We saved well over $500 doing this, but the price I'm paying right now are some rather sore muscles, and probably some sun burn. Mostly used a lopper, but had to resort to saws on the thicker stuff. Didn't want to climb with a chainsaw, but ended up using my old Milwaukee Sawsall for a couple of branches. I disconnected the cord when climbing and even that was a bit tricky due to the weight of the saw and the tight quarters. But got it done. Now the tree is no higher than can be reached by a fruit picker when standing on the ground. Cleared out a lot of crossing branches and suckers. A good days work.
You know we need some after pictures!
 
You know we need some after pictures!
I was too tired to take any afterwards. I'll take a picture tomorrow. Wasn't the best pruning job, but it's a lot better than it was. The photo I posted was a candid - I had no idea my wife was photographing me until I saw her between the branches. To her credit, she held the step ladder for me quite a few times today. There were a couple of locations that the ladder was only on 3 out of 4 feet. I won't do that if I am alone.

Edit: Added "after" picture to original post.
 
Last edited:
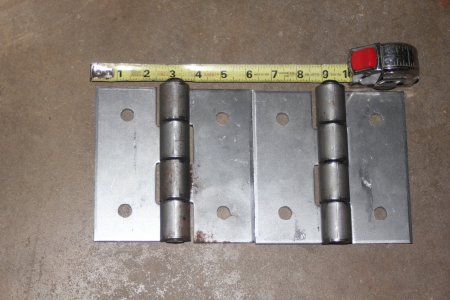
Spent most of the day down my Aunt and Uncle's house . My Aunt passed away last month and my Uncle ( the machinist ) passed away years ago . I grabbed many of his tools back then , but there were many more still there . I have to get them soon . But the small project of the day was the hinges for the fence on the garden . I had 10 of these MC hinges from hell left over from camp stove projects over the years . The plates are 1/4" thick so they should hold up . Had to drill the holes for 1/2" all thread to run thru the 4 x 4 posts . The little Shoprite drill press did it but what a PITA . Makes me want to hold onto the BP a little longer .
 

Attachments

  • IMG_1335.JPG
    IMG_1335.JPG
    565.3 KB · Views: 14
Simple bushing on the sway bar three point of a tractor. Dealer 25 dollars plus 10 dollar handling fee. Down time at least a week. Few minutes of lathe work and a piece out of the cut off pile. Sample part on the left new bushing on the right. Priceless feeling of satisfaction.
And that is why we have our own machines!
Store bought stuff always has a price, but do it yourself is priceless...
 
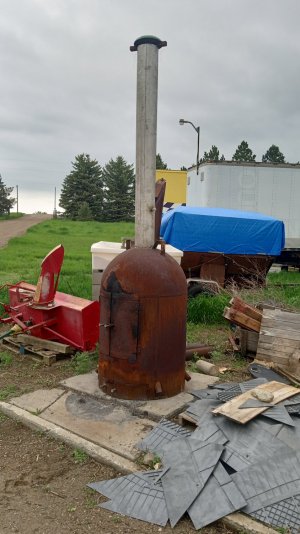
Not in the shop, but outside with the welder.
Incinerator needed a new chimney. The old black stove pipe is getting expensive and doesn't last very long. This piece of 3/16" wall stainless steel pipe should outlast the propane tank main body.
 

Attachments

  • IMG_20240523_162738798_HDR.jpg
    IMG_20240523_162738798_HDR.jpg
    258.3 KB · Views: 36
I am finally getting around to getting my grinding corner organized. I have started the benches. They are built. Next up on Monday is to primer and paint. Then next weekend pull out all the junk in the corner and install it. I will also be adding a dedicated circuit and outlet. Here is the before and mid bench work
7200a7a7d5cd5278021a42802400645f.jpg

c947261161df92c8824ab6a16f88ad85.jpg

2e33e91e7e69465fa5a6958e989c44e8.jpg

cb99a709fc6f8182a22b49decc9cd469.jpg


Cutting oil is my blood.
 
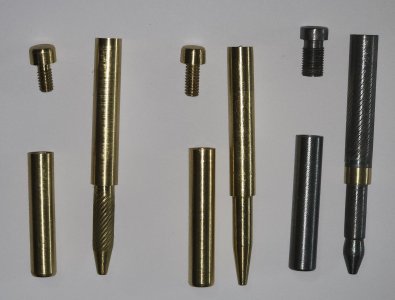
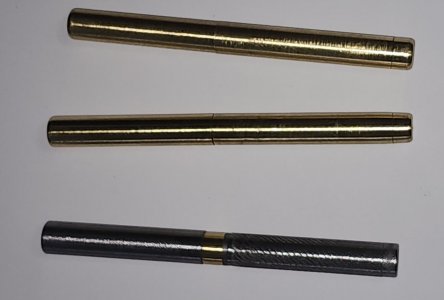
Using my Loagan 820. Learning to make ball point pen. Lots of frustration but they are functional. Not quite getting the fit of the cap to the body as snug as I would like. I get almost there but not quite. Having to knurl a little to get a snug fit. I am giving them away and the tackers seem happy.
 

Attachments

  • Pen Parts.jpg
    Pen Parts.jpg
    419.6 KB · Views: 23
  • Pens.jpg
    Pens.jpg
    206.9 KB · Views: 23
  • PenAss1-2.bmp
    PenAss1-2.bmp
    1.1 MB · Views: 6
More work on the backhoe.

We had made a template for hole spacing, but the od of what we are calling the "REFERENCE BUSHING" is 2.5 inches and it was only 0.3 inches from the edge, would rather have a bit more room.

We had marked the centers with the duplicate template blank that had just the centers, so we just marked a spot about 1/8 inch away.

We used our electricians hole saw kit, bimetal cutters.

Started with the 1/4 center drill to align, then removed the drill.

This gave us a couple of nice slugs, and they went very slow in back gear to keep the temp low.

Switch to boring bar, it was still in setting used for template, cleaned up the bore, added about 0.010 as the template was too tight.

Perfect fit!

The doubler fits well on the top, too big on the bottom, and will be welded on the back side, so it will be okay.

For the tip hole, the brain kicked in!
We clamped up the doubler where it will go, then we took the broken part and clamped it to the doubler.

We moved it up about 1/8 inch so we can get a good weld without going a lot, plus it is easier this way, we will use the doubler to hold the broken part to weld it in place, then remove doubler and weld the other side.

The doubler is long enough to cover part of the pin for the bucket ram.

Was wondering how to mark it, was considering removing the pin and using some sort of punch, but that would require messing with the ram, too much effort.

We went to TSC to get a new and longer hitch pin as the original would be too short, and it is cracked!

We also wanted to be sure the hole size was correct before we removed from the mill.

While there we found some collers, light went off...we clamped the broken part to guide that hole, we tapped the pin out just enough to hold the coller, clamped the doubler in place and epoxied the coller to the doubler.

It only needs to hold until we can get it in the mill and aligned.

It should be fully cured tomorrow.
5be80c22cffa376bea108db8eec3ebc2.jpg
5b0e724f563a3796611f02ce7944a80f.jpg
7f1f92cf537c1595d618a5c742837042.jpg
983b9fb6ab7acf24d0aecf8ef6613d21.jpg
a4886c2d792e8f736b2f0f97339cd754.jpg


Sent from my SM-G781V using Tapatalk
 
Back
Top