-
Welcome back Guest! Did you know you can mentor other members here at H-M? If not, please check out our Relaunch of Hobby Machinist Mentoring Program!
You are using an out of date browser. It may not display this or other websites correctly.
You should upgrade or use an alternative browser.
You should upgrade or use an alternative browser.
New to me Harig Super 618
- Thread starter RebelJD
- Start date
Hi, I know this is an old thread but I just picked up a Harris 618. Doing pretty much what you did. Got a quick question about the motor removal to get the front cover off. What is the simplest way to remove the motor to gain access to the front cover? Thanks in advanceHere is an update on my Harig Super 618 surface grinder. After inspecting and cleaning the saddle and table ways I put them back on the machine and verified there is no significant taper in either direction of travel. I also removed the front and rear covers and verified the column ways are in good too. So, I have refurbished the machine, and it is now back in operation. Here is a list of the major fixes / modifications I have done.
I'm new to surface grinding but I'm pleased with my initial efforts and I'm very happy with the machine, it's a welcomed addition to my shop.
- Replaced the cross-feed lead screw and nut.
- Upgraded the oil system with a new pump and filtering system.
- Installed a VFD for the spindle motor.
- Upgraded the electric system.
- Converted from Rack and Pinion to a cable system.
- Rebuilt the mag chuck.
- Repainted the entire machine.
I've learned a lot about these machines and would be glad to do a build thread if there is any interest, I did a take a lot pictures as I did the work.
Jim
View attachment 467309
Hello, glad to help. The motor is mounted to the spindle housing by five set screws in the front snout of the housing. Once you remove the wheel guard and wheel you can pull the motor assemble out thru the back of the machine. It is pretty heavy so having another person would be helpful, or an engine hoist. I believe the five set screws also allow the adjustment to ensure a perpendicular alignment of the wheel to the table. Good luck on your restoration.
Ok, thank you for your help. I have removed the set screws completely and can’t get her to budge. Didn’t want to go wrapping on anything with a hammer till I talked to you. Is it possible that she is a little stuck? Thanks againHello, glad to help. The motor is mounted to the spindle housing by five set screws in the front snout of the housing. Once you remove the wheel guard and wheel you can pull the motor assemble out thru the back of the machine. It is pretty heavy so having another person would be helpful, or an engine hoist. I believe the five set screws also allow the adjustment to ensure a perpendicular alignment of the wheel to the table. Good luck on your restoration.
Could possibly be corroded if the machine used a lot of water-based coolant. I'd suggest spraying some penetrant, like PB Blaster, in the top holes and let it soak overnight. Spray it couple times about an hour apart. If you do tap on it with a hammer, use a dead blow hammer or a brass hammer. But be careful there are precision spindle bearing in there and those a very costly to replace. Good luck.
- Joined
- Mar 26, 2018
- Messages
- 8,707
You did very well. Nice grinderHere is an update on my Harig Super 618 surface grinder. After inspecting and cleaning the saddle and table ways I put them back on the machine and verified there is no significant taper in either direction of travel. I also removed the front and rear covers and verified the column ways are in good too. So, I have refurbished the machine, and it is now back in operation. Here is a list of the major fixes / modifications I have done.
I'm new to surface grinding but I'm pleased with my initial efforts and I'm very happy with the machine, it's a welcomed addition to my shop.
- Replaced the cross-feed lead screw and nut.
- Upgraded the oil system with a new pump and filtering system.
- Installed a VFD for the spindle motor.
- Upgraded the electric system.
- Converted from Rack and Pinion to a cable system.
- Rebuilt the mag chuck.
- Repainted the entire machine.
I've learned a lot about these machines and would be glad to do a build thread if there is any interest, I did a take a lot pictures as I did the work.
Jim
View attachment 467309
Will do, I will let you know how it goes. Thank youCould possibly be corroded if the machine used a lot of water-based coolant. I'd suggest spraying some penetrant, like PB Blaster, in the top holes and let it soak overnight. Spray it couple times about an hour apart. If you do tap on it with a hammer, use a dead blow hammer or a brass hammer. But be careful there are precision spindle bearing in there and those a very costly to replace. Good luck.
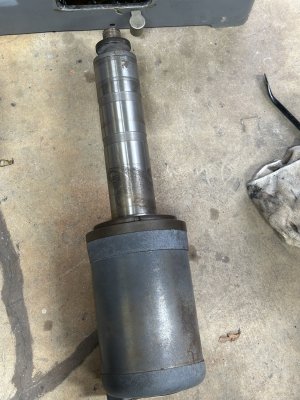
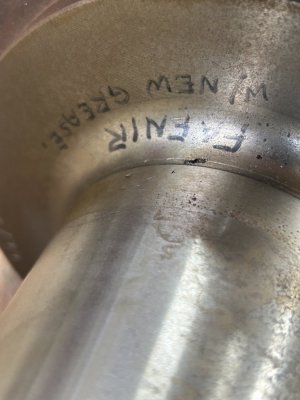
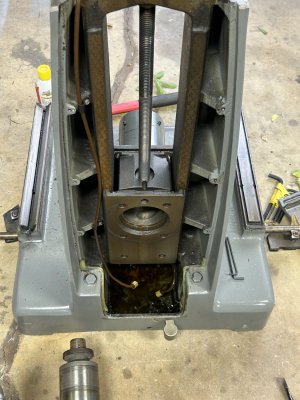
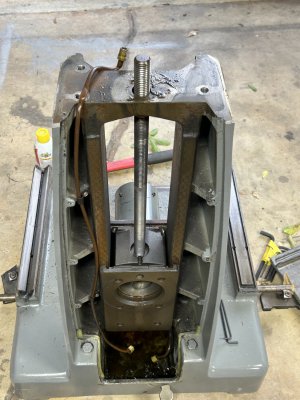
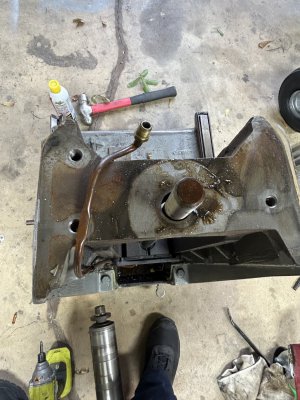
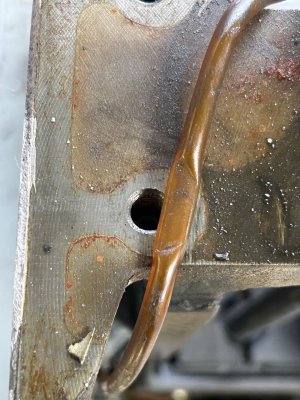
Well, I let her soak In PB blaster a couple days and got a small pry tool behind the motor and she slid right out. I got to the oil feed lines but still could not get the one running to the top to come out so I had to pop the top off which involved cutting through tons of filler that I will have to refill,lol. I did however find my issue with the oil line at the top. It was apparently pinched off when the machine was built. Blows my mind that Harris would have let this machine leave the factory without it oiling properly. Fortunately it doesn’t look as if the ways were hurt at all. The vertical motor support ways that is. Here’s a few pictures for you. Including a couple of the oil line. Thanks again for your helpCould possibly be corroded if the machine used a lot of water-based coolant. I'd suggest spraying some penetrant, like PB Blaster, in the top holes and let it soak overnight. Spray it couple times about an hour apart. If you do tap on it with a hammer, use a dead blow hammer or a brass hammer. But be careful there are precision spindle bearing in there and those a very costly to replace. Good luck.
Attachments
Will do. I spent most of the weekend working on stripping the electrical components out of the cabinet, stripping what was left of the paint from inside and outside the cabinet. Managed to get the cabinet primed and blocked up to 320 grit. Think I will hit it with a DA with 400, scuff the nooks and crannies and spray it. I will take some pictures of the process so far. I am going with a 2 K primer with the topcoat being Rustoleum Gray industrial enamel, sprayed not rattle canned. Should turn out good. Wish there was available stock of the original color used by harig. The Rustoleum is a pretty close match though.Your machine looks to be in pretty good shape. That crimped oil line is surprising. Good luck with the rest of your restorations and keep us posted.
Similar threads
- Replies
- 7
- Views
- 312
- Replies
- 1
- Views
- 237
- Replies
- 20
- Views
- 922

