Need help with measuring internal diameter

Anything I take to the garage gets LOST again ! :grin: ;)

My workspace is small so I'm pretty good with knowing where everything is. But I "lost" a 5/8 endmill that I never even got to use yet for over 2 yrs. I finally found the damn thing in my other good box of acid brushes, how it got in there I still have no clue. I quoted lost cause I didn't lose it, it was the damn gremlins! :big grin:
 
Oh that's a good idea. I never thought to use a Panavise but I got my Panavise after the HF stand. I love my Panavise but sadly it doesn't get used much anymore after I stopped messing with electronics.

I also have a Craftsman Panavise knock off with the suction base. Been sitting in the same spot on my desk for years. Lol. Maybe I should take em both to the garage so they get used again.

Yup, a Panavise will work fine. I used one before I got a Mitutoyo mic stand. I didn't think parallax could affect how you read a mic but it can when boring at the tenths level; the stand/Panavise helps with that part.

The other thing a stand does is help to tell you if your technique when using a telescoping or small hole gauge is correct. If you have a ring gauge then you know what the telescoping gauge should read. If you put the telescoping gauge in the mic properly, with the contact points in the center of the mic's anvils and the handle of the gauge is perpendicular to the mic spindle axis, then you know what that gauge should read when the mic juuust touches the gauge. If it does not read what the ring gauge says it should then the problem is with the way you are using the telescoping gauge and you need to brush up on your technique.

A ring gauge and mic stand is to a telescoping gauge what a cylinder square is to a precision machinist's square. When it takes you two hours just to get to the boring stage of a project, you best have your technique down pat or you'll be boring that project all over again. Ask me how I know.
 
My space is actually pretty large being a garage and 2 basements , but my " work " space is still non-existent . Way way way too many projects going on ! :big grin: I'm getting caught up slowly but it sure seems that every time I get an empty space , it's occupied with a new project within 72 hrs . :bang head:
 
I believe I read the following in one of the Gunsmith Kinks books from Brownells:
Take a junk bowling ball and cut a flat on it. The flat does not need to be perfect. Mount a small vise of your choice on the flat. Get a short piece of large diameter pipe, and set the bowling ball on it. The ball can now be rotated any way you please, to access the part in the vise.
 
That was and still is a very common method for hand engravers as well, the ball in question often being the size of a lawn bowling ball and of lignum vitae. Instead of a piece of pipe, a small pillow or doughnut of leather accomplished the same function as a cradle for the ball.

In practise, the piece to be engraved was adhered directly to the flat on the ball using pitch, wax, rosin, etc and then popped off when done. The lawn bowling ball was just the right size to nest comfortably in the holding hand, but not so large as to not be able to grip.

-frank
 
And another thing. When you rock the telescoping gauge you start at a small angle and rock it to vertical as you pull the gauge out of the hole. It is one fluid motion. The thumb helps to keep you from going past vertical. If you don't get the gauge to vertical you will get a larger reading. If you rock the gauge too far past vertical you will get a smaller reading.
Sorry I have to disagree Mickri. You can measure a bore at any point and the aim is to move the telescoping gauge from a position off perpendicular to the bore wall to perpendicular and then to an angle. As soon as the gauge is nor perpendicular to the wall again it is free and this allows its removal for measuring. Tension on the screwed in handle holds the setting though it pays to lock solid before measuring. Trying to remove the gauge by sliding it out of the bore without altering its setting is impossible.
 
I think that you misunderstood what I posted above. I start with the gauge at an angle which you describe as "not perpendicular to the bore." Look at the picture I posted above. Then I rock the gauge to vertical which you describe as "perpendicular to the bore". For me once the gauge is vertical (it could be just past vertical) the gauge slips out of the bore. It is one fluid motion from start to finish. So what are you disagreeing with? My terminology? Or????

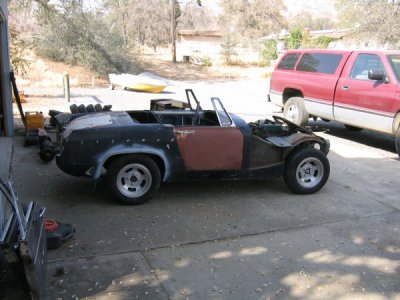
One of my projects is swapping a Toyota 3 TC engine and 5 speed into my 66 MG Midget. This requires that the drive shaft from the Toyota (2 7/16" ID) be mated up to the drive shaft (1 3/4" OD) on the Midget. Spend part of the afternoon turning a bushing that slips inside the Toyota drive shaft and over the outside of the Midget drive shaft. I wanted a very tight fit. Lots of micrometer readings. My new micrometer stand with the magnetic base got a real workout and preformed better than my expectations.
 
Well clearly I have misunderstood what you wrote and it seems not the only one. I read that "start at a small angle and rock it to vertical as you pull the gauge out of the hole" as meaning start with the gauge extended a bit, rock it to vertical,(square to the bore),and pull it out. :oops: No offence meant! You did state that if you rock it too far you will get an undersize reading though and that is impossible as once rocked 'over center' the gauge then becomes free.
You are mad driving a midget! Speedway is for motorcycles, I've seen those midgets and they are dangerous.
 
Wow. A lot of great responses. Seems like we all are learning.
 
I don't think that my 1966 MG Midget will ever see a race track of any kind let alone a speedway race track.

IMG_3506.JPG

Even with the Toyota engine it will only have around 85hp. I have been slowly resurrecting it since I drug it out of field 2 years ago.

20170330_184248.jpg
 
Back
Top