Need help with measuring internal diameter

The way I described using my gauges is the way that I have done it since the 1960s, same Starrett set, and they still work fine. I also have a B&S set that uses one handle for all the gauge sizes, it is longer than the Starrett models, and they also offered an accessory handle about twice the length, very handy for deep holes. The tightening knob on the Starrett model is so small that it would be difficult to over tighten them.
 
Okay, I'm getting a lot better results now. The video helped a lot. I thought the gage was placed in the bore and was slightly tightened, removed, tightened fully, and then measured with a mic. Now, I'm tightening the gage more and rocking it in the bore and I'm getting under a 0.001" variance now! More than enough for me.

I'm using it on a smooth bore. It's not threaded. I'm boring so I can put threads in it for practice.

I'll try the thumb technique, too! Sounds like a mic stand is in my future. Any plans for one? I'd like to practice making one.

I am using Machinery Handbook to set the minor diameter.

My gages are new from Mitutoyo. I assume a very good brand?
 
I measure the hole by rocking the gauge like the others have said but use the mike a little differently. My left hand is partially disabled so it's difficult for me to hold the gauge and the mike. I have a small toolmakers vice that I use as a mike stand. To measure the telescoping gauge, I preset the mike a bit oversize and rock the gauge thru just like I did with the hole. I then tighten the mike a little and rock the gauge thru again. I do this untill the gauge drags slightly on the mike anvil. I can get within a few tenths that way. It's slow but it's the only way I can be accurate given my situation. Obviously I just do this near the finish line and use dial calipers until I get close.
 
Last edited:
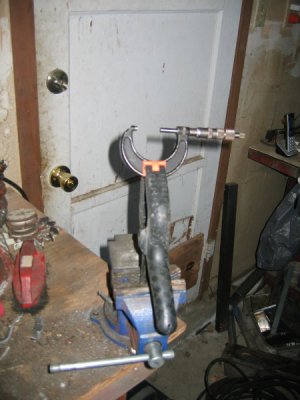
I was going to make a micrometer stand and looked for DIY plans. The simplest that I found used a plastic clamp. Never got around to making a stand. Too easy to put the clamp in the small vise on the work bench next to the lathe.

IMG_3754.JPG
 
The only real advantage of a mic stand is that it tilts, allowing you to read the barrel of the mic without having to bend over or twist you neck. A Panavise with a swivel base works just as well.
 
HF used to sell a micromter stand. Not sure what they are a copy of but it looks similar to the Mitutoyo one. Surprisingly it works pretty well, stable, holds a micrometer securely, & it's padded so it won't leave a mark on a micrometer.

I rarely use it though, I only use it when I need to measure multiple parts at a time. But it's good to have around for what they were selling them for. Best $7 or $8 I have ever spent there.
 
Just a side note...
. If you rock the gauge too far past vertical you will get a smaller reading.
Not so.

First off, it will not get smaller than the hole is, never.

Second, the tightness of the gage is such that the telescoping action can operate, but not slip once it has been compressed.

Third, if it's too tight you run the chance of breaking the handle when trying to slide the gage through the bore. pivoting on one end.

Lastly, never, never rock the gage through the bore more than once.
 
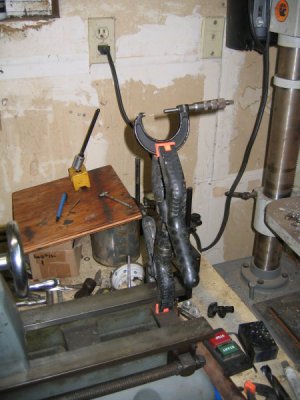
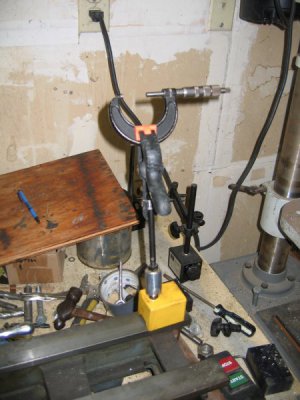
I have been playing around with different stand ideas this evening and came up with these two using stuff I had on hand.

IMG_3755.JPG

IMG_3756.JPG

My lathe has a long bed. 36" between centers with room to spare. The end of the bed is always clear. The way protector that I use when changing chucks pretty much lives back there. The first stand is two clamps with a hose clamp holding them together. The second stand is a magnetic base that I rarely use because it doesn't have an on/off switch and collects chips like crazy. And it doesn't have a way to lock the arm in place. Impossible to get accurate readings on the DI with the arm able to move. It has a small plastic clamp held to the base with a hose clamp. This is going to be my go to stand in the future. It will probably live on the end of the ways.

Tom, you have forgotten more about machining then I will ever know. And my measuring skills are not the best. So you are probably right that going past vertical doesn't give a smaller measurement. Still I had to go out into the shop and give it a go. I found that if I only went a little past vertical my measurement did not change. But if I rocked the gauge past where the edges touched the bore my measurement was anywhere from .0005 to .002 smaller. Chock that up to really poor technique on my part. Before I started using my thumb as a guide I routinely rocked the gauge way past vertical. Been a learning experience for me. Thanks for sharing your knowledge.
 
A Panavise with a swivel base works just as well.

Oh that's a good idea. I never thought to use a Panavise but I got my Panavise after the HF stand. I love my Panavise but sadly it doesn't get used much anymore after I stopped messing with electronics.

I also have a Craftsman Panavise knock off with the suction base. Been sitting in the same spot on my desk for years. Lol. Maybe I should take em both to the garage so they get used again.
 
Back
Top