Need help with measuring internal diameter

devils4ever

H-M Supporter - Gold Member
H-M Supporter Gold Member
Joined
May 13, 2019
Messages
1,016
Newbie here practicing making internal and external threads. For the internal thread, I've been making nuts for the external threads. I've been getting inconsistent results trying to measure the internal diameter of the nut. I started using my digital calipers, but was getting readings all over the place.

So, I bought a set of Mitutoyo Telescoping Gages hoping to get reliable consistent results. Well, I'm not. The bore is about 0.600" and I'm getting readings from 0.595" to 0.605". So, I'm looking for advice on how to use these accurately.

Thanks.
 
There is a trick to it. You have to ''rotate'' the gauge through the bore. Hard to explain, but easy to do. Does require some practice to get consistent results.

 
With practice, you'll do better than 10 thou accuracy with telescoping gauges. Still, its one of the most troublesome things to get accurate readings on bores. I won't use them when extreme accuracy is needed.

I've bought inside micrometers, they work quite a bit better. A bit expensive for a set to go down to 0.500".

I sprung for bore gauges, got them at auction. they are extremely accurate but you'd need DEEP pockets to buy them new.

Another thing to consider is pin gauges, great for small bores. If you only have one small job, you can make your own pin gauge, then fit your bore to the gauge.
 
I've been using telescoping gages for decades and they are just like using a micrometer or anything else. It's all about feel and technique which only comes with practice. The major problem with them is it is a dual stage process because you have to have good feel to get the gage right, then good feel with the mic. I have thought a mic stand would help measuring the gage as that can be cumbersome to hold both leading to inaccuracies. But I'm so used to the whole thing I get well within .001 with my cheapo dial calipers and my gages. I was also shown the basics over 40yrs ago by an old oil field wildcatter. He basically showed me how he did it and what I was looking for in less than 5min. The rest was practice on that VW cylinder until I got the same reading several times on top and bottom to check for taper. Been good to go ever since.
 
Last edited:
You insert the telescoping gauge in the bore, with the spring released at an angle of perhaps 10 degrees off being straight across the bore, lock the lock and push on the handle to rock it over center in the bore, remove it and check for size with the mike, carefully feeling for the maximum size of the gauge; with practice, you should be able to measure a size within a few tenths of a thou easily.
 
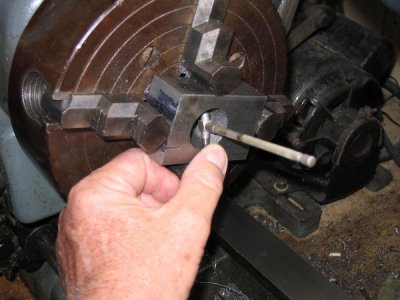
Newbie to newbie here. I had this same problem. I got all kinds of advice from the pros on here and I watched more videos than I can count. Then I started noticing in some of the videos that the person had their thumb at the bottom of the hole keeping the bottom of the telescoping gauge in one place. This was never mentioned anywhere.

IMG_3753.JPG

As soon as I started doing this my readings got more and more consistent. Using a micrometer stand helps too. I don't have one so I used a small vice to gently hold the micrometer. Another thing that I discovered was that outer edge of the hole tended to have small burs. Removing the burs also helped with getting consistent measurements. And practice and more practice.
 
And another thing. When you rock the telescoping gauge you start at a small angle and rock it to vertical as you pull the gauge out of the hole. It is one fluid motion. The thumb helps to keep you from going past vertical. If you don't get the gauge to vertical you will get a larger reading. If you rock the gauge too far past vertical you will get a smaller reading.
 
Newbie here practicing making internal and external threads. For the internal thread, I've been making nuts for the external threads. I've been getting inconsistent results trying to measure the internal diameter of the nut. I started using my digital calipers, but was getting readings all over the place.

So, I bought a set of Mitutoyo Telescoping Gages hoping to get reliable consistent results. Well, I'm not. The bore is about 0.600" and I'm getting readings from 0.595" to 0.605". So, I'm looking for advice on how to use these accurately.

Thanks.

Just to be clear, you do know that using a telescoping gauge to measure the ID of a nut with existing threads with a telescoping or ball gauges is not going be consistently possible, right? Not trying to be facetious; just making sure you understand this. These gauges require a clean consistent surface in order to work properly.

I wanted to add to what the other guys have said:
  • Telescoping gauges can potentially measure precisely. How precisely depends on what you use to read them with. For bore work a micrometer is suggested, not calipers.
  • Aside from technique, one of the main causes of inconsistent readings is human error. Trying to hold the telescoping gauge in one hand, the mic in the other and then trying to turn the barrel of the mic while holding both ends of the gauge in the dead center of the anvils and parallel to the axis of the mic is extremely difficult. A mic stand or small padded vise eliminates all of this. If you get serious about boring holes I suggest you buy a mic stand or set up a small vise to help you.
  • In order to read accurately, the convex ends of the gauge need to touch the mic contact surfaces pretty much in the dead center of those contact surfaces. If the gauge is off kilter then you will not get an accurate reading. The simplest way to assure accuracy is to get the handle of the hole gauge perpendicular to the axis of the mic spindle and then make sure the contact surfaces of the gauge are in the center of the mic contact surfaces. Again, a mic stand makes this easy.
  • When you assess the accuracy of your technique or your gauges, you need a known standard. I suggest you buy a ring gauge that is hardened, ground and calibrated to read in tenths. They are available on ebay and the precise size is not important, although you should have one to fit your telescoping gauges and one to fit your smaller small hole gauges. If you can consistently read those ring gauges with your tools then you know that your technique and the way you are reading them is proven and you can rely on them on your project.
  • When you measure a bore it must be clean - no debris or chips and no oil. Clean the bore and clean your tools before sticking them in the hole.
With all of that said, most hobby shop projects do not need tenths accuracy; that includes nuts unless you are going for a class 3 fit. I would guess the vast majority of boring needs would be met with a inside micrometer accurate to 0.001". For practical use, this is just fine; they are very accurate and easy to use with the part in the lathe. Mitutoyo, Starrett and any of the Swiss makers would work well.
 
Last edited:
Are you trying to measure a nut's minor diameter, or are you trying to measure the hole before the threads are cut? I recommend doing neither. Try to look up a minor diameter in a handbook (like Machinerys Handbook). Or, easier, get a tap drill size and just drill to that size. A drill should be close enough. If you are boring, you are measuring a straight bore, not threads. Use a plug gauge, homemade if necessary, to test the fit. Use thread wires to test the gauge.
 
Good posts above.

A couple more things. Using a telescoping bore gage is much more repeatably accurate when we can hold the gauge as square as possible to the bore axis, and rocking it through the diameter as square as possible and as centered as we can eyeball it. Side loading create errors. Using a bore gage while leaning way over, down, and sideways while reaching to make the pull is just asking for inaccuracy. Try to get in a comfortable position when you can clearly see straight down the bore how you are doing.

The other thing is not overtightening the telescopic gage. Doing so allows excessive forces to cause offset inaccuracies. Tighten it just enough to mic it reliably afterwards and without being able to squish the measurement with the mic. Over tightening also damages the gage, see the next paragraph.

Another thing is the telescoping gage itself. If it is an old cheap one, with rust on the parts, inside or outside. you are much more likely to have errors. If you gronk down on the screw and pull hard to get the gage through the bore, you are very likely galling the gage, which will make it less accurate for any user from then on. Beware of used telescoping gages, and ones with visible rust. I am not a tool snob, but my quite old Starrett telescoping gages still work like new and slide smoothly and evenly through the bore. I would never trade them for anything else, the newer ones are not as good as an older set used by a real pro regularly and cared for properly. Good work can be done with less good gages, but is not as repeatable and is more frustrating.

After using good gages carefully for some time to get used to them, it is quite possible to get consistent readings repeatable to a couple tenths on work that is easily accessible.

Practice makes perfect. I do not use telescopic gages regularly, so I practice for a bit to ensure repeatable results before measuring the money part.

Anybody can do it if they work at it and pay attention.
 
Back
Top