Mig Gone Haywire

Thanks, Darrell. I got the TIG to weld aluminum as that is what I work with mostly. Everyone said don't try aluminum until you are proficient with steel, because aluminum multiplies all the difficulties. A well-done TIG weld is a thing of beauty.

I usually want to weld both sides. I have an inch on the bottom of the inside corners (where the extension force will be) so I plan to put a long tack there. I don't have to run the angles that support the bottom all the way to the corners.

I think I found the problem, thanks to all you guys. You are the best. A picture is worth a thousand words, so here. I suppose I would have eventually found this, but it hadn't occurred to me yet until I posted here. Once you are looking for it, it is pretty glaring.
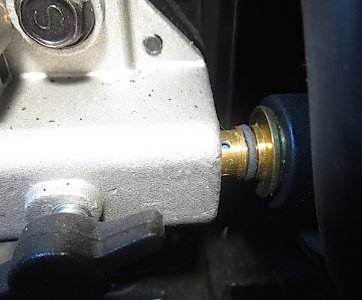
MIG malfunction_0460.JPG
 
This may not be an issue now that I've found the leak, but I've noticed that MIG welds tend to crater at the end of the bead. Is there a way to prevent this? Maybe back up just a little at the end?
 
Franko,
Glad it was a simple fix! As far as cratering, pause or back up slightly will help. Investigate some weave techniques also.Same with starting a weld, it helps to back up slightly after initiating the arc. It helps to burn in the weld puddle as the weld starts out cold, so to speak.

Darrell
 
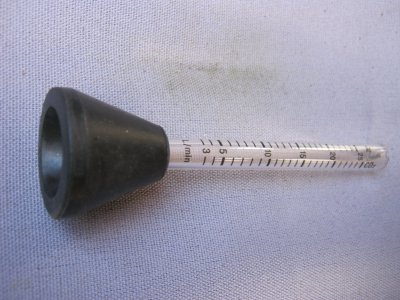
Just in case nobody else saw it...that's CFH .. not CFM. ...... CFM would drain a tank in short order. Recommended flow is around .3 to .6 CFM..which translates to 12 CFH to 36 CFH. The glass tube flow meter I have just has numbers on it with no designation, but I'm reasonably sure that "4" on it means .4 CFM
 
Franko,
Yep, if the ball is rising gas is flowing, may need to pull the Mig gun and reseat it. if that does'nt work then a hose has come undone inside. Careful taking the cover off there are capacitors inside the cabinet.

My brother in law has about the same size lathe, moved it about 20 foot a couple of weeks ago and tipped it over. His shop is on shiloh road just south of LBJ. I was not there when it happened, He has a couple of employees that made a mistake and over it went.

On your diagram, cut the angle iron 3/8ths shorter on each end and weld on the outside. No need for beveling those joints. The weak link is the pin on the left. Instead of a single pin in the middle of the frame, how about a pin on each end with a short lenght of angle on both ends and a leveling bolt for each?
I will be out of town the next two weekends, Arkansas Memorial weekend and near Tyler the next.

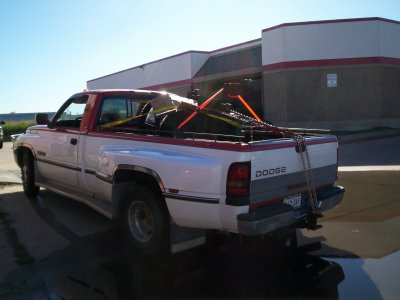
The picture is a 4000 lb ring roller head in the back of my truck, moved it with pipe and a crowbar, just take your time.

036.JPG
 
This may not be an issue now that I've found the leak, but I've noticed that MIG welds tend to crater at the end of the bead. Is there a way to prevent this? Maybe back up just a little at the end?
Stop welding before you reach the end of your weld. Start at the other end of the weldment and weld towards where you ended the previous weld and overlap the two welds.
Those welding leads work loose sometimes glad you found it.

Welding parameters for mig wire.

.030 mig wire limit is 14 gauge. General WPS, welding procedure specifications limit .030 wire to 14 ga steel. From my old miller welding calculator.

.035 wire 1/4 inch. wps limits .035 70s6 wire to single pass on a36 steel at 20 volts and 200 amps. General welding codes do allow 2 passes with 70s6 wire, but, the maganese in s6 wire reacts with carbon from both the a36 steel and the previous weld bead and can lead to centerline and under bead cracks.....caution is advised.
From lincoln electric literature.


chuck
 
On your diagram, cut the angle iron 3/8ths shorter on each end and weld on the outside. No need for beveling those joints. The weak link is the pin on the left. Instead of a single pin in the middle of the frame, how about a pin on each end with a short lenght of angle on both ends and a leveling bolt for each?
I will be out of town the next two weekends, Arkansas Memorial weekend and near Tyler the next.

3/8"? Did you mean to say 3/8ths? That would be a heck of a gap to fill between two 1/4" pieces.

The bolt is a pivot point so I can level the stationary wheels using a couple of bolts shown on the drawing. My shop floor has a 1" in 12' slope. Bolting both ends would defeat that purpose. The single pin is a 1/2" bolt that will be welded to the angle. I may have room to weld the bolt to a rectangle of 3/8" bar and put it inside the lip of the cabinet at the bottom and out through a hole through the cabinet and the angle.

I considered putting a couple more bolts on the ends and slots on the bar that holds the wheels to cinch it, but I fear that would take too much meat out of the 3/8" x 2" bar. The pivot bolt will always be cinched up tight and I believe the 1/2" bolt will withstand the shearing load. I expect the maximum load of cabinet, lathe and tools to not exceed 1200 pounds. 500 for the lathe, 200 for the tool chest and a generous 500 pounds for tooling and accessories in the cabinet drawers.

I've had my lathe and mill on wheels for 9 years. I'm pretty careful when I move them. Tumping one over would be a very bad thing, but I have to be able to move them.
 
Ok, while I have you guys attention, I have another question. I got one of those el cheapo HF welding tables. It's better than nothing and will have to do until I can make something more substantial.

The problem with it is that it is plated with something gold colored and is very reflective. I like to weld with good light, but my shop lights reflect off the table and activate my auto-darkening welding hood. I don't see any way to reduce the sensitivity of the hood lens. Is there a way to darken and dull the finish on the table short of grinding it and leaving it in the rain?

I have a less sensitive older auto darkening helmet that works find with my MIG, but doesn't darken when I use the TIG.
Franko,
It may be possible to remove the coating by soaking it in a muratic acid solution.. I know muratic will remove chrome if the part is left to soak in it. Years ago I worked on concrete pumps and we had some spendy parts soaking in muratic acid to remove some concrete that had gotten by some seals. It cleaned the parts alright, right on down to bare metal after it disolved the chrome. Oops.
I have a love hate relationship with auto darkening helmets and I have some expensive ones. Are you sure you are not getting reflection from your ceiling lights directly on one of the sensors? Do your helmets have sensitivity adjustments?

Darrell
 
Last edited:
Back
Top