[How do I?] Make a box square and set of small dovetail gages (straightedges)

Stefan did a far better job of describing the basics than I can, but I thought I'd describe how I think of the process.

Basically, any surface has a number of hills and valleys. That's easy enough to visualize. In reality, though, some of the hills are effectively big mountains and some are hardly more than molehills. What makes things confusing though, is that you have multiple hills on top of one big mountain and multiple molehills on each individual hill.

When you mark up a part on the surface plate, only the highest points pick up bluing, of course. For the first few passes, these are the molehills on top of the largest hills on top of the largest mountains.

The scraping process is to first knock down all the mountains until they are just reasonably sized hills. Then knock down the larger hills until they are all roughly the same height. Then knock those down until all you're left with are molehills all on the same plane. At that point, the bases of the molehills are now resting on what was initially the lowest valley -- everything else has been knocked down to that level.

EVERYONE (myself included -- see above) makes the mistake of starting to finish scrape too soon, attacking individual blue marks instead of just mowing down fairly large swaths.

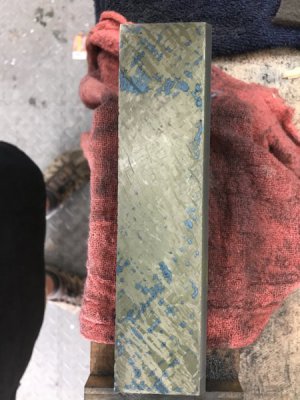
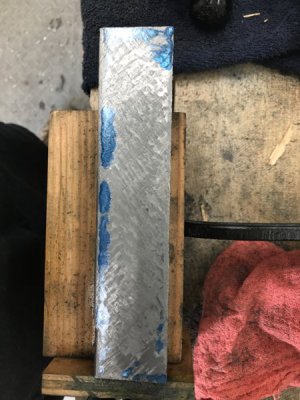
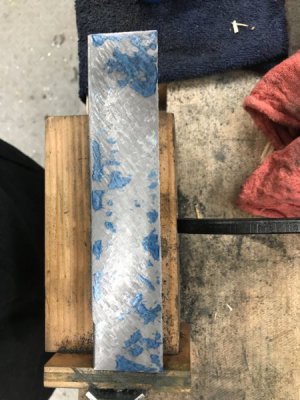
Here's an early spotting of the 8" part:
IMG_0370.JPG

Think of the blue spots here as just the peaks of the Himalayas. The rest is a cloud covered valley. There are probably hills in that valley but it's too early to tell.

So attack the upper right corner, left middle, and lower right corners with gusto. Don't worry too much about "staying in the lines" and only removing blue. Also, don't worry too much about individual separated strokes -- just "paint scraping" as Richard calls it is fine.
IMG_0371.JPG

Now we've revealed a little more of the topography. The valley is crescent shaped. Let's knock down these smaller mountains. Now we add the right middle to our points of attack, but continue paint scraping.
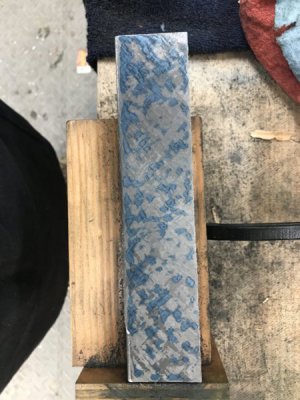
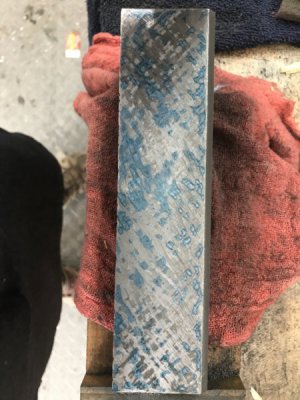
IMG_0372.JPG

This photo was taken about 45 minutes after the first one in this series of three (probably around ten passes altogether). Now none of the valleys are larger than a dime, so I need to start taking a bit more care with shorter strokes and no more paint scraping.

I actually started gradually increasing the amount of care I was taking even prior to this photo.

The first pass or two was true paint scraping with no concern regarding individual scrape marks, direction, or length.

Quickly, though, I switched to "crosses" before each blueing -- removing "mountains" by making short rows of individually separated scrape marks on one 45 degree angle, followed by a row in the other direction to make X shaped marks. It's VERY important to start making individual marks and changing direction regularly or you will start making ruts and getting washboard chatter.

About two or three passes before the last photo, I began scraping in only one direction (half the X) before each blueing. I still took care to alternate the direction each pass, though.

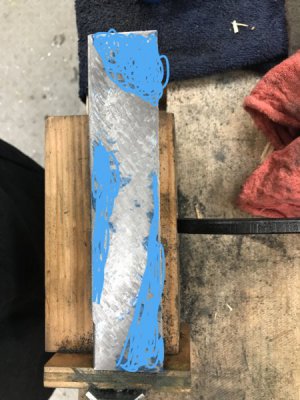
I'm mostly targeting the peaks of the mountains each pass, but I'm NOT overly focused on the individual blue marks at this stage. In fact I'd probably do an even better job if I took off my glasses and let the blue marks blur into fairly large blobs!

This is how you want to "see" that second photo above:
IMG_0371.JPG

That's how I think of the process anyway.

I hope this is of some use to someone! (Laugh)

Regards,
--
Rex
 
Last edited:
great stuff Rex!
it may aid you to stress relieve the part from time to time.
i look forward to seeing the progression :grin:
 
it may aid you to stress relieve the part from time to time.

Thanks!

I periodically beat on the unscraped parts with a hammer but suspect that's more stress relief for the scraper than the scrapee. ;-)

Regardless, I haven't seen any significant movement at all since I started, nor do I expect to, but again these are only a few inches long.

I'm no metallurgist, but everything I've read leads me to believe that only fairly high temperature cycling accomplishes much with respect to stress relief.

Sadly, I don't own a high temp oven, and my wife hasn't yet discovered what I paid for the used Biax. She'd murder me in my sleep if she discovers yet another piece of equipment in the shop! (Laugh)

I'll risk a periodic re-scrape if required, but I honestly doubt it will be necessary even with the 12" part.

Regards,
--
Rex
 
the simple act of smacking the object with a hammer will reduce the stresses after scraping or if you have a hard time making something flat.
Richard King showed us the very simple method of hanging the part and smacking the object firmly all across the object.
in the instance i was shown, the object was 4' Camelback, that a student was having fluctuating blue ups.

i totally agree, short pieces will not need as much consideration. :)
 
Where angels fear to tread.

I almost certainly shouldn't post this. While I tried throughout to sidestep the whole stress relief discussion by joking and emphasizing how small the parts were, the subject keeps coming up. Apologies in advance for "thinking out loud" in such a long and contentious post. :)

Richard explained the hammering process in my class, too.

Richard King is far, far, FAR more knowledgeable on the subject than me. I can state categorically, based on first-hand experience, that he's smart, experienced and commendably willing to share his knowledge. I learned an incredible amount in his class, and I'd recommend it to anyone with an interest in the subject.

I'm neither a metallurgist, a mechanical engineer, nor even a terribly experienced machinist, much less a professional with years of experience. I am just a random opinionated hobbyist on the internet — I sincerely recommend reading ANYTHING I write with a healthy dose of skepticism. Seriously, don't just believe me: Do your own research.

Still, for my sins, I am an (overly verbose) engineer. I earned a BSEE from Virginia Tech in 1985 (it's even less impressive if you'd seen my grades). After several subsequent years in the school of hard knocks, I also acquired an extra degree of inquisitiveness and skepticism about things. Lastly, I'm also a student of human nature. I know full well how even the smartest among us can make mistakes with respect to cause and effect (causation vs. correlation and/or lies, damn lies, and statistics).

Here's what I believe (AKA "what I think I know"):

My understanding is that stress in a cast iron part is caused by uneven cooling during manufacturing. Metal expands when heated and shrinks when it cools and hardens. If the cooling doesn't happen evenly, it can leave residual stresses in the part. Even with nice even outside-in cooling, the center of thick parts cools slower than the outside. Many of us have experienced significant warpage after milling off the "skin" on just one side of a cast part. This is simply because the stresses that were previously in balance are now way out of whack, and the un-milled side "pulls" to create a bend. After a few hours, though, the part should again be fairly stable in shape.

Anyone that's ever welded anything at all has also experienced heat induced warpage.

The thinner and longer the part, the more warpage you're going to see from any sort of force, including residual internal stresses from manufacturing or thermally induced expansion in all or part of the part. Thickness is FAR more important than the width of the part because the second moment of inertia is proportional to the cube of the thickness and only linearly proportional to width.

You can play with various beam sizes using an online calculator like this one if you want to prove this to yourself. For example a 12" x 1" x 1" steel beam will deflect about 0.0046" with 20 lb of force, and only half that with a 2" wide beam. If I double the thickness instead of the width, though, the deflection is only about five or six tenths. The math, if you're curious, is on wikipedia.

If you're scraping a reference surface, the thicker the part the better. A thick part is far less susceptible to movement from either internal or external forces.

Parts will move some amount when any internal stresses are removed, even on fairly thick parts. One thing you can absolutely take to the bank, though, is entropy. Once a part warps due to internal stresses being relieved, it won't move back unless some other force is added or removed. If the entire part is kept at the same temperature and no other forces are introduced, a new equilibrium point should be found fairly quickly. Milling off an eighth inch of "skin" off one side of a piece of durabar will cause it to warp measurably, but the movement should stop entirely within a few hours. It's possible that banging on it might accelerate the time it takes to reach a new equilibrium point, but personally I'm skeptical.

I'm aware of two primary techniques for stress relieving metal parts: vibratory (shaking parts and beating on them with a hammer) and thermal (VSR and TSR). There is also the "curing" process that many old timers still recommend of allowing parts to rust and "cure" through several night/day and seasonal thermal cycles — but I'd call this a form of TSR that's discussed explicitly in the US Navy document.

I strongly encourage everyone to read both of those links and draw their own conclusions.

Wikipedia isn't a definitive source, of course, but the Wikipedia article does link to other sources that are expressly pro-VSR. Still, this is unusually strong for Wikipedia: "VSR is not accepted by the Engineering community at large as a viable method of relaxing or reducing residual stresses in components that require it. For general use, conventional residual stress relaxation methodologies are recommended."

Personally, I'm siding with the Navy circa 1948 — they had just spent a few years depending on an awful lot of cast iron and cared deeply about such topics.

I'm personally of the belief that scraping off a few tenths of material has far, far less of an effect than milling off a large amount of "skin" (the part that cooled first). Before scraping anything, I'd recommend milling off a significant amount of material form all exposed surfaces (simply squaring the part in the mill and letting it rest at least overnight before scraping should suffice!). I believe this will have more of an effect on stability than almost anything else you can do.

I've never even tried to scrape in anything like a 4' camel-back straightedge, though. I don't doubt at all that it moved during the scraping process — that's a long enough part that even a tiny bit of stress could cause several tenths or even thousandths of movement along the 4' length. The camel-back shape is definitively to add additional thickness in an attempt to prevent as much movement as possible, but it can't eliminate it altogether. Further, it isn't realistic or easy to remove the "skin" evenly around such an odd-shaped part like a camel-back (as opposed to my small simple parts) — I suspect the residual stresses are quite complex as you remove material from the reference surfaces.

My (admittedly uninformed and armchair-quarterbacked) suspicion is that after milling and scraping a few passes of the bottom of the camel-back it moved due to stresses being relieved (causing much pain and frustration during the bluing cycles). After taking the time to beat on it for a while the movement appeared to stop. The question I can't help wonder about is if the movement wouldn't have stopped after an equivalent waiting period without the hammering.

I've also got to believe that even manipulating such a large part can't be easy. It's hard enough to get a consistent blue-up with a small part. I've had confusing readings on my little 4.5" x 2" surface due to convexity and tipping, specs of dirt on the plate, etc. That enormous straightedge would be even harder to interpret with even the slightest hump or dirt in the middle, and my hands would definitely be pretty warm handling that much weight! Many, many factors would make the bluing cycle tricky to interpret. It would be easy to blame it all on internal stresses, but I can't help but suspect that there might also be other factors in play.

I'd expect it to take weeks if not months to scrape in such a large straightedge.

Again, this is just my (current) opinion and I'm definitely not an expert. At all. Hopefully I've not ruffled anyone's feathers. VSR and weathering a part in the back yard for a year before scraping can't hurt. If it gives you the results you're after, go for it!

Peace!
--
Rex
 
Rex,

Very nice write up here. Your reasoning is not off base at all, pretty much dead on.

I've personally have not dealt with any cast iron warping (except for brake rotors) from machining as long as the material was flipped a couple of times to even out any stresses, if any. I've had more steel move on me from machining that from cast iron. There's no doubt that in the cast iron casting process that you get stress raisers from different section thicknesses in the cooling process. I've seen cast iron castings with splits, breaks, cracks from improper cooling.

I have mixed feelings about VSR myself. The best TSR or "seasoning" you can give iron is putting it out doors getting direct sunlight for a couple of years.

My 42" straight edge is made from a piece of G-2 Dura Bar that I left out in the sunlight for nearly 14 years before I started machining on it. I had another shop do the machining with special instructions on how the rough it out the come back, shim the straight edge, then finish machine it. Amazingly, it was within about .003" straight on all four sides. The only thing they didn't do was keep the two major surfaces parallel in both directions. Length wise was okay, but side to side, it's out about .007". I can live it for now. During the scraping process, I did not encounter any movement in the material. I need to go back and finish scraping it someday. I have it at about 20 ppi, which is good for what I do, would like to get down to at lease 30 ppi. So far, the straight edge is stable. I'm not too crazy at beating on your straight edge with a rubber mallet. You can induce stress into the SE just by hitting on it, too!
 
I was under the weather for a few days but I'm finally feeling better and had some time in the shop. I spent an hour or so yesterday and half the day today working on the 8" straightedge.

Not sure if I mentioned it before, but I think its good to make about a half dozen passes (crosses) over the entire surface before your first blue up. The goal is to get rid of all the milling marks and create an initial "checkerboard" of high-spots for blueing. I've been using the power scraper for this step, but after chewing up the sharp edge several times, I think I'll hand scrape even this step for the 12" one (I suspect that will be my most used length).

Here's a shot of the wide side, about six roughing passes after removing the milling marks (it was initially just bearing on the very ends, but the blue is gradually creeping toward the hole in the middle):

IMG_0386.JPG

At this point I'm still trying to remove a lot of metal with long heavy (and touching) scrapes. Here it is immediately after scraping that last blueing:

IMG_0387.JPG

When you get to the finishing stage, you want nice short clearly distinguishable scrapes all separated from each other. But at this point I'm still roughing, so long deep scrapes.

As you can see from the very next blueing, that did the trick:

IMG_0388.JPG

From this point onward I start taking a bit more care, making shorter individual scrapes and aiming more for the actual blue. Identical to what I've already described.

At some point, scraping will drive you crazy and you'll start chasing your tail. The blueings stop making sense and you'll swear that it's just random. The best advice I can give for when this happens is to clean up (especially the surface plate) and take a break for an hour or two, if not call it a day. Almost invariably, things are rational again within just one or two blueings after you pick it back up.

The most common reason for inconsistent readings is tipping over a high-spot — this is why hingeing is so important. If you've got a hump somewhere, the readings away from that spot (on the outer edges, for example, if the high spot is in the middle) are likely bogus, the part is imperceptibly tipping around the high spot. If it isn't hingeing properly, get rid of the hight spot before doing anything else. otherwise the readings won't make any sense. I'm constantly amazed at how an utterly confusing blue-up becomes clear and rational the very next blueing after removing a high-spot revealed by hingeing.

The second most common reason is a burr or a piece of dirt on the plate. It's an incredibly messy task to scrape cast iron, but cleaning periodically (and washing your hands!) will definitely pay off. You'll note the pros are constantly wiping parts and the plate with their hands before reading with a surface gage or any precision work on the plate. Your hands will feel even the tiniest bit of lint or grit. It's a good habit to get into. It's perfectly reasonable to wipe your hand across even a blued up plate, by the way (just remember to wash your hands before you transfer blue to your living room couch!).

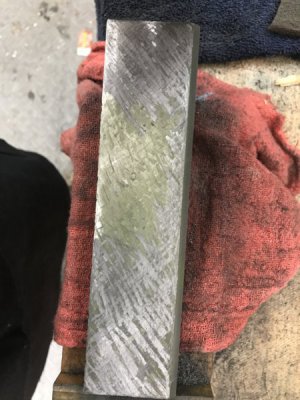
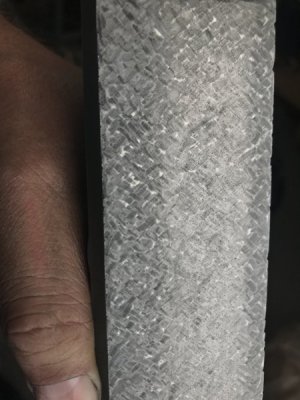
Anyway, I nearly drove myself crazy today trying to remove a dark stripe down both edges. This is precisely the same phenomena I mentioned earlier with the 4.5" straightedge. It's only visible if you catch the light exactly right, but it's quite noticeable in person. After channeling my inner photographer and manipulating the light a bit, I finally got a good shot of what I'm talking about:

IMG_0398.JPG

Notice the lighter area in the middle, and the darker stripes at both the near and far edge.

Looking closely at it, I'd have sworn those edges had slightly deeper scrape marks than in the middle where the lighter section is. I spent several hours diligently trying to lower that center area to the same level (all to no avail).

Eventually, I realized that I'd had exactly the same issue with the 4.5" edge. Once I'd taken a few passes hollowing out the middle lighter area so that it was ONLY bearing on the outer edges, I realized I'd been chasing my tail.

I further realized that it only happened on the wider, diagonal edge of the triangle. Remember that I sliced a rectangular bar down the middle at a 45 degree angle. On both the 4.5" and the 7.5" bars, the lighter center area only appeared on the face that was originally the middle of the bar (the 45 degree cut down the middle). On the faces that were originally the outside of the bar, there were no dark edges.

I now think that this is just a side effect of the original casting. The outer quarter-inch "skin" of the bar is slightly darker because it cooled first. The inner core stayed molten longer, and you can still detect a slightly lighter color for that portion! No amount of scraping will fix this, it's like the rind on a watermelon.

The lesson I learned is to trust your tools (not just your senses). I couldn't understand why I was still seeing blue marks on the visibly "lower" outside edges. The answer is that it's an optical illusion — they aren't really lower. Darker metal makes the same depth of scrape appear slightly lower. Sigh.

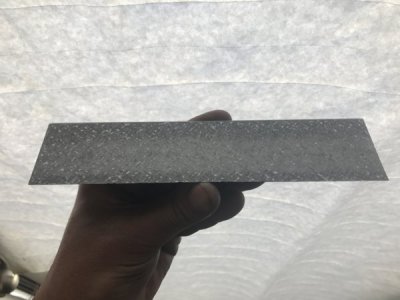
Here's another shot with good lighting that shows the lighter colored metal in the core of the bar. This was shot under nice diffuse, soft, even light from a window with a white shade drawn. It's also right after doing an alcohol "blue-up". If you look closely, you can see the mirror glints of where I rubbed it on the surface plate (and several of those glints are in the darker outer edges).

IMG_0401.JPG

By the way, I quickly realized I'd drive myself both blind and insane trying to scrape an alcohol "blue-up" directly. You have to catch the light just right to even see those mirror glints.

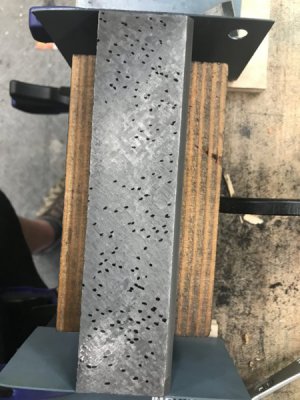
What I did is to take the part over to the window and turn it and my head this way and that until I could see the glints clearly (it turned out to be easiest to see when I caught my own reflection o my dark blue apron on the part). Once I had everything tilted to where it was easy to see, I just marked each spot with a sharpie:

IMG_0402.JPG

You can see that alcohol is revealing some very shallow "holes" that just weren't visible when using ink.

At this point I'm truly "pin-pointing." Each scrape is only about a sixteenth of an inch long. I'm getting pretty good at bump scraping to remove these individual sharpie marks. Tomorrow, I'll bring out a tripod and my SLR to try to capture how I bump-scrape. Using alcohol like this should get me "flat" to within 50 MILLIONTHS or so (where "flat" means "following any curvature of my surface plate").

Now that I'm no longer chasing my tail, and have figured out how to mark up with alcohol, I'm pretty confident that by end of day tomorrow I'll have two extremely precise straightedges (basically scraped to the limits of my cheap "lab-grade"/B-grade surface plate). Then I just have the long one left.

Regards,
--
Rex
 
Last edited:
[In case it isn't clear, this entire post is partly to help anyone else getting started, but also to clarify my own thoughts and improve my own skills. The old saw is literally true: if you want to learn something really well, try teaching it to someone else.]

Thoughts On Tools

Scraping isn't a particularly expensive endeavor, especially for anyone already bitten by (and possibly bankrupted by) the hobby-machinist bug. No heavy machinery required (a biax power scraper is very nice to have, but it's truly a luxury). A surface plate, surface gauge, and dial test indicator are useful for far more than scraping (hopefully you already have them — I'd find it hard to machine without them).

Here's the complete list of mandatory tools:

- A surface plate. To get started you don't need a particularly large one. Ideally, the diagonal dimension should be longer than the longest part you expect to scrape in. This one from Amazon is more than large enough for the three triangles I'm making.

- A decent dial test indicator. Ideally one that can read down to 0.0001" per division (adjust accordingly if you're of the metric persuasion). You can definitely get by with a 0.0005" indicator, but a 0.001" indicator just isn't sensitive enough for the kind of precision you can get when scraping. This is by far the most expensive thing on the list, but it's useful for far more than just scraping, of course.

- A surface gauge and snug to hold your dial test indicator. This is DEFINITELY something I'd buy used off of ebay (the base is a great starter project for scraping, by the way).

- A handscraper. If you're planning to do a lot of scraping, I strongly recommend following Richard King's advice and build or buy one using the Dapra design. Keith Rucker provided me with some dimensioned drawings if you'd prefer to build your own (pretty straightforward for anyone with a mill). I bought mine for about $100 USD directly from Dapra. If, like me, you only expect to scrape occasionally, you could use an old tubular Anderson-style scraper. I've no doubt it's also possible to modify an old file if you had to. I wanted every advantage I could give myself, so I bought the Dapra BB20016 (and I'm very happy I did).

- If you build or buy the Dapra, you'll need at least one blade for it (and, sadly, they are tough to find on ebay). You'll definitely want carbide bits (you'll spend more time sharpening HSS than you will scraping, otherwise). Figuring out what you'll need is a bit of a chicken and egg problem, though. You won't know what you want until you've played with a number of different options. My recommendation is to acquire a 6" toolholder (p/n 130M, about $65 new) and a 3/4" carbide insert (p/n 25/20, about $50 new). The shorter length (p/n 120M) is necessary if you want to try hand flaking, but for finish scraping you'll definitely want the longer 6"/150mm length. With the 3/4" insert, you can sharpen all four edges so you can have both a 3/4"/20mm and 1"/25mm width blade for the price of one. If you don't want to fuss with the insert, I'd recommend just two fixed carbide blades: the 25mm width (p/n 25-150, $92 new) and the 15mm width (p/n 15-150, $83 new).

- Something to sharpen your carbide blades. The cadillac option is a slow-speed grinder like the Glendo AccuFinish, but it's easy enough to cobble something together that would work. I bought an old Glendo off ebay a while back, but if I didn't have that, I'd probably just mount a grinder wheel for carbide in my lathe somehow, and build a little platform for a 5 degree angle (just keep your ways covered, of course). Stefan shows his home-made grinder that he uses in his scraping video.

- A small stone or slipstone of some sort to remove burrs. Ideally something fairly flat. If you have a coarse diamond sharpening plate, you can easily flatten an india stone. Something like this slipstone on Amazon is fine.

- Some sort of marking ink, ideally in two contrasting colors (though it's possible to scrape with just one color ink if you have good eyesight). You need something that won't dry out quickly, is highly visible, and can be spread VERY thin. Prussian blue is the original. You can find (oil based) Dykem high spot blue on Amazon. Dapra sells a nice water soluble spotting ink from a company called Canode that I can recommend highly. On Richard King's recommendation I've tried the yellow and the blue. The yellow contrasts well with blue, but scrape marks can still be a little hard to see. They used to use red lead in the days before MSDS, so I'm tempted to try the red Canode myself.

- Truly ridiculous quantities of paper towels. I usually use red shop towels for everything else, but they just have too much lint for scraping. The blue paper shop towels work great, but you'll go through an awful lot.

- A (cheap) paintbrush for brushing away chips.

- A decent quantity quantity window washing liquid. The cheaper the off brand the better (by smell, the cheaper brands seem to use more ammonia :). It thins Canode spotting ink great, but won't work with oil based prussian blue or Dykem High Spot. It's also a reasonable cleaner for your surface plate in general.

- I also use WD40 as a lubricant both when sharpening my blades, when deburring my parts with a stone. Stoning dry will load up the stone almost immediately so it no longer cuts, so I always use a lubricant of some sort. Window cleaner will work, but because it contains a lot of water it can rust your part if you aren't careful to dry it. I prefer to use WD40 when deburring (WD = "water displacement" — its an ideal lubricant for stoning and will hopefully prevent stray Canode or Windex from rusting your part).

- Woodworking clamps and workholding ingenuity. You have to be able to hold onto your part while your working on it. A woodworkers bench and vises are great for this, as are handscrews and milling vises.

- Adjustable lighting. You can never have too many of these thing from Ikea.

- A piece of card stock or sheet metal with a 1" x 1" hole in it to measure PPI.

Doubtless I'm forgetting something, but the only truly mandatory piece of equipment is a surface plate. You can cobble together just about everything else, but I'm very happy I sprung for the Dapra handscraper. It would be a lot harder without that.

The blades for the Dapra handscraper are the toughest thing to come by, and a little bit pricey if you buy new. I happen to have an extra carbide holder and carbide bit, so if anyone is really at a loss just drop me a line and maybe we can work out a trade of some sort.

Regards,
--
Rex
 
Very informative and taking notes along the way.:geek:

Just to add an idea here. A treadmill motor could possibly be a great substitute for the Glendo. They are super easy to modify. I have 4 of them and one is going to be used for grinding my carbide. Bought a diamond cup wheel before Stefan's video came along, but I like the cheap abrasive that he shows in his vid.

Here is a video I made a few years ago that shares the simple conversion for the more popular controller that many people find in the treadmills. If you're interested in this route. A.K.A., cheap!!

 
Nice. I may eventually create a power drive for raising/lowering the head of my mill. A treadmill motor should be just the ticket for that.

You don't need nearly as much torque for a slow speed carbide grinder. After looking at the glendo unit, I'd even consider repurposing an old turntable/record player! Some diamond paste on an aluminum turntable platter would probably work like a treat. That might be an interesting DIY project.

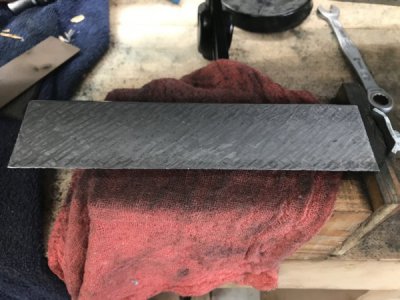
Didn't spend much time in the shop today, but I did finish the 7.5" straightedge. Here's the final alcohol "blue up":

IMG_0406.JPG

That's about as flat as I can get it.

Regards,
--
Rex
 
Last edited:
Back
Top