[How do I?] Make a box square and set of small dovetail gages (straightedges)

Rex Walters

H-M Supporter - Diamond Member
H-M Lifetime Diamond Member
Joined
Apr 21, 2015
Messages
653
I recently completed Richard King's week long scraping class, and I've made it most of the way through the Connelly book. This, of course, now makes me a certified expert in scraping and machine rebuilding. (Not!)

Just kidding. After several weeks scraping in a cast iron box square casting, I'm increasingly confident in my ability to scrape flat, parallel and square, but I'm still a clueless newbie when it comes to scraping in dovetails and actual machine ways.

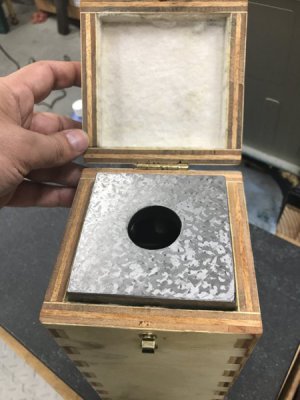
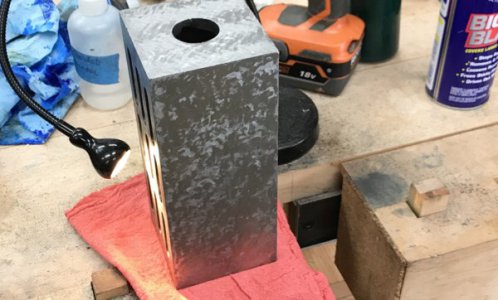
Here's the box square / transfer block I made:
IMG_0296.JPG

After spending a month working on that sucker, I also took the time to make a nice felt-lined, finger-jointed wooden box to store it. On Richard's recommendation, I built the case to store the square on end (as it is in the photo) rather than horizontal. The thought being that horizontal storage might lead to a slight bow developing over time. I forgot to photograph the box, but I'll post it if anyone is interested.

I now want to start scraping in my little Logan lathe, especially the replacement cross-slide I made for it. The bed ways are hardened, but the cross slide, compound ways, and compound rotary ways are all fair game.

Before I can do that, though, I needed some small straightedges. Yay! More tools to make.

I purchased a small hunk of cast iron, 12" x 2 1/4" x 1 1/4" with the goal of making three small dovetail gages: one 12" long, one 7.5", and one 4.5".

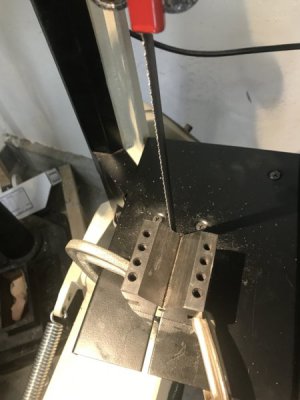
Rather than mill away half the block, I painstakingly set up my horizontal bandsaw for vertical use and clamped a v-block to the table:
IMG_0307.JPG

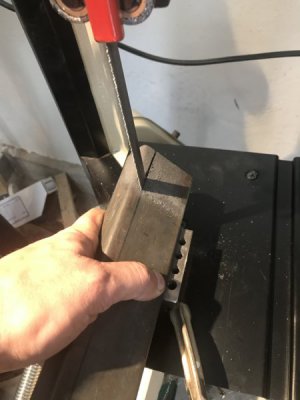
Then I spent what felt like hours slicing the bar in half:
IMG_0306.JPG

Then I realized I should have milled all the square edges first instead of leaving them rough.

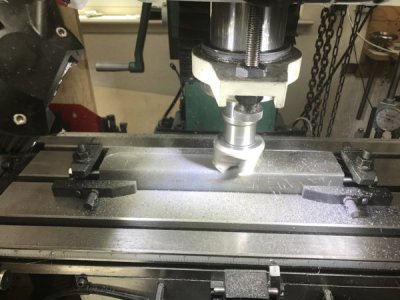
After puzzling for a bit, I eventually figured out how to get the wide edges milled flat (workholding 101). Since I plan to make handles eventually, I drilled and tapped 5/16-18 holes in the ends of each half bar to aid in clamping:
IMG_0308.JPG

Not the most robust workholding, but it sufficed with light cuts and slow feeds.

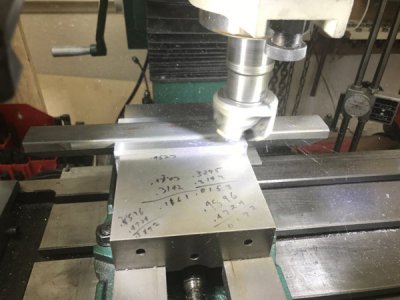
Then I milled the smaller edges in the vise. I wasn't worried about any flex from the overhang since I'm going to scrape it in anyway:
IMG_0309.JPG

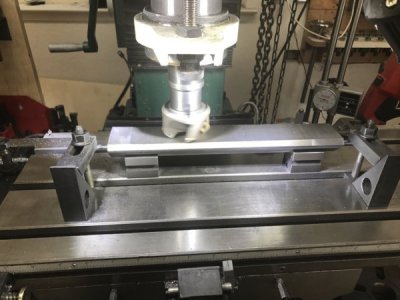
Finally, I used a pair of small v-blocks to mill the 45 degree side:
IMG_0310.JPG

Then I just had to cut one of the 12" wedges into two parts to get the three sizes I wanted with little waste.

I then stress relieved the bars by hanging them from one end and beating on them with a hammer for a bit. I also left the outside for a few days and plan to sacrifice a chicken next weekend. (Seriously, I think these are small enough that they shouldn't move too much, and if they do I can always rescrape them periodically until they relax.)

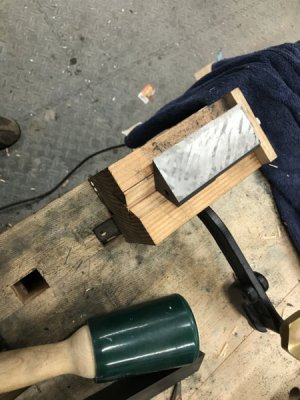
Yesterday, I made a little wooden fixture to hold the work securely as I start scraping them in. I decide to start with the little guy and work up to the 12" one:
IMG_0312.JPG

That's all for now. I'll post updates as I complete the scraping.

Regards,
--
Rex
 
Nice work and planning, Rex! Great job on the box square. Sacrificing the chicken will help, but time keeps changing it a little. High precision metal references are always works in progress on some level, that is what is nice about granite...
 
Very nice, I will be following this with great interest.

I hope Mr. King makes his way near the mid-Atlantic before he retires. I really want to learn this stuff.
 
Hi Rex,

Thanks for sharing this.
I'm looking forward to the next installment and learning from your journey.

-brino
 
Thanks for the comments!

I made a little more progress tonight after work.

First, here's a photo of the square box square box (okay, rectangular box square box):

IMG_0315.JPG

I'll build something similar for the dovetail gages after I finish the first one.

I didn't capture any of the early work to get the first face roughly flat. Basically, "paint scrape" to get rid of the mill marks, then power scrape to get it to ten or twenty PPI.

Go watch Stefan's videos if you have any questions on that process.

Since these will be reference gages, I'm aiming for around 40 PPI and maybe 60% bearing (unsure about the latter, gotta dig out the notes from the class).

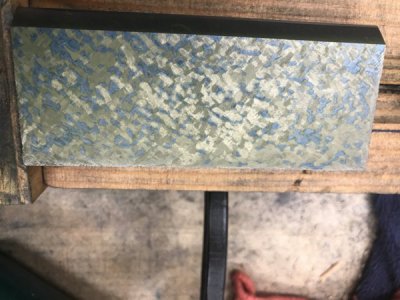
Here's where I was earlier tonight:

IMG_0316.JPG

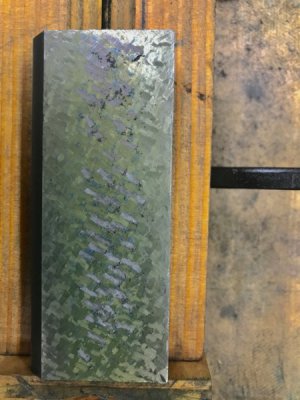
It's a little hard to see, but there's a low spot in the lower left corner, and I've somehow managed to over-scrape most of the thin edge on the bottom of the photo (no bearing at the edge).

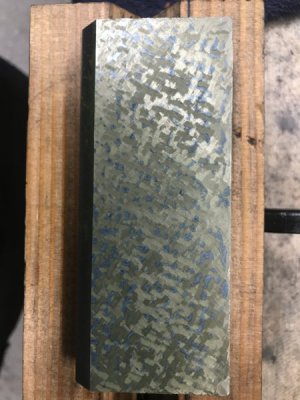
After several more passes, I got it a little closer, but there are still some holes on the thin edge (right, this time). I should be able to get it where I want it the next time I'm in the shop.

IMG_0323.JPG

I count about 30 to 35 PPI. I bumped the contrast and saturation on my phone so it's easier to see (it looked a lot better in person - the lighting in the photo doesn't do it justice!):

IMG_0324.JPG

Thought I'd share some things I learned in the class and as I keep practicing:

It's certainly possible to scrape with just one color of spotting ink, but two contrasting colors make things a LOT easier. Wipe the lighter color over the entire surface, then spot with the darker color on your surface plate. The base color shows you where you've scraped, whether you managed to hit one of the high spots or not.

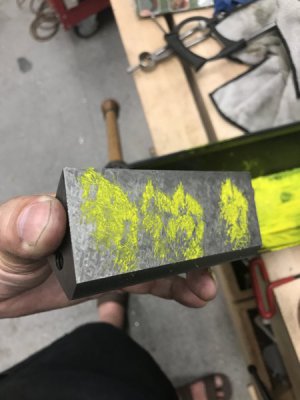
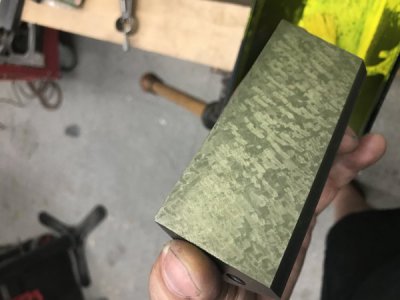
Apply the base color (yellow in my case) by dabbing it on then rubbing almost all of it away. You just want to just dull the surface to highlight your scrape marks. After buffing it out the ink should be completely dry to the touch:

IMG_0317.JPG
IMG_0318.JPG

Do not repeatedly scrape in one place trying to hit your spot! If you miss it, just move on. Subsequent scraping passes will get it eventually, but multiple scrapes in one area will dig a hole. Uniformity of depth on each scraping pass (and reversing directions between passes) is very important. Each time you scrape off high spots, you reveal new ones, but eventually what you just scraped may become a high spot. You want as many of them in the same plane as possible -- it's hard to get there if every scrape is at a different depth.

When you start going past 20 PPI you really want thin, thin ink (both base color and spotting). Thicker ink coats on the plate while roughing will make you think you're pretty much there with complete, even covering. Then spotting with an almost imperceptibly thin coat of ink will reveal that your really only bearing on far fewer points than you thought. Sigh.

I can get to 20 PPI pretty quickly now with a power scraper. Not only is it faster, with practice it's easier to get nic even rows of scrapes all at the same depth. As you get closer, shorten the stroke and narrow the blade.

For finishing I strongly prefer bump scraping by hand. It's slow and painstaking, requiring a lot of concentration, "touch" and control. Once you get the hang of it though, it's incredibly satisfying to knock off each little high spot individually (again, don't back up and try again if you miss though!).

The angle of your blade to the surface is as important as the amount of downward pressure you apply. Obviously less pressure for finishing passes, but a steeper angle also helps. Shallower angles of attack make wider scrape marks. I can tell you first hand that hours and hours of scraping over a few weeks was the only way to develop a feel for what angles and how much pressure.

Flatten your stone on a known flat rough diamond stone. You shouldn't be stoning so hard that you put a curve in anyway (the goal is just to knock off burrs) but a flat stone, your eyes, and your fingers can reveal a surprising amount.

Trust the hinge. TRUST THE HINGE! Hinge the part every time you spot it. If you find a high spot in the middle (trust me, you will, sooner rather than later) take care of it immediately before going on. Just wipe off the marks on the ends and scrape in the middle. Then stone, spot, and hinge, repeating until the part hinges correctly (about a third of the way in from each end).

On a rectangular part like this you can hinge the part itself on the surface plate to find a high spot in the middle across the long dimension. Once you start to get close, though, you should check across the short dimension, too, by hinging a known flat block (gage block, 1-2-3 block, or parallel) on top of your part.

At one point I used a gage block to discover I had a high spot across the short dimension across almost the entirety of my part. I was using the (non-precision-lapped) side of a 2" gage block ( Jo block). First I put the gage block on my surface plate and hinged it to see which side was flattest. Turned out one side had an obvious high spot in the middle, but the other side hinged perfectly.

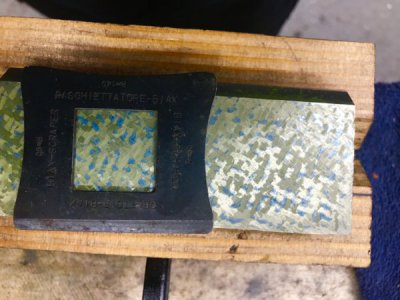
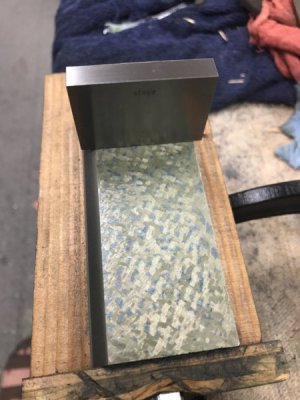
Here's a sequence of me using the gage to detect the high spot and then correcting the problem (only took a single pass!):

IMG_0321.JPG
IMG_0322.JPG

Note that I just used my thumb to wipe off the spotting marks on the edges before scraping in the middle (reduces temptation!).

Lastly, you can increase the bearing percentage with slightly heavier stoning after getting to your desired PPI. This basically just flattens out the individual bearing points. "Stone the &$@# out of it!" As Richard says in his inimitable way. Caution and a flat stone is advised, of course, lest you stone it out of flat.

Anyway, I'll post a few more (shorter!) updates as I get more time in the shop.

Regards,
--
Rex
 
Trust the hinge........ Hinge the part every time you spot it.

Rex,
For those of us interested in the process, but totally unfamiliar with the lingo could you provide a short definition/description for the term "hinge" in this context? Or a link to one.

Thanks,
-brino
 
Very nice work. Great ideas for techniques that I was not aware of. Keep the dialog alive! Spread the knowledge... Thank you, Rex.
 
Rex,
For those of us interested in the process, but totally unfamiliar with the lingo could you provide a short definition/description for the term "hinge" in this context? Or a link to one.

Thanks,
-brino
Brino, it is also called a "spin test".
http://metalscraping.com/w2-Preview.html#15-three see number 11
Edit: If the surface is concave, the pivots will be at the extreme ends of the work. Ideally the pivot points will be about 1/3 the way from the ends, or 30% from the ends, depending on who you ask. Testing for spin/hinge 0n every pass is critical to a scraping job.
 
Be careful! Those steel toed shoes may not hold up to that two pound chunk of cast iron if it slipped out of your hand.:(

I like your box square. Next project on my list. I have a piece of 4-1/4" square cast iron that would make a perfect box square out of. Got me thinking now. I notice your scrape marks are long. That could prevent you from getting to the 40 ppi spotting you are after. Try to shorten them to half that. Yeah, I know, it's hard to do with a hand scraper. Much easier to do with a power scraper when you have one.

Thanks for sharing!
 
Brino, it is also called a "spin test".
http://metalscraping.com/w2-Preview.html#15-three see number 11
Edit: If the surface is concave, the pivots will be at the extreme ends of the work. Ideally the pivot points will be about 1/3 the way from the ends, or 30% from the ends, depending on who you ask. Testing for spin/hinge 0n every pass is critical to a scraping job.

Precisely. Stefan also covers it in his videos which I intended to link to but forgot: Scraping basics - scraping flat - part 1.

I think after the initial flattening you're far more more likely to make it convex (with a high spot in the middle) than concave, though. At least that's been my experience -- you unconsciously scrape the edges and ends harder than the middle. A hinge test will reveal this.

Basically, if the part hinges/spins anywhere other than a third of the way in from the ends, you've got a high spot directly under where it hinges. Fix that before continuing.
 
Back
Top