Jet 13X40 Headstock alignment nightmare with Walter Meier.

I have been thinking all night about a simple method you can do to check head-stock (HS) alignment without but an expensive test bar to put in the spindle nose taper. Chuck up a 1 1/2 to 2 1/2" Bar of alum, leaded cold roll or the best some thick wall tubing. A random length with with about 8" sticking out. First face it, don't worry yet about the face alignment.

Then take a clean up cut of the OD, stop about 1" from chuck, You will want the turned area to be about 6 1/2 to 7" long. The mark n the part 2 areas that we call collars or flange 1/4 to 3/8" wide on the extreme right end then measure 6" toward the chuck and mark another collar or flange 1/4 to 3/8 long, Then go to the right side and turn on the machine, turn clearance say .030" deep between the collars and in the space nearest the chuck to the left of the left collar. __TT________TT
I hope my crude drawing makes sense. That's the top half
of the shaft...Next go to the collars and take .002" cut, on right side.

Lock your cross-slide, after you clean up the right side disengage the feed lever DO NOT TOUCH THE CROSS-FEED or Compound. Let them stay at that position. then hand crank the saddle down to the left and engage the feed to clean up the collar next to the chuck. When the tool clears the edge of the 2nd collar stop the feed and turn off the spindle. Then slowly crank the saddle to the right, dragiing the tool across the collars.

Take a 2nd dry cut..this will eliminate the push away factor. At the end of 2nd cut slowly crank it to the right again to the right and mic the collars. If the head-stock (HS) and bead are aligned it will be the same or slightly bigger .0001" in 6" on tail-stock end.
If it's out, You bed has a twist or the HS is mis-aligned. If it is DON'T Start aligning your head. Let me know and I'll tell you what to do next. I am getting writers cramp...
 
Richard,
First of all thanks for taking your time. That is all any of us have. I am an engineer-surveyor and haved been practicing for 45 yrs., so I have a good idea of measurements but this single issue has thousands of solutions; however, the procedure must have specific milestones. In surveying, which I taught UAB in the 80s, we have methods to assure we are starting with a blank sheet of paper.

I was supplied a very thorough (15) alignments record that were performed at the factory. My lathe was generally half of the factory allowable(s) for each test. So I know it will do as I need, getting it back there is the general issue. you can say I have had zero help from the distributor. One tech said themachine would not perform to those established standards. But we go on, as Tony Wells suggested.

I have on hand:
a) ground 1.5" bar, MT#5 one end, plain the other, 16" long
b) "dumbell bar", ground on both ends. Commercially produced through BROWNELLS
c) dial gages (0.001 and 0.0001) and a test indicator (0.0005)
d) desire

lastly, this lathe headstock is pinned as previously noted.

1) Did you level and align the bed first? Yes and very precisely. The bearings are held down after leveling.

2) Has anyone ever discussed the 2 collar test for turning a straight bar in the head-stock? Yes. The machine fails this test. I can do this again if needed. I may have my records. Essentially it measures 0.003" difference HS to end of bar.

3) I also check the cross side so it is square to the bed-ways. Not been done.

4) I hope you can turn a shaft without taper and the cross feed test and get 2 good readings. Did you suggest I perfrom this?


OK, the above is in reponse to yout FIRST POST. I am digesting your last post.

Thanks for your time, I have not phone service here at the shop (it is remote) but excellent internet.

Mike
Remlap, Al (thats palmer spelled backwards per a duel in 1880s)

PS dumbell bar tested 0.001" diff HS to TS center.
 
Second post:
Then go to the right side and turn on the machine, turn clearance say .030" deep between the collars and in the space nearest the chuck to the left of the left collar. __TT________TT
I hope my crude drawing makes sense. That's the top half
of the shaft...Next go to the collars and take .002" cut, on right side.

OK, I got it to here. Will post photos when done. Then I'll STOP, leaving everything in place and make sure I have the second phase comprehended.

Onward and upward.

Mike

PS also Available is a K&E alignment scope (now Brunson)
 
I was looking at the Jet website....is the machine a bench model or does it have a cabinet? If it's on a bench, what kind of bench? Is it bolted to the bench....?
 
Hi again,


I am writing this so those who have the same issue down the line can check their machine if they do not have all the nice test bars.

When you mic the 2 collars and they are good and you can do the face test and it's good, your all set. But if they are off what is wrong? The bed has a twist or the head is out of alignment. If you have a precision level like a 199 Starrett that the bubble is .0005"/12 graduations. Or even a 99 with a .005" / 12". Set the level on top of the cross-slide or saddle so it is 90 deg to the bed ways, mark the place your sitting with a magic marker. If you can level the machine or slide a feeler gage under one end of the level so it reads level. Have the saddle cranked up next to the head-stock, (HS) remove the test bar we just cut, or if you didn't level / align the bed first, level it before you do the 2 collar test bar. Adjust the machine or level so the bubble rest on the center and on a line. If your using the .005" per foot get a magnifying glass and a super sharp pencil. Mark the level where the bubble rests.

Now crank the saddle back toward the tail-stock (TS) about an inch and then move it back to where it was sitting stop the cranking always moving the same direction. Re check the level. It might take a few tries. Then crank it down the bed as close to the end as you can, if you can slide off the tail-stock,. then crank it the direction you cranked it at the other end and let the bubble come to rest. Usually it takes 10 seconds. If it is off adjust the leveling feet. I read you said it is spot on with the leveling, but if it isn't level the bed or use a level to "align the bed" Leveling a machine on a Aircraft carrier is tough don't you think...so aligning the bed-way parallel to each other is the key. If your bolted to a bench you will have some issues with stability I bet, but do the best you can and shim between the bed and the bottom of the bed legs. If it sets on a cabinet, be sure to check all the bolts holding the cabinet to the bed are tight. I also like to see the bed sitting on leveling plates under the leveling bolts.

I am sorry, I can't take the time all at once to write it all. I do have a life outside the board. Once you have the bed level aligned as close as you can get it or as close as your new machine spec's say. Put the 2 collar bar back in the chuck and do the above tests again. The standard spec is .0002" per foot, so your bed can be out .0006" from end to end and be within spec. More later.

Back again.

I know you have these test bars and I looked for a dumbbell online and could not find anything online to even know what it looks like.

Now that you know the bed is straight / level / aligned...You take the test cuts on the OD of the Collar. What is you reading? If it's a under .002" (.001" per side from center axis line). I would twist bed out of alignment so the 2 collar test cut straight. If the collar is big on the right side or TS end the mount a dial indicator where your tool is on the center of bar, and put .010 pressure on the indictor, then tighten the front side TS end leveling screw so the indicator moves .002". I know what your thinking it would be 1/2 that, but it won't be. Take .002 and take another cut. It should be good or you can tweak it again.

When done tighten the lock nuts with 2 wrenches on the screws and take one more cut. If it is more then .002 then the head is probably out of alignment with the bed. I used to be a repair station for Jet years ago. For the most part the machines were not the best, but people got there monies worth. Usually someone can follow the directions when they buy a machine and all will be OK, but factories do screw up now and then too.

If you double checked to be sure the cabinet is tight to the bed and its leveling screws are snug. I see the on the Jet Web-Site the head cabinet has 4 leveling pads. On a small machine it's difficult to get them to twist the bed unless they are bolted to the floor. But if the machine was build correctly you only put an equal amount of weight on those 4 screws and leave them alone.

more..

I prefer to do the 2 collar test in the field over indicating a ground bar out in the field. When I am builiding a machine from scratch or rebuilding a machine I use a ground test bar fitted in the spindle taper. In the field I like to make a test bar as if I was machining a part. If the bed is aligned with a level by using the precision level tests and as you move the saddle and the level does not move off the line and the 2 collar test is bad then the head stock is not aligned with the bed.
 
Last edited by a moderator:
I added some more info to the prior post but figured I should add this one as a new one.
-------------

Sorry for the delay here, but my uncle is in the hospital. So have to check on him from time to time and keep up with the honey-do chores.

For those of you who do not have a precision test bar you can keep taking test cuts on the 2 collars bar and move the head a little at a time, or you can make a your own true test bar. You have the 2 collar bar now and it's close. Turn down test bar so both collars are the same size. If one is .004" bigger then the other end the turn it down .004 so when you mic the bar both ends are the same.

Then mount a mag base and dial indicator on the compound and loosen the head and move it until the test bar indicates true with the travel of the saddle on the newly aligned bed. When indicating the 2 collars leave the TS end a little plus by +.0001 to .0002" towards the operator. Now tighten the head down and again take a test cut and it should be close. Once you have the bed aligned and the aligned to the bed then I would face the part. If all is OK it will face concave .0002" in 12" is the spec. I would face a 6" piece or the bigger the better so you get a easy math calculations. If it is good ream the dowels bigger and put in new ones.

If the face cut is off then the machine was a lemon and the saddle is out of square with the bed. In all my years I have only seen one machine returned because it was a lemon. I wish you could call me so I believe I could explain it better on the phone then typing. Tell Jet to give me a call and arrange for me to come out to check your machine. I have a friend who is a Gunsmith and he buys Mazak lathes.

I can also write about aligning the tail-stock if needed. Give me a day or so. PM me please if you have any questions or write me Richard@handscraping.com or next week after the first. 651 338-8141
Good luck and everyone have a safe and Happy New Year :))
 
Richard,
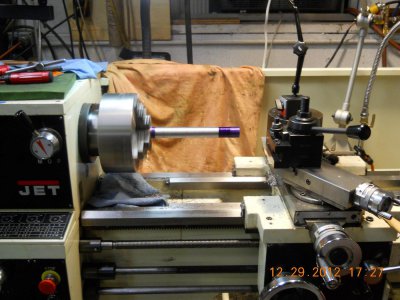
tnx. I tried to use a tube, however, it was poorly formed and my skim cut was 0.045 and not cleaned up. Abandoned the tube. So i fd a 10" bar, indicated it and took off 20 t. Skim cut finished. Will digest your 2 posts and will send pics, then finish workpiece as you described after church. Made my skim 6.5" long. Will not use rest of bar. Pic will show.
mike
 
Use alum if you have it...or leaded cold roll...I'll say a little prayer and cross my fingers, toes, arms and legs...lol.
 
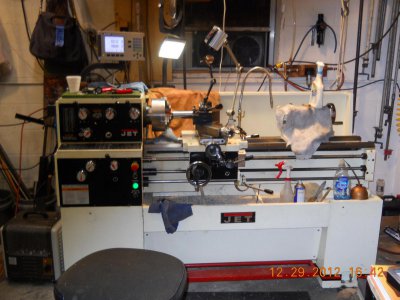
My machine:

12-28-12 012a.JPG

the bar, "skimmed", 6.20". collars next, later this afternoon. OD about 1.2". This matl has poor machinability, lotsa iron. Has some 2.5" AL, but high $ stuff. 235 rpm, 0.014 "/rpm. Finish OK, not good.

12-28-12 013a.JPG

12-28-12 012a.JPG 12-28-12 013a.JPG
 
Have you gotten your lathe issue straightened out (no pun intended)?

Aligning the headstock on your lathe is tedious, but it is not difficult.

There are simply four bolts you need to loosen... Two under the chuck end, and two more under the rear of the spindle. On the back of the headstock, there should be two jack bolts allowing you to tweak the headstock. You do not need to perform any further dissassembly nor "remove any gears". If the headstock is "pinned", you'll need to remove and discard the pins.

I just loosen all 4 headstock to bed bolts and the jack bolts and muscle the head around to get it as close as I can using a test bar with max TIR set at the top of the bar. Now, lightly snug up the headstock to bed bolts lightly and use the jack bolts for the fine adjustments. Now you can begin taking test cuts on a thick aluminum round over at least 6-8" for the final tweaking.

Of course it is essential to ensure the lathe is leveled properly and the bed isn't twisted before you start this. A carpenter's level is nowhere near good enough. You need a machinist's level.

I've got my Grizzly 4003G cutting only a 0.0002 over 8" per the above on a 3.5" dia piece of aluminum taking very light cuts to avoid springing the work. It used to be 0.004! My cross slide is slightly out with respect to the bed and there's not much I can do about it. But, our lathes are imports, not Hardinges and are priced accordingly.

I have found that you need to align the bed to the spindle by longitudinal measurements, not by using the cross slide and facing cuts. The latter includes two sources of error. Also, do not use the tailstock when aligning the headstock!!! The tailstock gets aligned to the headstock separately.

All this is presuming your lathe spindle isn't angled up or down with respect to the bed (which will also cause a taper to be cut). If this is the case, there could be debris between one or more of the headstock or bed "pads" or the bed pads were ground with the bed sprung.

John
 
Back
Top