Jet 13X40 Headstock alignment nightmare with Walter Meier.

never to old to learn.............

That angle will make a cone pointing in or out

Steve, I have never heard of,... considered,........... or even thought of, the theory of alignment behind that, but that is just so simple it stuns me,..
I am still learning now. Just going over center.............Nelson, where is the big "self head slap along with a kick up the butt" smiley?

Cheers Phil
 
TW,

OK I'm convinced. I looked more carefully. (No pics.) The left door frame must be removed since it is bolted to the HS and the base, read heavy. But until I get into the "fire" I will not be able to see how the adjustments are made. So I am off to war. One thing I can do is remove a bolt, most times.

And, on another matter: the motor failed. Will not start above 430 rpm. I turned in a WR 15 da before expiration. So I am still making noise. :winner:think it is a starter capacitor.


Also I added some photos-analysis to http://winchester52.blogspot.com/2012/10/my-13x40-jet-lathe-nightmare.html that may explain how this all got too far. I think just proceeding is wise. See 6 mos ago, I could not even perceive starting the repair.

Mike
Cullman AL
Remlap AL (Jet 13X40)
 
Last edited:
Re: Jet 13X40 Headstock alignment nightmare with Walter Meier Version 2

An update for those interested:

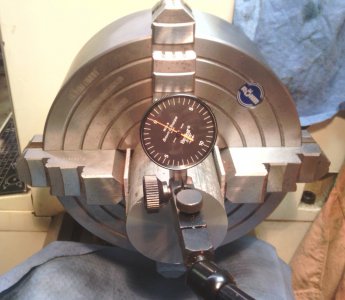
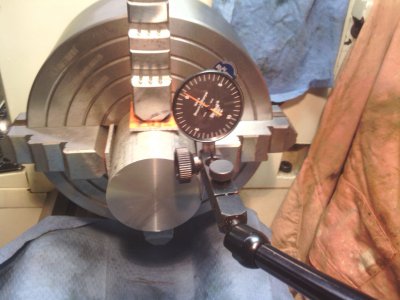
On 11-14-2012 WM sent a subcontractor to evaluate the headstock condition and to repair the motor capacitors. They did so and addressed the headstock alignment issue. Here is their solution:
1) Use 4 jaw chuck
2) add aluminum shims (1/8") to jaw contact points on bar.
3) install 2 test guages after bar centered.
4) use chuck wrench extention to tighten the chuck jaws until alignment is acheived.
5) Me being a novice have never heard of this method.


Let me know if anyone has used this procedure. I have serious doubts and my $1000 chuck will not be treated that way.
The misalignment is 0.003 in 8". Also, if reading this and you have performed the alignment for this lathe, I could really use the help. Further the tech says this amount cannot be corrected for this lathe.

The concensus seems to be: just do it.

Thanks
Mike
Remlap, AL​
 
Mike the tech is telling you how to center a work piece with the "crush method" where you simply mash the work into a soft material vice loosening the opposite jaw. It has no bearing on spindle alignment.

I am still not at all certain that head alignment is the cause of your .003:8" taper. There are many other things that could cause it. Tailstock not centered left right or height, material springing, dull cutter, just to name a few.

Please re-read post 5 and give it a try. If you come up a few thou out with that method then it is the "head stock alignment".

Steve
 
Steve,
Thanks for taking your time. I am certain of the HS misalignment. I purchased a quality test bar ground to 2 tenths with a MT 5 on one end.

see http://winchester52.blogspot.com/2012/10/my-13x40-jet-lathe-nightmare.html at the end. Just look at photos and you'll see the bar.

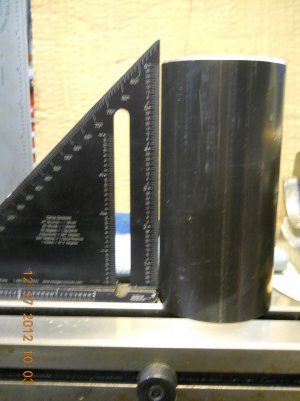
Then after your comment, I faced a 1.5" bar X3". Set it on mill table with a try square. about 1 degree.

The techs comments were that the machine is not capable of better than 003/8". The specs say 0005/5. THE MACHINE IS 2 YRS OLD.

I'm wondering if I am beating a dead horse. I do not have the experience to know. Can I get this machine better?

tnx
Mike
 
Hey Steve,

pursuant to your suggestion I faced a 3" dia tube

DSCN2023.JPG

of course the lens did affect a pure "plane" image AND I'm not sure at this resolution IF you can see due to the resolution. Is this what you meant? Looks like I wasnt very steady. Hee Hee

:))Mike

DSCN2023.JPG
 
Hey Steve,

pursuant to your suggestion I faced a 3" dia tube

of course the lens did affect a pure "plane" image AND I'm not sure at this resolution IF you can see due to the resolution. Is this what you meant? Looks like I wasnt very steady. Hee Hee

:))Mike

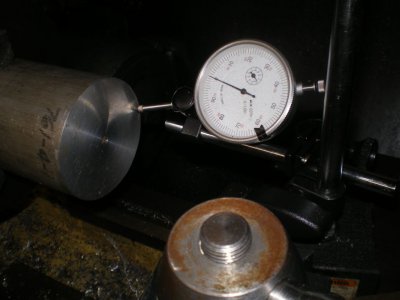
Not exactly. You take a piece of free machining stock that you can get a good finish on. Simply face it and fix a dial indicator to the cross slide. As below

IMGP2965.JPG
as you sweep the dial indicator across the near side to center it will read 0 even if it is notably tapered because you are sweepin the same relative angle as the tool cut BUT when you sweep beyond center you will see an increase/decrease if the head is not perpendicular to the cross slide.

Steve

IMGP2965.JPG
 
got a big piece of AL...on the case steve. will let U know. I know this machine will do the boring I need. :)) am not throwing in the towel. tnx
 
Response to #17

Steve, first thanks for your time:
518.jpg1024.jpg

I repeated meas about 5 times. varied from 3 to 5 tenths.
total dia 2.50". good thought. so it is shaped like a dish.
so, that is twice the error in 1.25"?

Mike

518.jpg 1024.jpg
 
I wish I had seen this sooner as I could have helped with alignment issues on any lathe in the future, please ask me as I have been aligning lathe beds for my entire life (62 years). My Dad invented the King-Way Alignment Instrument that was sold buy Do-All and Sheer Tumico and by us. I started to apprentice under my Dad when I was 12 and I have taught alignment and scraping at several new machine builders over the past 28 years. I have been teaching machine rebuilding / building /way scraping for over 35 years at hundreds of companies all round the world.

One thing I must have missed while reading in this posts... Did you level and align the bed first? The test that was on the Winchester link for aligning the tail stock is not correct. The long bar sags and when you flip the indicator over it drop too. Has anyone ever discussed the 2 collar test for turning a straight bar in the head-stock? The cross-slide face test is the way I do it also. I also check the cross side so it is square to the bed-ways.

I hope you can turn a shaft without taper and the cross feed test and get 2 good readings. The head-stock needs to point toward the operator .0002"to .0004/12" to compensate for push-a-way or tool pressure and this also faces concave. I have the George Sleshinger book the "Testing Machine Tools" and can send you some scanned pages on lathe alignment. That book along with the book called "Machine Tool Reconditioning"
have been the basis for many of the modern test sheet published today.

I will try to write up a procedure and post it in Machine Rebuilding and Scraping forum and try to post it with pictures in January. If you are having issues now Please call me 651 338 8141 (8AM to 8PM CST) or write me at Richard@Handscraping.com or PM me.
 
Back
Top