Heat Treat Oven...

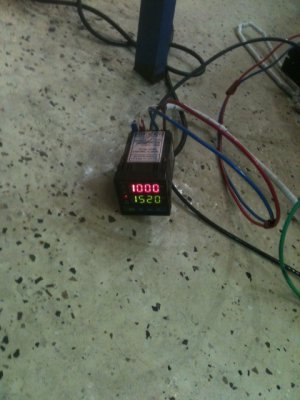
Update. I snipped 1.5 zig-zags off and the current is up to 16 Amps. House voltage is reading 242 at the moment so we're at 3872 Watts. It's on it's way up to 1000 degrees. We'll see how long it take to get there. The insulation is still cool and the black frame is cold. At this writing, the internal temp was 700. The 10 ga supply wire is cold.

The kanthal wire was rated for 25 Amps. So I'm trying to find an Amperage trade off that gets it up to 1600 degrees in there and not push the wire too hard.

BTW: There's no odor at all. I was concerned that this insulation or the heat paint might smell funky.

The PID is working nicely. You can see the indicator lights and when it starts to approach a target temperature, it gets conservative with power to not overshoot.

Ray
 
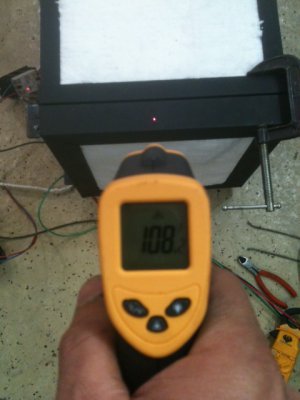
Another update... 1000 degrees in the box and 108 on the metal frame. The outside of the wool is just lukewarm. The rate of temperature rise is tapered off quite a bit -about 1 degree per 4 seconds. I'll probably snip an additional half segment off the coil.

Instead of the hassle of cutting sheets of stainless steel, I'll just buy some concrete board for the outside enclosure. That stuff has very high thermal ratings.

At this stage of the game, I'm thinking the thermal engineer steered me in the right direction. Have to admit, I was a bit concerned about going this route.

Ray

108.JPG1000.JPG

108.JPG 1000.JPG
 
Lookin good Ray. Glad to see this one resurrected.

"Billy G"
 
It's alive!

I hope you are writing down the times, so you can chart the rise over time. Using the wool you will have a much faster rise vs a cement block type as noted. It will take a couple tries as you really need to start at ambient to have good data.

The small box at work that has standard brick insulation, has two elements, one for each leg of the 220 volt single phase. Even at that the box takes a long time to get up to high temps. I have a clock setup on it to turn it on at 4am so it will be ready by 8am.

The new box that is 90% ready and has been tested, runs on 3 phase, 25 amp per phase. Hits temp in less than 90 minutes.
Pierre
 
Bill, Pierre...

Thanks for all the words and moral support... I gotta admit, I took 1/2 day of vacation time to get home and work on this. Been wanting to do heat treating for a long time and have read about a half dozen books on the matter. The latest book mentioned below outlines the hard-core facts about ferrous metal heat treating in the first 150 pages. Very good succinct information but you really need to read "Heat Treatment, Selection and Application of Tool Steels" [William E. Bryson. Hanser publ] for preliminary background information. After the 1st part, the remaining 800 pages covers every detail about carbon steel known to man.

I've often wondered why in the world there are so many different types of steel that are so incredibly similar; for example 1044 vs 1045. In most cases, from a fabrication point of view, those similar metals are interchangeable but, the minor differences are there to support more convenient types of heat treating. The end result is often the same but, one of them might require a heat treating method that's more convenient. This latest book does not outright mention this but, when you compare the their processes, it's easy to infer the rationale behind it all. I could well surmise other motives for such similar metals too...

... The oven ... Well, I let it get up to 1200 degrees. All total, it took just under 90 minutes. I disconnected the main power about an hour ago and it's now showing about 880. Yes, I need to tweak the kanthal wire a little more. Once I build the enclosure, I'll get more serious about measuring the rise and fall times. I'm also planning to put a gas flood inlet/outlet valve in it to pump it with argon. That will change the times too.

Ray
 
Ray, I hate to ask this, as I generally like to do all my own research, but yours is turning out pretty much the size I plan on building, so when you are finished and happy with the outcome, I would appreciate a list of your components and sources if it's not too much trouble. I could go though the selection process, but I would like to see what you have come up with. Mine will be 3 phase, but your parts list would undoubtedly be very useful to me.
 
Hi Tony...

Absolutely but, here's the best I can do because this is one of those rare cases, where I'm slapping this together as I go.

The exact source and models for the pyrometer, SSR, PID and heat sink are shown in post 13 of this thread.

The blanket material is available at a lot of places and I've included a link. The price is about the same as what I paid but shop around in case you find a better deal. I paid about $125 for the roll but the place that sold it to me charged a fortune for shipping because they weren't setup for retail shipping. The roll was 25' long and I used (rough guess) 2/3 the roll to construct this. http://www.hightemptools.com/inswool.html

The inner cage was 304 Stainless, 3/8" diameter -all total about 22 linear feet. I used 1-1/4 angle iron for the frame (about 30 linear feet) and 2" for the door (7 linear feet). It was all shop drops except the 2" angle iron.

To connect the kanthal wire, I took a piece of the stainless rod, turned a little nipple on the end and screwed the end of the coil onto it. The kanthal wire was found on eBay -I didn't bother to save the source/seller because it's common as water. Just order by the "Amperage per foot" you're looking for. Sometimes they specify the wattage rating so you can deduce Amps from that.

Rust Oleum black matte Heat Paint (about 5 bucks).

-Wear gloves and a respirator when handling the wool.

Although the wool was 1" thick, I planned on 1-1/4" in all the rough-sketch layouts. It worked fine but if I were to do it over, I would allow 1-1/2" to make it easier to work with and fit inside the cage.

I hope that helps but if there's anything I can clarify, just shout...

Ray


Ray, I hate to ask this, as I generally like to do all my own research, but yours is turning out pretty much the size I plan on building, so when you are finished and happy with the outcome, I would appreciate a list of your components and sources if it's not too much trouble. I could go though the selection process, but I would like to see what you have come up with. Mine will be 3 phase, but your parts list would undoubtedly be very useful to me.
 
Sorry for being so "chatty" but I'm finding this particularly exciting... here's more info...

11 hours after power it off (final temp last night was 1200 degrees), it was still 205 degrees inside. It's on the garage floor with the overhead door cracked and there was a cool breeze on it all night. Wow! This thing holds heat!

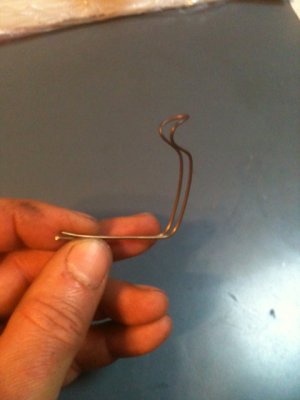
Here's an example of the hooks that holds the kanthal wire. It's 20 ga SS safety wire bent so the brick sits on it to hold it in place. It got discolored but is still pliable so I think it's suitable and will last a long time.

hook.JPG

Sadly, I do not have the proper name or part number for the fire brick that just rests on the bottom. It was supplied by the guy who sold me the wool. I believe they were about $15 each and are 1 x 11 x 11-3/4". Do not use concrete patio bricks as they will shatter/explode when the moisture within them expands and boils.

I was concerned the 3/8 SS rod would sag so, the floor of the cage was built with a couple extra "joist" supports and little stumpy legs for support. I just checked a few places at the edges where the insulation can be pushed away to see the 3/8 rods. They did not even discolor much less come anywhere near the point of sagging. Apparently the inner layer of wool does a fine job. I used 304 stainless since it has very good working temperature up to 800F and is very corrosion resistant. They also happened to be left overs from a different project.

Stay tuned and I'll share what I learn/observe. BTW: Cash outlay so far is approximately/conservatively $275 with about 12 hours of hands-on labor spread-out over 2 days.

Ray

hook.JPG
 
So... I adjusted the coil one more time and it's drawing 9.5 Amps per leg (19 A. total). That's good enough for the coil to be within 5 amps of the rated value. From a "cold" start (150 degrees), it took 15 minutes to reach 700. It slows down around that temp and 1hr, 15m later it was up to 1300 degrees. At that point, you can feel heat radiating off it but everything is still within touchable range (about like a warm cup of coffee). The rate of increase really slows down at this point -obviously due to the exterior surface area giving-up it's heat. I'd estimate that in another 30-40 minutes it would reach 1500. If the base bricks weren't in there, there's no doubt in my mind it would reach 1500 much faster.

Plans thus far: Use the last of the wool to wrap one more layer then, build an enclosure from concrete board. That should keep every precious ounce of heat inside the box where you want it and probably allow a 90 minute heat-up to 1580 (typical temperature for carbon steel normalizing).

You might be wondering why I'm concerned about 90 minute ramp-up times... Quite simply, a full normalizing cycle can take anywhere from 1 to 5 hours. Once normalization is done, the first tempering (which as a long soak time) must be started within one hour. I really don't want to be up at 1:00AM nursing this darn thing!

Gears are turning. Future plans: 1) Try to find thinner base bricks. I want every calorie of heat going into metal -not the brick. 2) Experiment with different kanthal wire, possibly something that can take 30 Amps.

As is, the unit is ready to do real work so if you're thinking of making one, go ahead and pull the trigger.

Finally, once this thing is built, I have several pieces that need treating. One of them is a surprise project that I think you guys will love... Anyhow, I'll outline the basic steps gathered from truly professional sources. As I expected, the methods of "heat it up till it's red and dunk it" can do more harm than good in a lot of cases.

Ray
 
what are your plans for a shelf (for lack of better term) where your parts are going to sit on? It looks like yours will be safer than my Muffle furnace and kiln set up. When you I the blacksmith tongs in the heat zone, you need to be care not to touch the heating element, same with the tooling being treated. there is a bit of a magnetic attraction. worse when you are trying to get a bunch done in a hurry.
 
Back
Top