G0704 CNC AC Servo Rebuild (Picture Heavy)

Nice! I've seen those sitting there, but made myself a promise not to pick up loose parts and pieces from HGR. I never use them.

Those white Sumitomo brand gearboxes are hypocycloidal gearheads and are supposed to be as good as harmonic drives.
 
Sadly the robot was not to be mine. It was a Fanuc LRMate 200iC with R30iA controller, all the cables, and a teach pendant. It was at auction for $300 so I was hopeful nobody would find it but it ended up selling for $5000. Way more than I was going to spend, but honestly someone got a really nice setup for cheap.

If anyone knows where to find a small used 6 axis robot, I'd love to hear ;)

I have a few more weeks of work travel and out of state weddings and then I can get back to the shop!
 
Well I'm back to work on some more LUA coding. This time I have a few goals:
  • Start-Up Menu system to get the machine ready to run
  • Absolute homing by reading the motor encoder at power-up and writing that position to the Mach 4 axis positions
  • Script a new M code for rigid tapping
  • Make sure that a servo fault, PSU fault, or cabinet over-temperature condition will stop the machine
I started out with the menu system. I wanted to add this because I often forget to oil the machine and turn on soft limits. By having a menu guide me through the steps, I should be very unlikely to forget stuff.

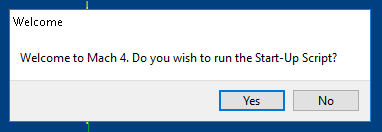
When I open Mach 4, a short delay is created by waiting for 60 scans of the PLC script to elapse (3 seconds) before running the start-up script. This is because the code begins to run a second or two before the graphics load on screen. I am greeted with this screen. Clicking NO will exit the script, and clicking yes will take you to the next step.

1.PNG

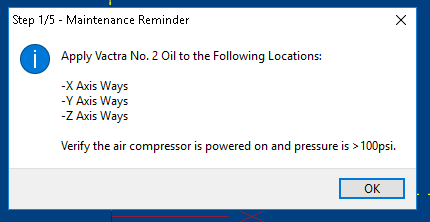
Step 1 is a simple acknowledgement that I have performed the normal maintenance on the machine. Clicking OK will take you to step 2.

2.PNG

Step 2 seems a little complicated, but some of my future features (like rigid tapping) will require me to dynamically change servo drive parameters on the fly. There is a risk that if Mach 4 crashed or power went out when the parameters were set to non-default values , the machine could behave incorrectly later on. To combat this issue, when Mach 4 opens, all the parameters that I might change are set to a default value. I just need to be careful because these will overwrite any changes I make in the servo configuration utility.

3.PNG

I had an extra computer listening on the RS485 network and logging all the traffic. Here is what that configuration dump looks like. The first 2 numbers after the colon are the drive serial address (00 = X Axis, 01 = Y Axis, 02 = Z Axis, 05 = Spindle). The 4 numbers after that are the parameter and write selection (in the case of the second line "01E1" is "Write, Slew Limit Enable Disable), the 2 after that are the data (in this case 00) and finally a 2 digit checksum. Immediately following line 2 is the drive's response which should echo the same address, parameter, and function code (but not return any data). My serial code is able to handle response failure, exceptions, and corrupted data. About 12 parameters are configured in each drive at start-up so roughly 50 serial transmissions occur in around 100ms.

Capture.JPG

If all the transmissions are met with successful responses, I display the following pop-up. If any responses are missed or exceptions are returned, then a warning message will appear prompting me to restart Mach and start troubleshooting if the issue persists. I have completed this section of code and found it to work very well.

4.PNG

Next menu prompt will ask If I want to home the machine. Clicking YES will take you into the homing menu, clicking NO will skip homing.

5.PNG

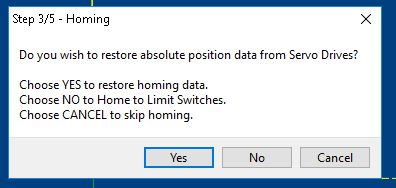
The homing menu first gives you the option to restore absolute position data from the motor encoder. Once it is working, this will be what I do 99% of the time. My axis motors (Allen Bradley MPL-A310P-MJ22AA) have a Multi-Turn Absolute Encoder on their shaft. This encoder uses a magnetic disk to produce a pair of SIN/COS waves offset by 90* electrical. This signal is 1.0V Pk-Pk and has 1024 cycles per motor shaft revolution. The drive further interpolates this signal by up to 1024 counts per cycle (a whopping 1048576 counts per revolution). Some newer drives can even interpolate up to 2048 counts per cycle. I have opted to only interpolate at 64 counts per cycle (65536 counts per rev) since this is way more resolution than my machine can handle producing. Since the disks are magnetic, the motor doesn't need to keep the encoder powered to maintain position knowledge.

It gets better though! The encoder also has a miniature gearbox inside of it with several more magnetic disks. By saving the motor position and disk positions before powering off, the drive can compare the positions of the disks after turning on again and calculate its exact position as long as the motor was not moved more than 4096 revolutions while powered down. This is perfect for fixed travel length applications like machine tools.

This position data is available in a drive register to be read by host commands just like above. In addition, I can define the drive's zero location. When I home to my limit switches to zero out Mach 4, I will also write to the drives to zero them out too. I can later read the drive position count register, divide by 327680 (motor counts per inch), and plug that number into Mach 4. This is always saved by the motor after the machine shuts down, so it essentially negates any need to home the machine after turning it on.

So in this menu, I will pick YES to read the data, or NO to home to the switch and redefine the drive zero location. Clicking CANCEL will skip homing. This code has been roughed out on paper but is not yet ready for the machine.

6.PNG

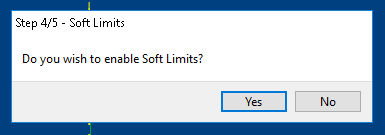
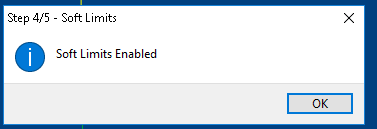
The next step is to enable soft limits (I always forget). Clicking YES runs a couple of MAch 4 API calls to do the same thing that clicking the soft limits enable button does.

7.PNG

And you get a nice notification. If you click NO, the message will warn you that you need to be careful jogging since you can now reach the limit switch.

8.PNG

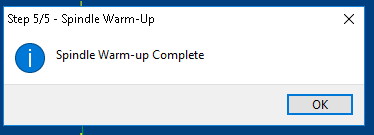
Finally I offer the ability to load a simple GCODE file which ramps the spindle up to max speed over 5 minutes.

9.PNG

And a caution message before the machine starts automatically.

10.PNG

And a final pop-up to confirm the script is done.

11.PNG

I still have some more code to write to finish this up, but it is getting very close. I'm super happy that the configuration script works.
 
Continued on with the LUA coding last night. I have been using some code posted by Andy and Warp9TD to handle the MPG switch settings and have always found it annoying that the MPG doesn't pick the right axis and jog increment until you move the switches (it can read incorrectly right when Mach loads). This is because the code handling those switches in called only on a change of state.

To get around this, the last thing I do when the Screen Load Script runs is call the function to set the switch states. This forces Mach 4 to read the switches and load the correct values. In addition, I added change of state scripts for the Servo Drive Fault input, the System OK input, and the Cabinet Over-Temp Alarm input. All of these are able to E-Stop Mach 4 and display unique indications of what the issue is. These too are called at the end of the screen load script to ensure they are in the right state for operation.

The last thing to do with this part of the code is to modify the ENABLE button to prevent me from enabling the machine if any of these conditions are true.

Here are the relevant portions of the code:

Code:
SigLib = {
    [mc.ISIG_INPUT1] = function (state)
        SystemOKChange()             
    end,
    [mc.ISIG_INPUT2] = function (state)   
        DriveFaultChange()                      
    end,
    [mc.ISIG_INPUT12] = function (state)  
        CabinetTemperatureAlarmChange()      
    end
}

function DriveFaultChange()
    local hDriveFault
    local DriveFault
    hDriveFault, rc = mc.mcSignalGetHandle(inst, mc.ISIG_INPUT2)
    DriveFault, rc = mc.mcSignalGetState(hDriveFault)
    if (DriveFault == 1) then
        mc.mcCntlEStop(inst)  --Activate the EStop signal in Mach
        mc.mcCntlSetLastError(inst, "A Servo Drive Has Faulted") 
    else
        mc.mcCntlSetLastError(inst, "Servo System Faults Cleared") 
    end 
end

function SystemOKChange()
    local hSystemOK
    local SystemOK
    hSystemOK, rc = mc.mcSignalGetHandle(inst, mc.ISIG_INPUT1)   
    SystemOK, rc = mc.mcSignalGetState(hSystemOK)
    if (SystemOK == 0) then
        mc.mcCntlEStop(inst)  --Activate the EStop signal in Mach
        mc.mcCntlSetLastError(inst, "A Power Supply or Main Cotactor Has Failed")
    else
        mc.mcCntlSetLastError(inst, "System OK Signal Has Returned to Normal")
    end 
end

function CabinetTemperatureAlarmChange()
    local hTempAlarm
    local TempAlarm
    hTempAlarm, rc = mc.mcSignalGetHandle(inst, mc.ISIG_INPUT12)
    TempAlarm, rc = mc.mcSignalGetState(hTempAlarm)
    if (TempAlarm == 0) then
        mc.mcCntlEStop(inst)  --Activate the EStop signal in Mach
        mc.mcCntlSetLastError(inst, "Cabinet Over-Temperature Alarm!") 
    else
        mc.mcCntlSetLastError(inst, "Cabinet Temperature Has Returned to Safe Levels")
    end 
end
---------------------------------------------------------------
-- Define Initial States --
---------------------------------------------------------------
--Without this code, Mach will not place the MPG in the right state at startup
--Correct Axis and Jog Increment only loaded when switches are moved

PendantAxisChange()

PendantSpeedChange()

PendantEStopChange()

DriveFaultChange()

SystemOKChange()

CabinetTemperatureAlarmChange()


Also here is the code for the screen load menu script. It is still a work in progress and immediately needs work on axis enabling, absolute homing, and starting the classic version of homing to a switch.

Code:
function mcServo.AbsolutePositionRecovery(address)
    local rError = 0
    local ctsInch = mc.mcMotorGetCountsPerUnit(inst, address)
    local sError, position = mcServo.GetPosition(address, ctsInch)
    if sError ~= 0 then; rError = 1; return rError end
    mc.mcAxisSetPos(inst, address, position)
    mc.mcAxisHomeComplete(Inst, address);
    return rError
end

---------------------------------------------------------------
-- Start-Up Script --
---------------------------------------------------------------

function startUpScript()
    local welcomeBox = wx.wxMessageBox("Welcome to Mach 4. Do you wish to run the Start-Up Script?", "Welcome",2)
    if welcomeBox == 2 then
        local oilBox = wx.wxMessageBox("Apply Vactra No. 2 Oil to the Following Locations: \n \n-X Axis Ways \n-Y Axis Ways \n-Z Axis Ways \n\nVerify the air compressor is powered on and pressure is >100psi.", "Step 1/5 - Maintenance Reminder",4)
        local configBox = wx.wxMessageBox("Do you wish to write the default configuration to the Servo Drives?", "Step 2/5 - Servo Configuration",2)
        if configBox == 2 then
            local xmtError = mcServo.writeStandardConfig() --Configure all axes
            if xmtError == 0 then
                wx.wxMessageBox("Configuration Successful", "Step 2/5 - Servo Configuration",4)
            else
                wx.wxMessageBox("Configuration Failed! \n \n Some parameters may be set incorrectly for use with Mach 4. Shut down Mach 4 and try again. \n If this issue persists, confirm connectivity and parameters using Ultraware. ", "WARNING",4)
            end
        end
        local enableBox = wx.wxMessageBox("Do you wish to Reference Home? Choosing YES will enable the axes", "Step 3/5 - Homing",2)
        if enableBox == 2 then
            mc.mcAxisEnable(inst, 0, true);
            mc.mcAxisEnable(inst, 1, true);
            mc.mcAxisEnable(inst, 2, true);
            mc.mcAxisEnable(inst, 5, true);
            local HomeBox = wx.wxMessageBox("Do you wish to restore absolute position data from Servo Drives? \n \nChoose YES to restore homing data. \nChoose NO to Home to Limit Switches. \nChoose CANCEL to skip homing.", "Step 3/5 - Homing",18)
            if HomeBox == 2 then
                local e1 = mcServo.AbsolutePositionRecovery(0)
                local e2 = mcServo.AbsolutePositionRecovery(1)
                local e3 = mcServo.AbsolutePositionRecovery(2)
                local e4 = mcServo.AbsolutePositionRecovery(5)
                if e1 ~= 0 or e2 ~= 0 or e3 ~= 0  or e4 ~= 0 then
                    wx.wxMessageBox("Home Position Recovery Failed! \n \n Axes must be referenced to switch before operation.", "Homing Failed",4)
                else
                    wx.wxMessageBox("Home Position successfully read from Servo Drives", "Step 3/5 - Homing",4)
                end
            elseif HomeBox == 8 then
                wait = coroutine.create (RefAllHome) --This is the code from the ref all home button
                --Figure out how to wait here unitl the coroutine is complete and homing has finished.
                local hsBox = wx.wxMessageBox("Home to Switch completed Successfully. \n \nDo you wish to write the absolute home position to the Servo Drives?", "Step 3/5 - Homing",2)
                if hsBox == 2 then
                    local a1 = mcServo.DefineHome("0x00")
                    local a2 = mcServo.DefineHome("0x01")
                    local a3 = mcServo.DefineHome("0x02")
                    local a4 = mcServo.DefineHome("0x05")
                    if a1 ~= 0 or a2 ~= 0 or a3 ~= 0  or a4 ~= 0 then
                        wx.wxMessageBox("Home Position Definition Failed! \n \n Absolute Position Recovery will be inaccurate until corrected.", "Homing Failed",4)
                    else
                        wx.wxMessageBox("Home Position successfully saved to Servo Drives.", "Step 3/5 - Homing",4)
                    end
                else
                    wx.wxMessageBox("Home Position was not saved to Servo Drives.", "Step 3/5 - Homing",4)
                end
            end
        end
        local softBox = wx.wxMessageBox("Do you wish to enable Soft Limits?", "Step 4/5 - Soft Limits",2)
        if softBox == 2 then
            mc.mcSoftLimitSetState(inst,0,1)
            mc.mcSoftLimitSetState(inst,1,1)
            mc.mcSoftLimitSetState(inst,2,1)
            wx.wxMessageBox("Soft Limits Enabled", "Step 4/5 - Soft Limits",4)
        else
            wx.wxMessageBox("Soft Limits are not enabled. Use Caution when jogging", "Step 4/5 - Soft Limits",4)
        end
        local spindleBox = wx.wxMessageBox("Do you wish to run the Spindle Warm-Up Routine? This will take approximately 5 minutes", "Step 5/5 - Spindle Warm-Up",2)
        if spindleBox == 2 then
            local cautionBox = wx.wxMessageBox("CAUTION! The Spindle is about to run. Verify no cutting tools are present. \n \nKeep Hands Clear!", "CAUTION!",16)
            if cautionBox == 4 then
                mc.mcCntlGcodeExecuteWait(inst,"M03 S500")
                mc.mcCntlGcodeExecuteWait(inst,"G04 P30000")
                mc.mcCntlGcodeExecuteWait(inst,"S1000")
                mc.mcCntlGcodeExecuteWait(inst,"G04 P30000")
                mc.mcCntlGcodeExecuteWait(inst,"S1500")
                mc.mcCntlGcodeExecuteWait(inst,"G04 P30000")
                mc.mcCntlGcodeExecuteWait(inst,"S2000")
                mc.mcCntlGcodeExecuteWait(inst,"G04 P30000")
                mc.mcCntlGcodeExecuteWait(inst,"S2500")
                mc.mcCntlGcodeExecuteWait(inst,"G04 P30000")
                mc.mcCntlGcodeExecuteWait(inst,"S3000")
                mc.mcCntlGcodeExecuteWait(inst,"G04 P30000")
                mc.mcCntlGcodeExecuteWait(inst,"S3500")
                mc.mcCntlGcodeExecuteWait(inst,"G04 P30000")
                mc.mcCntlGcodeExecuteWait(inst,"S4000")
                mc.mcCntlGcodeExecuteWait(inst,"G04 P30000")
                mc.mcCntlGcodeExecuteWait(inst,"S4500")
                mc.mcCntlGcodeExecuteWait(inst,"G04 P30000")
                mc.mcCntlGcodeExecuteWait(inst,"S5000")
                mc.mcCntlGcodeExecuteWait(inst,"G04 P30000")
                mc.mcCntlGcodeExecuteWait(inst,"M05")
                wx.wxMessageBox("Spindle Warm-up Complete", "Step 5/5 - Spindle Warm-Up",4)
            end
        end   
    end
end
 
Spent some more time on LUA over the weekend and was able to make some decent progress.

First off, I modified the ENABLE button to prevent the user from enabling the machine if any alarm conditions are active. Mach 4 already does this for the ESTOP, but not any of the other conditions I added (Cabinet temp, Pendant ESTOP, PSU OK, etc). Additionally, error messages are displayed telling the user exactly why the machine cannot be enabled.

The first condition is the only one where enabling the machine is allowed, and the API call mc.mcCntlEnable(inst, 1) handles enabling. All the other conditions display an error message and also reset the ENABLE button back to the unpressed state.

Code:
local inst = mc.mcGetInstance()
local hSystemOK
local SystemOK
local hTempAlarm
local TempAlarm
local hPendantEStop
local PendantEStop

hSystemOK, rc = mc.mcSignalGetHandle(inst, mc.ISIG_INPUT1)
SystemOK, rc = mc.mcSignalGetState(hSystemOK)
hTempAlarm, rc = mc.mcSignalGetHandle(inst, mc.ISIG_INPUT12)
TempAlarm, rc = mc.mcSignalGetState(hTempAlarm)
hPendantEStop, rc = mc.mcSignalGetHandle(inst, mc.ISIG_INPUT15)
PendantEStop, rc = mc.mcSignalGetState(hPendantEStop)
    
if (SystemOK == 1 and TempAlarm == 1 and PendantEStop == 0) then
    mc.mcCntlEnable(inst, 1)
elseif (SystemOK == 0 and TempAlarm == 1 and PendantEStop == 0) then
    mc.mcCntlSetLastError(inst, "Cannot Enable: A DC Power Supply or Main Contactor has Failed")
    scr.SetProperty("tbutton2", "Button State", "0")
elseif (SystemOK == 1 and TempAlarm == 0 and PendantEStop == 0) then
    mc.mcCntlSetLastError(inst, "Cannot Enable: Cabinet Over-Temperature Alarm is Active")
    scr.SetProperty("tbutton2", 'Button State', "0")
    elseif (SystemOK == 1 and TempAlarm == 1 and PendantEStop == 1) then
    mc.mcCntlSetLastError(inst, "Cannot Enable: Pendant ESTOP is Active")
    scr.SetProperty("tbutton2", 'Button State', "0")
elseif (SystemOK == 0 and TempAlarm == 0 and PendantEStop == 0) then
    mc.mcCntlSetLastError(inst, "Cannot Enable: Cabinet Over-Temperature Alarm is Active and a DC Power Supply or Main Contactor has Failed")
    scr.SetProperty("tbutton2", "Button State", "0")
elseif (SystemOK == 1 and TempAlarm == 0 and PendantEStop == 1) then
    mc.mcCntlSetLastError(inst, "Cannot Enable: Cabinet Over-Temperature Alarm is Active and the Pendant ESTOP is Active")
    scr.SetProperty("tbutton2", "Button State", "0")
elseif (SystemOK == 0 and TempAlarm == 1 and PendantEStop == 1) then
    mc.mcCntlSetLastError(inst, "Cannot Enable: A DC Power Supply or Main Contactor has Failed and the Pendant ESTOP is Active")
    scr.SetProperty("tbutton2", "Button State", "0")
elseif (SystemOK == 0 and TempAlarm == 0 and PendantEStop == 1) then
    mc.mcCntlSetLastError(inst, "Cannot Enable: Cabinet Over-Temperature Alarm is Active, a DC Power Supply or Main Contactor has Failed, and the Pendant ESTOP is Active")
    scr.SetProperty("tbutton2", "Button State", "0")
end

When the machine is enabled, and the DISABLE button is clicked, all the axes are dereferenced. I do this because I know the motor shaft will move slightly when power is removed and I don't want to mistakenly think that everything is perfectly in place.

Code:
local inst = mc.mcGetInstance()

mc.mcAxisDeref(inst, 0)
mc.mcAxisDeref(inst, 1)
mc.mcAxisDeref(inst, 2)
mc.mcAxisDeref(inst, 5)
mc.mcCntlEnable(inst, 0)

Next, I started working on the absolute position recovery script. I noticed that when I asked for the drive's position, the numbers I was getting back were incorrect (compared to the hex values I saw on the serial line). I traced this back to my hex to decimal conversion code which assumed a 4 character hex length. The position data is returned as 8 characters so the two's-complement conversion was wrong. There may be a more elegant way to write this code, but now the conversion checks the length of the input string and selects the correct conversion based on that. I ran a huge number of test cases through this and it worked perfectly. The drive only returns data in packets of 2, 4, or 8 characters.

Code:
----------------------------------
-- mcSerial.Hex2Num(string) --
----------------------------------
function mcSerial.Hex2Num(string)
    local hexNum = tonumber(string,16)
    if string.len(string) == 2 then
        if hexNum >= 128 then
            hexNum = hexNum - 256
        end
    elseif string.len(string) == 4 then
        if hexNum >= 32768 then
            hexNum = hexNum - 65536
        end
    elseif string.len(string) == 8 then
        if hexNum >= 2147484148 then
            hexNum = hexNum - 4294967296
        end
    end
    return hexNum
end

Before I added the complexity of doing absolute position recovery in the start-up script, I figured I should get it working on the Ref All Home button first. I modified the script to ask if I wanted to use the absolute data, or home normally. Here it is.

Code:
--RefAllHome()

local HomeBox = wx.wxMessageBox("Do you wish to restore absolute position data from Servo Drives? \n \nChoose YES to restore homing data. \nChoose NO to Home to Limit Switches. \nChoose CANCEL to skip homing.", "Homing Type",18)
if HomeBox == 2 then
    local e1 = mcServo.AbsolutePositionRecovery()
    if e1 ~= 0  then
        wx.wxMessageBox("Home Position Recovery Failed! \n \n Axes must be referenced to switch before operation.", "Homing Failed",4)
    else
        wx.wxMessageBox("Home Position successfully read from Servo Drives", "Step 3/5 - Homing",4)
    end
elseif HomeBox == 8 then
    wait = coroutine.create (RefAllHome) --This is the code from the ref all home button
end

If I choose YES, then it calls the function mcServo.AbsolutePositionRecovery(). This function DOES NOT WORK right now, but I am really close. Basically it changes the Mach configuration to home in place rather than having the ESS handle the homing. It queries the drives for their current position, copies that into the homing offset, then runs a home in place. My current problem is that I need Mach to reload the config.ini file to make these changes apply. I will work on fixing this tonight.


Code:
---------------------------------------------------------------
-- Absolute Position Recovery --
---------------------------------------------------------------

function mcServo.AbsolutePositionRecovery()
    local rError = 0
    local sError = 0
    local xPosition
    local yPosition
    local zPosition
    local sPosition
    mc.mcAxisSetHomeInPlace(inst, 0, 1)
    mc.mcAxisSetHomeInPlace(inst, 1, 1)
    mc.mcAxisSetHomeInPlace(inst, 2, 1)
    mc.mcAxisSetHomeInPlace(inst, 5, 1)
    mc.mcCntlSetLastError(inst, "Axes Set to Home in Place")
    local XctsInch = mc.mcMotorGetCountsPerUnit(inst, 0)
    local YctsInch = mc.mcMotorGetCountsPerUnit(inst, 1)
    local ZctsInch = mc.mcMotorGetCountsPerUnit(inst, 2)
    local SctsInch = mc.mcMotorGetCountsPerUnit(inst, 5)
    sError, xPosition = mcServo.GetPosition("00", XctsInch)
    if sError ~= 0 then; rError = 1; return rError end
    sError, yPosition = mcServo.GetPosition("01", YctsInch)
    if sError ~= 0 then; rError = 1; return rError end
    sError, zPosition = mcServo.GetPosition("02", ZctsInch)
    if sError ~= 0 then; rError = 1; return rError end
    sError, sPosition = mcServo.GetPosition("05", SctsInch)
    if sError ~= 0 then; rError = 1; return rError end
    mc.mcAxisSetHomeOffset(inst, 0, (xPosition*-1)) --Need to multiply by -1 to invert the counts (because the drive polarrity on all these servos is inverted)
    mc.mcAxisSetHomeOffset(inst, 1, (yPosition*-1)) --Need to multiply by -1 to invert the counts (because the drive polarrity on all these servos is inverted)
    mc.mcAxisSetHomeOffset(inst, 2, (zPosition*-1)) --Need to multiply by -1 to invert the counts (because the drive polarrity on all these servos is inverted)
    mc.mcAxisSetHomeOffset(inst, 5, (sPosition*-1)) --Need to multiply by -1 to invert the counts (because the drive polarrity on all these servos is inverted)
    mc.mcAxisHome(inst, 0)
    mc.mcAxisHome(inst, 1)
    mc.mcAxisHome(inst, 2)
    mc.mcAxisHome(inst, 5)
    mc.mcAxisSetHomeInPlace(inst, 0, 0)
    mc.mcAxisSetHomeInPlace(inst, 1, 0)
    mc.mcAxisSetHomeInPlace(inst, 2, 0)
    mc.mcAxisSetHomeInPlace(inst, 5, 0)
    return rError
end

I'm really happy with the progress. I think I might go back and recap my to-do list.
 
OK, copied from earlier in this thread, here are my to-do items (I added a few not on the original list:

  1. Rebuild spindle - DONE
  2. Install spindle motor, belt drive, and drawbar - DONE
  3. Remove old CNC components - DONE
  4. Install axis motors and mounts - DONE
  5. Install electrical cabinet - DONE
  6. Install limit/home switches - DONE
  7. Install wireway and cable routing - DONE
  8. Install touchscreen computer - DONE
  9. Migrate to Mach 4 - DONE
  10. Validate system functionality - DONE
  11. Performance characterization - DONE
  12. Mach 4 Pendant Configuration - DONE
  13. Mach 4 LUA Scripting & Servo drive serial communications
    1. Pneumatic drawbar release - DONE
    2. MPG functions - DONE
    3. Cycle start, hold, and stop buttons - Didn't get it to work on first attempt, need to revisit
    4. Spindle Enable/Disable - Works, but I need to interlock it with the Cycle Start button, homing, etc. Maybe I will just remove?
    5. Spindle Orient - Button is on the screen but not scripted, is this needed?
    6. De-ref all when disabled - DONE
    7. Auto Enable Soft Limits - DONE
    8. Power On cycle/Start-Up Menu Script - Mostly done except for absolute homing code
    9. Stop machine for faults and alarms - DONE
    10. Drive Serial Communications - DONE
    11. Spindle Load Meter - DONE
    12. Absolute Homing - Actively in progress and should be done soon!
    13. Rigid Tapping - Mapped out on paper, low priority until everything else is done
    14. Gear Hobbing - Same code as rigid tapping.
    15. Fix Cycle Timer - Stock cycle timer code not working for some weird reason, need to investigate
 
I went on quite the adventure to get this absolute homing code working on Mach 4 but I did it!

For those of you who have absolutely no clue what I am talking about, my CNC has servos on all the axes (Allen Bradley MPL motors with Ultra 3000 servo drives). The motors have a multi-turn absolute encoder that records the position of the motor shaft AND the number of turns relative to a zero location (up to 4096 revs). I developed a serial interface between Mach 4 and the drives which allows me to query them for information. In this case, since the drive always know exactly where the motors/axes are at (even if Mach 4 doesn't), I can ask them for the exact motor position.

Using this, instead of homing each axis to a limit switch every time I turn on the machine, I can just copy that position data into Mach 4 and define home relative to that. It happens in under a second and is extremely accurate.

I won't get into the nitty gritty details of the issues I had, but trust me it wasn't very straightforward to get Mach 4 like to home to that data. It required the programmatic switching between homing in place with a variable offset while still retaining the ability to home to switches if I want to redefine the home position.

Here is the code:

Code:
function mcServo.AbsolutePositionRecovery()

    local rError = 0
    local sError = 0
    local xPosition = 0
    local yPosition = 0
    local zPosition = 0
    local sPosition = 0

    mc.mcAxisSetHomeInPlace(inst, 0, 1)
    mc.mcAxisSetHomeInPlace(inst, 1, 1)
    mc.mcAxisSetHomeInPlace(inst, 2, 1)
    mc.mcAxisSetHomeInPlace(inst, 6, 1)
    mc.mcProfileSave(inst)

    wx.wxMilliSleep(100) --Sleep 100 milliseconds

    local XctsInch = mc.mcMotorGetCountsPerUnit(inst, 0)
    local YctsInch = mc.mcMotorGetCountsPerUnit(inst, 1)
    local ZctsInch = mc.mcMotorGetCountsPerUnit(inst, 2)
    local SctsInch = mc.mcMotorGetCountsPerUnit(inst, 6)
    sError, xPosition = mcServo.GetPosition("00", XctsInch)
    if sError ~= 0 then; rError = 1; return rError end
    sError, yPosition = mcServo.GetPosition("01", YctsInch)
    if sError ~= 0 then; rError = 1; return rError end
    sError, zPosition = mcServo.GetPosition("02", ZctsInch)
    if sError ~= 0 then; rError = 1; return rError end
    sError, sPosition = mcServo.GetPosition("05", SctsInch)
    if sError ~= 0 then; rError = 1; return rError end

    mc.mcAxisSetHomeOffset(inst, 0, (xPosition*-1))
    mc.mcAxisSetHomeOffset(inst, 1, (yPosition*-1))
    mc.mcAxisSetHomeOffset(inst, 2, (zPosition*-1))
    mc.mcAxisSetHomeOffset(inst, 6, (sPosition*-1))

    mc.mcAxisHomeAll(inst)

    wx.wxMilliSleep(100) --Sleep 100 milliseconds

    mc.mcAxisSetHomeOffset(inst, 0, 0)
    mc.mcAxisSetHomeOffset(inst, 1, 0)
    mc.mcAxisSetHomeOffset(inst, 2, 0)
    mc.mcAxisSetHomeOffset(inst, 6, 0)

    mc.mcAxisSetHomeInPlace(inst, 0, 0)
    mc.mcAxisSetHomeInPlace(inst, 1, 0)
    mc.mcAxisSetHomeInPlace(inst, 2, 0)
    mc.mcAxisSetHomeInPlace(inst, 6, 1) --Leave Spindle as Home in Place
    mc.mcProfileSave(inst)

    wx.wxMilliSleep(100) --Sleep 100 milliseconds

    return rError
    
end

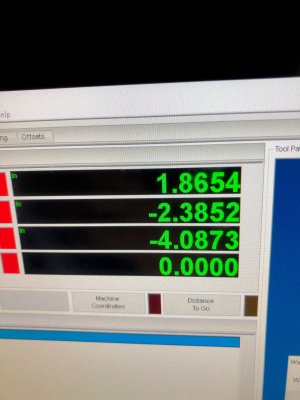
All of this to get the right numbers into these DROs (without using work offsets) and to set the red LEDs on the left to green.

1.jpg

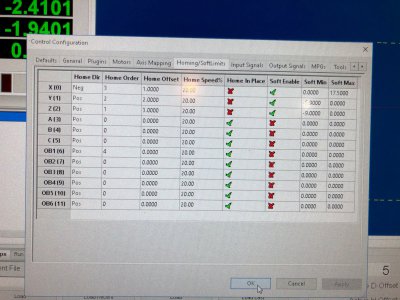
The script manipulates the check marks in the "Home in Place" column.

2.jpg

With this, I should be able to quickly finish up the Start-up script without issue.
 
Very nice, thank you for sharing your code. Even though I'm using Linux CNC understand the concepts is a great help and who knows, I may switch to Mach in the future. I'm just about to the point in my project where I can turn my attention to the software side of things....

Cheers,

John
 
I have a feeling that lots of posts about programming might not be the most exciting thing on a machining forum, so I thought I would go back and make a few posts about some of the work that wen into this machine before I started recording it on this forum. I'll keep posting about the code for those who are interested, but right now I'm mostly doing boring changes to the error handling .

This rebuild started when I got my hands on some old servo equipment from work. I lived in an apartment and was really missing doing project like I did in college. Unfortunately since I was new to the area, I didn't know anyone who was involved in these hobbies or any machine shops nearby.

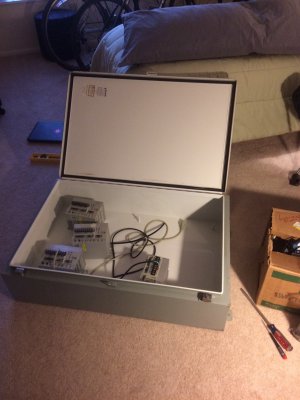
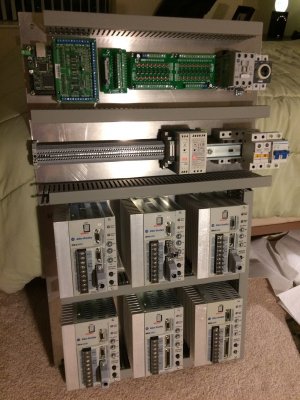
I figured that building an electrical panel was doable in an apartment setting (I kept it under the guest bed) and I got to work.

I scored a 24x36x8" enclosure off of eBay figuring it was twice the size I could ever need (ha).

1.jpg

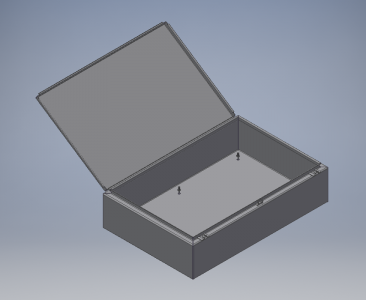
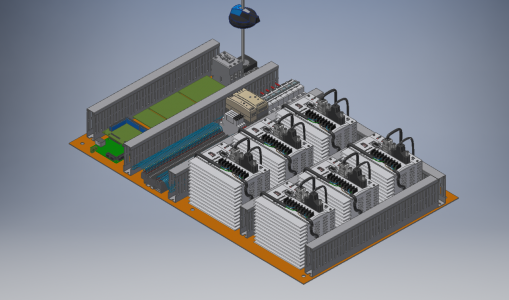
I decided to do some extra planning by modeling the enclosure and components in CAD. I use Autodesk Inventor.

3.png

I think that opting to model the panel really saved me as I was able to figure out wire spacing and routing ahead of time.

2.png

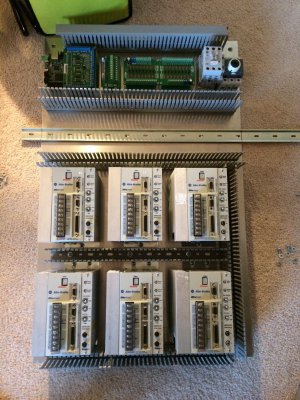
I used a 1/8" aluminum sheet as a subpanel and began laying out the components. I picked up a cheap rivet nut gun to put threaded holes into the panel. This was super handy to be able to screw all the components in from the front, rather than my old panel which had nuts on the back.

6.jpg

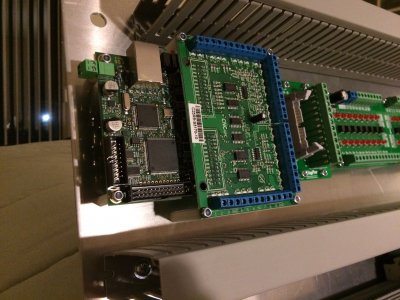
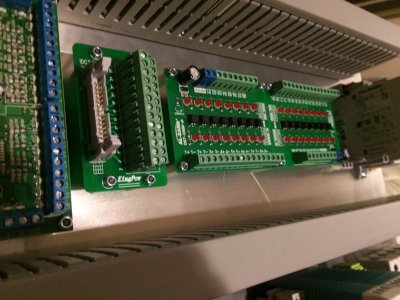
I stuck with simple breakout boards for the Ethernet Smooth Stepper this time since I felt that the fancy breakout boards can be more of a hindrance sometimes. The circuit boards with the red LEDs are voltage translators for converting back and forth between 24V and 5V. Most of the automation gear was either junk from work, AutomationDirect, or import stuff from eBay. The panel is wired to support either 120V or 240V at 60A, but it is only currently hooked up to a 240V 35A feed.

7.jpg

Ethernet Smoothstepper from Warp9TD and a C25 breakout board from CNC4PC.

8.jpg

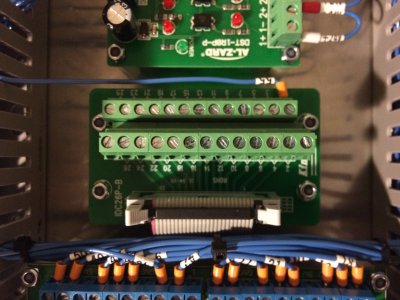
A generic IDC-26 breakout board. The ESS doesn't follow "normal" pinout for the IDC-26 connectors so the screen printed labels do not match.

19.jpg

The voltage converter boards are easily found on eBay or Amazon.

9.jpg

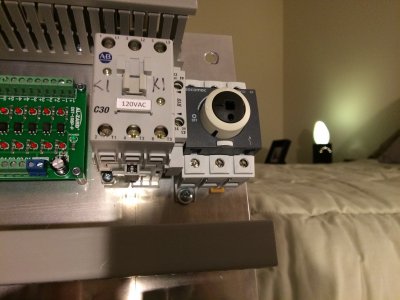
The main disconnect is a Socomec from AutomationDirect and lets me mount a remote operator on the front of the door. The AB C30 contactor powers up the servo drives separately from the logic components. The "B10" contact on the side is part of a "System OK" input into Mach 4 along with the power supply status.

10.jpg
 
Back
Top