Comparing Gage Block Sets

A Starrett 50 mm standard is the same. I’m not posting any pictures unless I found the measurements to be repeatable.

3CD83BBC-5F49-4F3A-AA72-FD44B7AADFC6.jpeg
 
Last edited:
Here is a 100mm Shars gage block in a Starrett 100-125 mm outside mic:

4BC6DF3B-CB4F-4A0B-B348-F01EF8003523.jpeg
 
Last edited:
The Moore & Wright standard measures 99.99 mm (.01 mm is about .0004”).

1B707C5D-7E9B-4322-9A7E-3825C335BED7.jpeg
 
After all of this, the mic measures the Shars 100 mm gage block to be 100.00 mm.

41C3FAC4-DE86-4980-A9F1-C9282CFA26E3.jpeg
 
The factory says that the 100 mm gage block is a little short (-.10 but I don’t know the units). Does anybody know what the units are for these deviation values? It would be a really tight tolerance if these were microns (1 micron = .000001 m = .001 mm).

D240DF74-C8C4-467F-90C4-DD56A8882BB6.jpeg

Edit: the deviation values are given in microns.
 
Last edited:
I do wonder what it would cost to have the gage blocks calibrated by a NIST traceable lab. It would need to be a fraction of the price of a new set, otherwise nobody would ever calibrate and only buy new. Most shops calibrate all tools yearly.

I might have our guy at work get a quote for a few shop tools I have.
 
@erikmannie What I see is what I'd expect. Measuring using the standard isn't going to give you premium results but it is what you have. for the 1" where the set shows it +11, that is +11 ten thousandths or +1 tenth. That is what I'm reading on your mic.

It is better to calibrate them on a AA grade surface plate using a half-tenths indicator, comparing it to a master gauge block set. I am suspicious of your 4" results, and would recommend checking both your standard and your mic against an outside standard, such as a B grade Mitutoyo gauge block, or better. I was lucky over the years to have access to lab quality surface plate and blocks. This is no longer the case.

It probably is the case that the Shars calibration is lying, but it would be prudent to check first. Cheap mic standards are notoriously fickle.
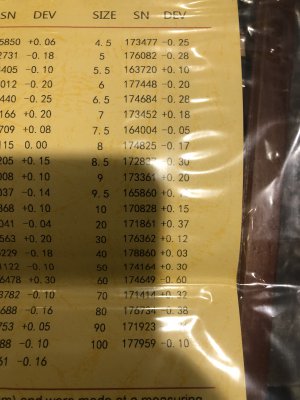
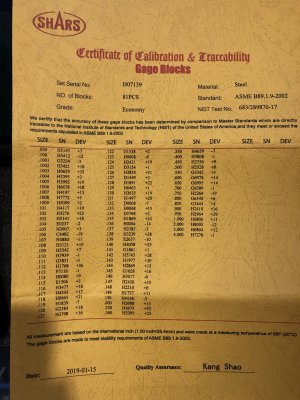
Can you clarify “+11 ten thousands or +1 tenth”? I wonder if you mean “+11 hundred thousandths” (.00011”).

I had thought that these deviation values were in millionths of an inch. E.g., they say that the 1” gage block is actually 1.000011”.

3904FEE2-A38D-4EE9-9DFE-E6894849210F.jpeg
 
Last edited:
I haven't read the calibration standard document in more than 20 years, however I'm sure the "DEV" (deviation) value for an inch gage block is millionths (0.00000X) of an inch.
 
I do wonder what it would cost to have the gage blocks calibrated by a NIST traceable lab. It would need to be a fraction of the price of a new set, otherwise nobody would ever calibrate and only buy new. Most shops calibrate all tools yearly.

I might have our guy at work get a quote for a few shop tools I have.

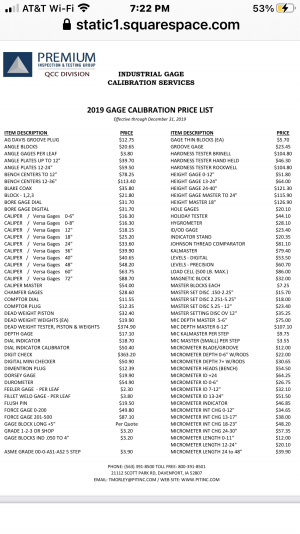
This price list says $3.20 to $5.70 for each gage block:

D4681F98-5893-4F27-9147-F1D307CC98AA.png
 
Back
Top