[CNC] CNC from sketch to part the way I do it

In this video I talk about some of what I have learned about working with oval, eclipse, concave and convex shapes and how to draw them.
I also explain about converting splines to arcs in dxf files so d2nc will recognize them.
thanks for viewing
steve

[video=youtube;B7_xr8Z9Q8k]http://www.youtube.com/watch?v=B7_xr8Z9Q8k[/video]

Steve, here is a simple way to draw an ellipse, either using a compass or with CAD. This is from an old friend who got this from an even older friend. he claimed that this was how the barrel makers of old made their designs. No math is necessary.

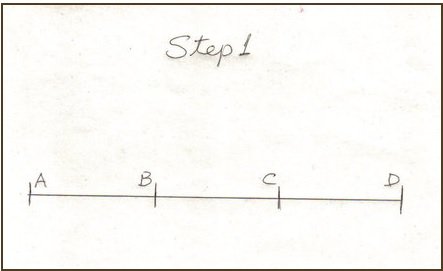
Step 1

Draw a line that represents the length of the oval and divide it into 3 equal parts defined by points A, B. C and D.
1.jpg

Step 2
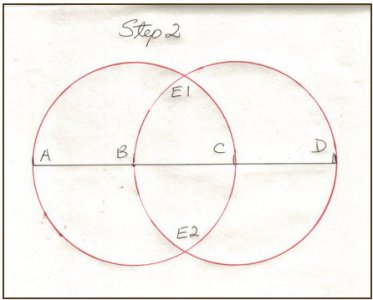
using a radius as long as one third of the line, say A to B , draw 2 circles using B and C as centers. These 2 circles will cross each other at 2 points E1 and E2.
2.jpg

Step 3
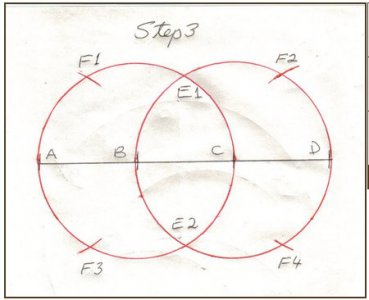
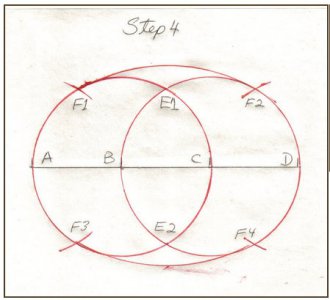
Create new points on each circle of same radius as above, and by using A and D as centers. Name them as F1, F2, F3 and F4.
[FONT=&amp]3.jpg

[/FONT] Step 4
Using the distance between F1 and E2 as a radius, and E2 as the center, draw a circular arc from F1 to F2. Repeat this step and draw the arc from F3 to F4 by using E1 as center.
4.jpg

good luck

1.jpg 2.jpg 3.jpg 4.jpg
 
Steve, here is a simple way to draw an ellipse, either using a compass or with CAD. This is from an old friend who got this from an even older friend. he claimed that this was how the barrel makers of old made their designs. No math is necessary.

Step 1

Draw a line that represents the length of the oval and divide it into 3 equal parts defined by points A, B. C and D.

View attachment 67669

Step 2
using a radius as long as one third of the line, say A to B , draw 2 circles using B and C as centers. These 2 circles will cross each other at 2 points E1 and E2.
View attachment 67670

Step 3
Create new points on each circle of same radius as above, and by using A and D as centers. Name them as F1, F2, F3 and F4.
[FONT=&amp]View attachment 67671

[/FONT] Step 4
Using the distance between F1 and E2 as a radius, and E2 as the center, draw a circular arc from F1 to F2. Repeat this step and draw the arc from F3 to F4 by using E1 as center.

View attachment 67672

good luck

This is a clever way to draw an oval but it is not an ellipse. An ellipse is a conic section. Here is how to draw one: http://en.wikipedia.org/wiki/Ellipse#Drawing_ellipses
 
that's pretty interesting, I wish I would have known that years ago making oval picture frames. I was pulling my hair out trying to get it right.
but I don't think the math for that method would make one that fits 6 x 9 or 4 x 7 , I agree it makes an oval shape but not to dimension.
I could be using the wrong math jargin I may be calling an eclipse an oval.
I wonder if a true oval is proportional, if the height = "A" then the width has to = "B" ?
I was in the smoking area at school during math :nuts:
but thanks i'll remember that
steve
 
Last edited:
that's pretty interesting, I wish I would have known that years ago making oval picture frames. I was pulling my hair out trying to get it right.
but I don't think the math for that method would make one that fits 6 x 9 or 4 x 7 , I agree it makes an oval shape but not to dimension.
I could be using the wrong math jargin I may be calling an eclipse an oval.
I wonder if a true oval is proportional, if the height = "A" then the width has to = "B" ?
I was in the smoking area at school during math :nuts:
but thanks i'll remember that
steve

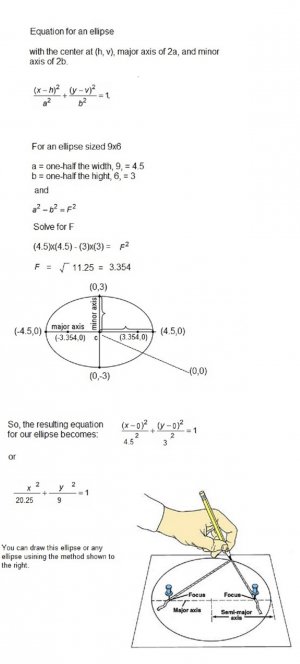
Steve, Mr. Hasler is correct. What I offered is not a classical conic section. However, it does result in a pleasant shape. I'm not sure the 6x9 or 4x7 sizes are true ellipses either. Also the term, "oval" is not specific, that is, it does not define a specific mathematical shape, but actual is a general term used to define a "squashed" circle. But an ellipse is very special.In fact a Circle is an Ellipse, where both foci are at the same point (the center).
In other words, a circle is a "special case" of an ellipse.

here's a little example for an ellipse that is 9 inches wide and 6 inches high.


ellipse3.jpg

ellipse3.jpg
 
The pic showing the string trick for drawing an oval works pretty slick, I got 2 thumb tacks and tried it.
In this video I show a little of what I have learned working with text in Emachineshop. At the end I get tongue tied and have a problem figuring out what was going wrong. I figured it out when i watched the video and the alignment problem I started having was caused by the characters moving to the left instead of staying centered when I re-sized them. so it is better to determine the correct size and then place them instead of trying to edit each one after. I was too close to the problem to see it but I leave my mistakes in the videos if they still make sense.
thanks for viewing
Steve


[video=youtube;LOBejshnoAY]
 
Last edited:
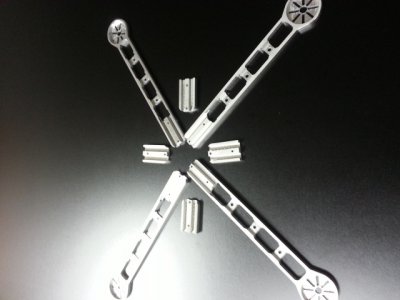
This is a part that steves videos have helped me out and I hope others have benefited from the time and effort to produce them. A huge thanks!! and this is what watching them has helped me make. Quadcopter arms with support brackets
Quad.jpg

Quad.jpg
 
Hey Steve,
Ready for another request or do you need a break ???
I've been trying to draw something on eMachineshop with limited success.
Basically, it's a ring (donut shaped kind of) with holes going from the outside edge into the middle through hole.
I can get the holes every 90 degrees, but was wanting to place them every 30 degrees.
Dimensions don't really matter at this point I can drw it myself if I can only figure out how to get the holes spaced.

Hi!

This is one way of solving this problem:

  1. Draw the circle where you want the center of the smaler circles to be placed.
  2. Draw a line from the center and out in any direction
  3. Change the angle of the line by selecting it and change the angle (The box for specifing the angle is on the top left corner of the screen). Change the angle to 0, 30, 60 90... degrees.
  4. Repeat from 2 untill you have all the lines you want.
  5. Draw one circle and change the dimention to what you want it to be.
  6. Copy this circle as many times you need and place the copies with their center in the crossing between the helplines and the original circle.
  7. Trim as needed.


Thanks Steve for helping me find eMachineShop. It's fast and simple to use. I'm still many hours behind on all the videos here. They are of great help for a novice in the CNC world!


Cheers
Bernie
 
jpigg
I can't picture what your wanting to draw, can you do a hand drawing, scan it and post the pic.
I haven't become bored I have just run out of ideas for videos.
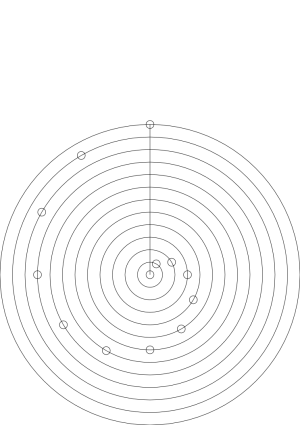
if your wanting to divide a circle into lines at 30 degrees, highlight the circle then go to line divide and enter 12. that will give you an intersect point on the circle every 30 degrees from it's center.
steve

spiral.png
 
Sir Steve,

I have watched all your instructional videos in this thread from the start, some of them more than once. I am very much impressed by your miniature steam engine and crushing mill. That work is absolutely beautiful. Bravo.


I must say, you are so very kind to help those less schooled in CNC milling. Sharing your experience had helped many people. It has helped people that already have equipment, and those contemplating making the plunge into CNC. Your willingness to share your mistakes as well as successes, helps those of us that would otherwise be stuck when we made a mistake. You are absolutely right, tutorials for software or machines always show everything going perfectly. Which is nice for marketing, but leaves a lot unanswered for the user.

For me, these videos and the lessons therein have changed my hobby machinist future completely. These videos have demystified the whole CNC premise for me, and calmed my fears that even simple jobs could take weeks. I have learned from the videos, that one can draw and cut a simple part the same afternoon just as with a hand crank mill. These videos have convinced me that I will indeed buy a CNC mill for my garage, instead of a hand crank mill with which I am so familiar. You have made a significant influence on my future projects.


Thank you Sir!


Back
Top