2021 POTD Thread Archive

Few months back my brother got this blue 206 to legalise the orange one. Then i had freshly hurt my back so i only helped him to strip the trim and replace the passenger sill panel. Since then its been to the body shop they finished the body work, painted it and left it outside with the windows down for half a month, now the interior is trash. So i started with that, removed the big LPG tank in the boot, supports carpeting. Then i started on the back bumper, tail lights, door trim, handles, locks, mirrors, hood trim this took few hours. From here it needs to come apart more so i can rebuild it. I'll be pulling and replacing the interior, also installing the HVHC from the orange 206 with A/C with the entire wiring loom and the BCM. Then i'll be dropping the engine subframe entire drivetrain for it so i can put this body over the drivetrain from the orange one after it gets fully serviced.
IMG_20210523_215235.jpgIMG_20210516_184243.jpgIMG_20210516_184655.jpgIMG_20210516_184754.jpgIMG_20210519_154634.jpgIMG_20210516_184713.jpgIMG_20210719_200704.jpgIMG_20210719_200654.jpgIMG_20210719_200644.jpg
 
Great body shop you're working with :(
Yeah, due to the price less work they do cheaper it is, this time they charge my brother only their cost. 250 Euros for a full body respray with lots of bodywork, i'm sure the paint along was more than half the price. Prices for a outside respray here are from 500 e to 1500 euro. I'm disappointed about the interior, but i have a good one that i'm planning to instal from the orange 206.
 
Last edited:
Today i got an early start in the big garage, started with taking apart the interior, smaller parts took the youngest, but biggest difference made removing the seats and dashboard, also removed the heater box. Then i jack it up and place it on jack stands, removed the front wings, hood, brakes, axles, hubs, subframe, then the engine and gearbox and many other things like radiator, hoses and other things. I have to say, its a lot of work but it's much easier to work on, everything is light. All the bolts are plated and come off easy, the french know what they wore doing. Next i need to do a bit more cleaning in the interior swap the heater box, swap the wiring loom, transfer the A/C lines then service the engine and drop the body shell over the new engine.
IMG_20210731_165839.jpgIMG_20210731_165900.jpgIMG_20210731_165912_1.jpgIMG_20210731_165939.jpgIMG_20210731_165953.jpg
 
That's not a statement you hear very often about French engineering and design:)
Yeah, french design. It only requires dropping the entire drivetrain and suspension to make it easier to service the engine. I've done it so many times now that i know the bolt sizes without looking, i'm used to much harder, where everything is rusted and parts them self can hurt you with their weight.
IMG_20210713_124811.jpg
 
Improving LMS's sine vise
Several years ago I bought the #1756 sine vise from Little Machine Shop.
I don't use it too often, but every time I do, I wonder why it has nothing to facilitate securing it to my mini-mill table. I searched through our Hobby Machinist forum postings to see if anyone has tried any improvements. An old thread shows this is a common complaint, but no mention of any corrective action.

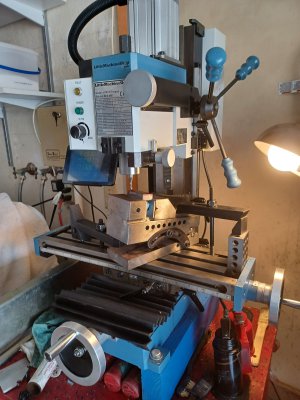
Two weeks ago, I was making a simple sharpening jig, my first photo shows the awkward, precarious setup. So I decided to remedy this problem by attempting to drill a few holes through the vise's hardened-steel base plate. I had read that a carbide masonry bit would handle hardened-steel, so I got a new 3/8" carbide bit, and before starting, I touched up its cutting edge with my Drill Doctor and a diamond hone.

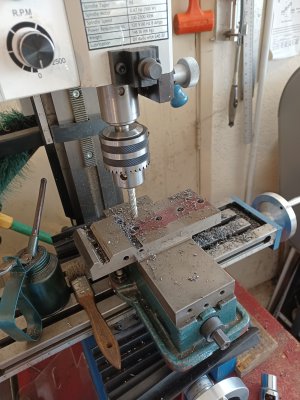
I was pleasantly surprised how well it did work... at first I took it slow and easy, but by the time I got to the last two holes, I was pulling hard on the Z-axis handles, one hand on each of two handles, almost hanging from them. My mill is now the LMS 4190 Deluxe HighTorque Mini Mill and it proved to me that it really deserves that HighTorque label! (Especially as compared to my prior mini mill, the standard HF model.)

My second photo shows the holes in progress,
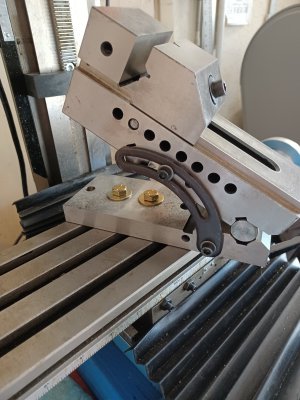
The third shows the end result. The holes are spaced to match the mill's slot spacing. Since the T-nuts take a 5/16" threaded rod, the 3/8" hole allows a fair degree of skew in the X-Y plane, as seen in final photo.

Has anyone else made other mods to this model vise? I had considered making slots, similar to many milling vises, or perhaps drilling holes in the sides to take some sort of custom hold-down stud.

Greg
 

Attachments

  • 20210718_145217.jpg
    20210718_145217.jpg
    1.4 MB · Views: 55
  • sine vise drilling.jpg
    sine vise drilling.jpg
    1.5 MB · Views: 48
  • sine vise 1.jpg
    sine vise 1.jpg
    1.2 MB · Views: 58
Back
Top