2021 POTD Thread Archive

doing all the work in my first bay made me realized i needed new lights there. So after i was done with cars i attached new LED lights in a X configuration. But i'm not sure if that was smart, because i realized how dirty and messy my garage is

That made me laugh out loud!
Thanks!
-brino
 
last weekend i bought a Huot drill index for 6$ with drills in it. Alot were chipped. The box was also rusty and in sad shape. I sanded the box down. Painted the inside with a rust paint that turns rust into good paintable surface. I then coasted the outside and the inside with grey primer. Finished it up with some gloss grey. I then sharpened all the drills. Just missing 2 drills now for a complete extra set of drills.
38814FC6-8A34-4EED-8C9E-5AC6801CD7C7.jpeg75EAC45E-42BF-4F86-8B4D-C535370785B6.jpegD10EBB68-B0B9-4E42-94BF-88E4FB138EFA.jpeg2A10C3A2-0255-4F67-B0CF-22AB05F408F8.jpeg77A6BB6B-FF47-49CA-A38F-4360C22C99CB.jpeg
 
Yesterday was an interesting drive to work. On my drive i felt my car being very slow also i felt a vibration in the steering wheel but i was on a very bad road and thought it's from all the potholes, also noticed my engine temp is right at 90 C is usually lower. Just i was arriving i stopped by shop 1 mile from my work, just i walk out i smell the brakes. The drivers front brake disk was glowing red, the 25 years old caliper decided to get stuck. I waited to for the brakes to cool down a bit and with lots of throttle drove it to work. Just as i was making my morning tea a work college called his VW beetle stopped at the same store 1 mile down the road and won't start, i had 15 min till my classes start, so went down the road to help, then i felt the brakes on my car wore almost gone but still stops. The beetle had a dead alternator we jump started it quickly to get back to work and after work we again connected them together for an hour with my engine running to charge up his battery so he can drive home. On my way home i stop by parts store bought me some new caliper seals and brake fluid but i have to wait on discs and pads, so i removed, hone the bore and refurbished the brake caliper. Driving down the mountain with not much brakes was a bit fun but with the manual gearbox and diesel engine i was able to keep it under control, the college with the VW had a hard time keeping up but every uphill i waited for him. He also made it, funny enough his repair bill is exiting my manly because i'm doing my own repairs.
IMG_20210504_121044_2.jpgIMG_20210507_182142.jpgIMG_20210507_184029.jpgIMG_20210507_184632_1.jpgIMG_20210507_184654_1.jpg
 
Yesterday was an interesting drive to work. On my drive i felt my car being very slow also i felt a vibration in the steering wheel but i was on a very bad road and thought it's from all the potholes, also noticed my engine temp is right at 90 C is usually lower. Just i was arriving i stopped by shop 1 mile from my work, just i walk out i smell the brakes. The drivers front brake disk was glowing red, the 25 years old caliper decided to get stuck. I waited to for the brakes to cool down a bit and with lots of throttle drove it to work. Just as i was making my morning tea a work college called his VW beetle stopped at the same store 1 mile down the road and won't start, i had 15 min till my classes start, so went down the road to help, then i felt the brakes on my car wore almost gone but still stops. The beetle had a dead alternator we jump started it quickly to get back to work and after work we again connected them together for an hour with my engine running to charge up his battery so he can drive home. On my way home i stop by parts store bought me some new caliper seals and brake fluid but i have to wait on discs and pads, so i removed, hone the bore and refurbished the brake caliper. Driving down the mountain with not much brakes was a bit fun but with the manual gearbox and diesel engine i was able to keep it under control, the college with the VW had a hard time keeping up but every uphill i waited for him. He also made it, funny enough his repair bill is exiting my manly because i'm doing my own repairs.
View attachment 365260View attachment 365261View attachment 365262View attachment 365263View attachment 365264
What a day!
 
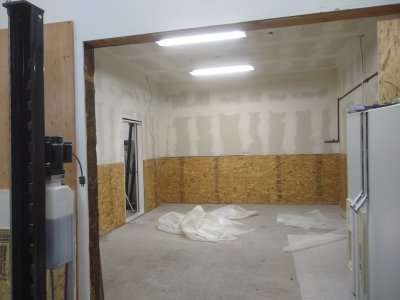
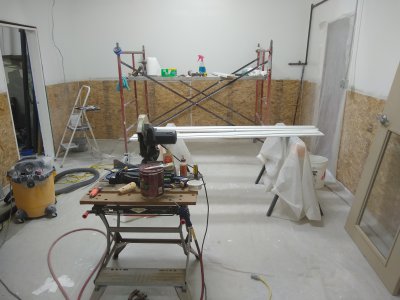
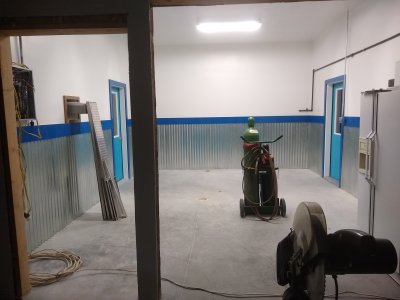
Got the welding and fab portion of my shop mostly done. Should be moving all my welding equipment in this week, as I have metal work coming up on the staircase, jib cranes, and overhead storage areas. Got tired of paying $430 for $200 doors, so checked with a few friends and came up with one that would fill the bill. It needed a little repair and sanding. Combined that with an old door jam I had laying around that also reqired some work, and resizing. It's the one on the left in the last pic. Looks as good as the new one on the other side, and aside from new weather stripping, zero cost. Mike


IMG_20210318_112206506.jpg


IMG_20210401_143002027.jpg

IMG_20210503_124901644.jpg
 
I recently replaced my 12" Craftsman wood-cutting band saw with a 1948-model DoAll ML 16" saw. I love being able to change speeds quickly between metal and wood. I was replacing the threshold on a garage door at my parents house and needed to cut a 36" aluminum extrusion down to 32". Had to do some notching also (alas, no photos of that project). Not that it was super critical, but I wanted to cut the end of the extrusion square. My DoAll saw table doesn't have a miter gauge slot though DoAll offers this accessory:

Capture.JPG

The standard miter gauge bolts to the edge of the table. It looks to be a steel rod with end brackets. The miter gauge appears to have linear bearings for riding on the steel rod. It also looks like the miter assembly can swing around 270 deg. off the table when not in use. It'd be nice to have, but probably costs more than my entire saw.

Instead, I figured on extending the table with a piece of 3/4" x 3/4" and 1/2" x 1 1/2" CRS to give the saw a standard miter gauge slot. My plan was to bolt the 3/4" square piece ~0.390" below the top edge of the 1/2" thick piece. Then bolt the whole assembly to the 4 tapped holes in the saw table. That'd give the saw a standard slot for using the table saw's miter gauge.

I was too lazy to pull the vise off my Bridgeport and go directly to the table. I used an 18" long gauge block to verify the tram of my vise. I guess an alternative, since the holes were grouped together on the ends, would have been to just touch off in Y at the center of the hole clusters.
20210509_155520.jpg

I supported the ends of the 2' pieces of steel with a machinist jack. Then center/spot drilled and drilled clearance holes. The DoAll table has 3/8"-16 tapped holes, naturally used a 3/8" drill for the clearance holes. I used 5/16"-18 cap screws to bolt the 3/4" square bar to the 1/2" X 1 1/2" bar. Probably not the smartest move on my part (lack of experience/confidence maybe. . .), but the three 5/16"-18 holes were power-tapped on the BP. Always makes me nervous though I think (hope) the tap would slip in the chuck before breaking.
20210509_161742.jpg
20210509_162031.jpg
20210509_164145.jpg
20210509_165706.jpg


Easy peasy after the BP work was done. Ran the 5/16-18's with a dab of Loctite to secure the 3/4" square piece to the 1/2" bar stock. Then four 3/8" cap screws to tie the assembly to the table.

Father's day is just around the bend so I anticipate getting (if my wife and kids check my Amazon wish list) a Kreg or similar miter gauge. There are a few out there with aluminum 80/20-type extrusions with sliding stops, etc. that should work well.

Thanks for looking, Bruce


Bolted steel bars in place. Gives the DoAll a 3/4" x 0.390" deep miter gauge groove for a standard table saw miter gauge.
20210510_192702.jpg

20210510_192725.jpg
20210510_192745.jpg
 
Well this is pretty low-precision stuff today but it works nevertheless. I’ve been disappointed lately with the offerings for decent ways to hang garden tools. I didn’t want to spend an arm and a leg and I wanted simple — no moving parts and one-handed operation. So I came up with this.

Scrap 2” ABS pipe that I cut into 3-1/2” lengths. No science here, it just looked right. Then I sectioned out one quarter of the round, a random 2-flute cutter zipping through like cheese. The cut wanted to close up as it neared the end but I jammed a small wedge in to keep it open and finish off

9C9E34F5-73BB-4335-A67A-F971CB53DF0F.jpeg6C065C1E-D5C4-4BE5-BE8A-7AD588E83998.jpeg

After a little deburring I sliced one end off at maybe a 10 degree angle or so and popped a couple screw holes through the back, countersunk of course. And ta-dah! No fussing, no ratting around, just hang the tool and walk away.

299BD474-5D13-4F82-96C0-8540CC94CDC5.jpeg

Thanks for looking.

-frank
 
I got to play with some brass today. I very seldomly cut any brass but wow it was so great to machine. Way nicer than even aluminum.

Started on the bandsaw
2d7042850a59a2cc9d0aa0d66c61e674.jpg
1cceb3cffeecb601673a63e20190a8b8.jpg


The large chucks of aluminum are tomorrow’s projects.


Then we moved over to the lathe and started setting my tools up. I had to add about 7 tools to the machine and that took me a few hours to assemble and find all the correct collets.
Here is a look into the tool belt
8a88c0f9865bde30af4d0a64e59e5532.jpg


Here is the tool eye measuring a tool
735e2f0bbf5e7a65b62884ea48cc6193.jpg


A look into the tool offset table. The machine reads to .00001” and that’s not any extra zeros
9f87ea5f204b88beb7e0cdcd48b4a6d0.jpg


Then a bit of programming which was pretty easy for this part and out popped this.
f4ff61dc1d3fde4861026515c61e600b.jpg


Od is within .0002” and so is the bore on the id.

Those are m3 tapped holes in the top .5” deep.

That’s just the first operation I need to finish the other side tomorrow.


Quick note for you guys holding very tight tolerances out there.
I finished the od to within .0001” before I cut the bore. After cutting the bore the area around the bore on the od actually expanded by about .0008” that’s almost .001” and on this part that would trash it as it’s a quill and needs to fit it’s housing perfectly.

Luckily I just took another finish pass and that got it down to size
 
Back
Top