2021 POTD Thread Archive

The project that i started yesterday i finished today and immediately put it to use, i mounted the wheels, deflated them marked and removed the wheel weights, the rims wore prepared for paint when i wash them. You can see the good access i have from the back side also. Wrapping the tires was a big task but i got some help from a friend who couldn't keep up just handing me staff from few feet away. After i wrapped all of the wheels i painted them one by one while spinning them, i painted them in the factory primer grey color but with much better quality paint and thicker, the factory paint is so thin and easy to take off i've got down to clean steel with a rag and some paint thinner, trying to take off some letters written by a marker.
IMG_20210222_195841_1.jpgIMG_20210222_195851.jpgIMG_20210223_191548_1.jpgIMG_20210223_191554_2.jpgIMG_20210223_194822.jpg
 
I give you credit. You’re not only into your vehicles... but you do nice work. It’s apparent that you don’t like cutting corners and take pride in your vehicles and workmanship.
 
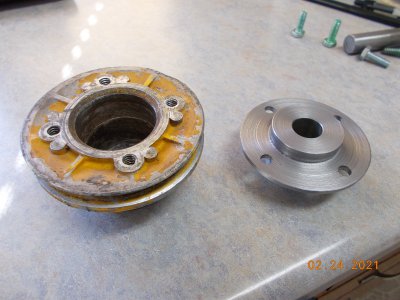
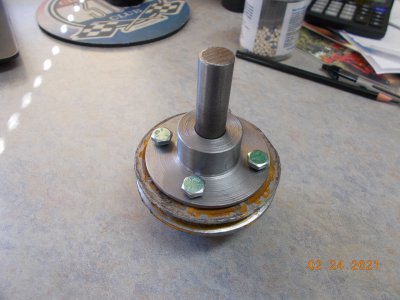
Turned and drilled a driveshaft coupling for an early Cub Cadet Hydro.
Used a chunk of 3" round stock. A 6" piece should yield enough mat'l for 4 of them I hope.
Still need to mill a slot near the bottom of the deep end near the flange to receive the pin that goes through the end of the shaft as soon as I figure out how to hold it in the mill.

I think I am getting the hang of this lathe!
The HSS bits I have ground so far (thanks Mikey!) are working out well and I'm getting nice finish surfaces.
 

Attachments

  • DSCN8300.JPG
    DSCN8300.JPG
    1.8 MB · Views: 18
  • DSCN8301.JPG
    DSCN8301.JPG
    1.9 MB · Views: 18
You can spend money quick buying hydraulic fittings. I know a local guy who has a homemade loader on, I think, his Farmall C. The tractor might break in half, but the loader won't. He runs his off a hydraulic PTO pump but the tractor doesn't have a live PTO. I don't remember his C having any hydraulic remotes.
 
You can spend money quick buying hydraulic fittings. I know a local guy who has a homemade loader on, I think, his Farmall C. The tractor might break in half, but the loader won't. He runs his off a hydraulic PTO pump but the tractor doesn't have a live PTO. I don't remember his C having any hydraulic remotes.
Yes, some of the old tractors don't have a 2 stage clutch, so every time you come to a stop with the clutch pushed in the pto stops too. I was lucky that my Cub has the hydraulic option. I just had to get an adapter for the junction block to power my loader. I'll include some pictures and a brief description of my setup after I get the valve installed.
 
I don't spend much seat time on any red tractors. My dad broke the mold and went with green tractors. IH was top dog for a long time but I still prefer green.
 
Wife asked me to make a 2.5” riser for her stand up desk. I had a chunk of 1” Baltic birch that already had black Formica on it. I sprayed the edges with Marsh black ink. It’s crazy how well this stuff works. Once I saw it was working well on the edges, i shot the underside with it.

The standoffs were machined out of some 1.25” 6061 I had on hand. It was a fun project machining all four the same. The heights are within “0.004 across all four parts. Counterbored the screw holes so the screws had the right amount of stick out. Cut the rubber pads out of snap back on the laser and CA glued in place.

Overall the project is super solid, looks nice and most importantly the Wife will love it!

e11d406733e07e5540df8292d4ae1ce6.jpg


b97cbc2719bca8f30bc5bf1627d15efd.jpg
 
Last edited:
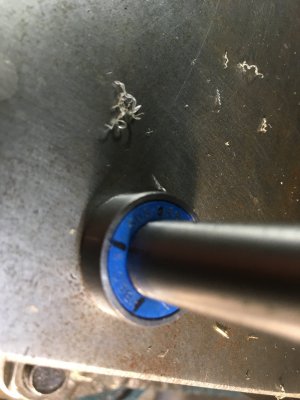
I saw a youtube video made by Stephan G who compared several styles of edgefinders. His conclusion was that the most accuracy/repeatability was with either a DTI rotated zero to 180 degrees and some math performed, or a ball bearing on a shank held in a collet where you run the bearing up until it touches, then move half the bearing diameter to find zero. The DTI stuff is just too cumbersome to set up and mess with, for me.

I have a cylindrical "kick out" type edge finder but it's always the case that it doesn't fit whatever collet is in at the time, so take out the collet, put in new collet with edgefinder, find the edge, remove collet, put original collet back in. Tedious.

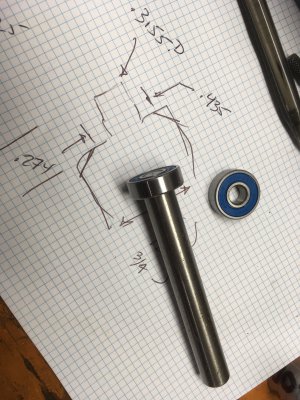
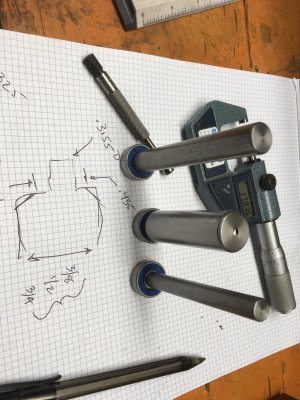
So this morning, I made three of the ball bearing style finders, with some 22mm OD, 8mm ID bearings that I had just for inventory. I made three shaft sizes, 3/8", 1/2" and 3/4", as these are the collets I tend to mostly use. I turned the end of the shafts down to a press fit on the bearing ID, used the little 1 ton arbor press and presto.

The interesting and I think terrific thing about these is that by putting some Sharpie marks on the bearing, it becomes more user friendly to old eyes than the kickout type finder, where it's always kicking out on the far side of where I am. These marks are of course invisible when approaching the edge (500-1000 RPM) and obviously easy to see when the bearing is completely stopped upon contacting the edge. But there will always be a little runout in the system, and as the bearing contacts the edge at some point in the rotation, the bearing stops and like a strobe light, you see the mark for a millisecond or such. You have to try this, it's great. I found that I could get a half thou readout difference between no contact, strobe-like appearance, and stopped, which is the resolution of my DRO. This is, for me, a sharper indicator than the kickout finder, it's easier to see and I don't have to get my head down in the works to observe. The clincher is repeatability was better than I can achieve with the kickout finder.

You have to try this. Took about an hour and a half to make all three of these and test them. I'm sure you can do this faster. I putter.

If you're working in metric, the bearings I used were 22mm, so just move 11 mm to center. Working in imperial, I just find the edge, zero the DRO, flip to mm, move 11 mm and flip back to inch. These bearings are all very very accurate of course, just a few microns variance max to min.

I give up on trying to get pictures to orient correctly. A pox on certain software developers.
 

Attachments

  • Edgefinder 1.JPG
    Edgefinder 1.JPG
    1.9 MB · Views: 36
  • Edgefinder 3.JPG
    Edgefinder 3.JPG
    1.7 MB · Views: 39
  • Edgefinder 4.JPG
    Edgefinder 4.JPG
    1.6 MB · Views: 38
Looks great Winegrower

Bearings are pressed on I take it?

Soon as I try and remove the kick out style from a collet the pointy end gets stuck inside and the spring gets stretched.:rolleyes:
 
Back
Top