2021 POTD Thread Archive

No machining tools yet, so I hope it is ok to post a non machining type project. I did make a front trailer hitch receiver for our ATV yesterday. I'm still learning to TIG weld so I welded both sides mainly for the practice. It's going to be way over kill for the intended use of pushing a 50 gal orchard sprayer into a tight spot. Anyway I thought it turned out pretty good. I'll try to get it painted and installed by the weekend, I'll post a finished project when I do.

Tim

View attachment 355847View attachment 355848

Here's the finished project.

Tim

20210220_092627_copy_1512x1512.jpg20210220_092634_copy_1512x1512.jpg
 
I don’t do well in the cold weather, so needless to say I haven’t been in the shop much .
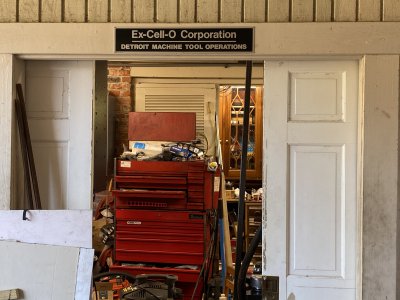
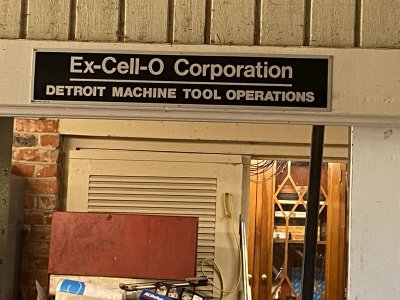
But, I did hang a little sign I picked up on EBay.
so,,,what do you think?
 

Attachments

  • 0B900BC7-5FAF-4A6C-ADB8-82343CB13B59.jpeg
    0B900BC7-5FAF-4A6C-ADB8-82343CB13B59.jpeg
    2.6 MB · Views: 30
  • 3348D862-9828-4933-9276-0ADBD5490504.jpeg
    3348D862-9828-4933-9276-0ADBD5490504.jpeg
    655.2 KB · Views: 30
I decided to make a 6JT taper to a B&S 7 for my mill. I'm much happier with the better chuck. Runout is 0.003, not perfect but good enough. I had to guess on the 6JT taper because my taper attachment doesn't have a scale that reads to the perfect measurement. I went with a Jacobs no 34 because I had it laying around and it looks like it has seldom been used. The dots on the end are from me so I could keep track of the jaws when I dissembled, cleaned and lubed it today.
Just thought I’d throw this out there for you. I’m no expert on tapers. And I do have a taper attachment on my SB. But looking at that scale on the taper is absolutely useless in my opinion.
But, a taper attachment isn’t even needed. And even when using my SB attachment, I don’t pay attention to the scale.
I made an L00 taper for a collet nut on my Clausing and since it’s a short taper... I just used my compound on the cross-slide. All that was needed was to set a 1/2 thousandth dial indicator and run against a known good taper. In this instance, the spindle itself. Once you’re reading zero and can move the compound back and forth without your indicator moving.... Bobs your uncle.

Mr Pete has three different methods of making tapers. It’s really easy guys. Nothing complicated at all.

####
by the way.... I’m sure most of you already knew this. The only reason I am posting it is tapers kind of scared me early on. But, they really are kind of simple. And FWIW, I don’t know if I’ll ever even have a use for the taper attachment. I honestly like the compound method. I guess if I had to make a few of them then the taper attachment would be great. But when is that going to happen ? Probably never.


and the compound rest method....which is just easy.
 
Last edited:
It would have been easier to use the compound for the 6JT taper but I needed the taper attachment for the B&S 7 taper. The taper is longer than my compound.
 
It would have been easier to use the compound for the 6JT taper but I needed the taper attachment for the B&S 7 taper. The taper is longer than my compound.
When that happens what you can do is back off on your compound and move your carriage and cross slide up and just barely touch the part off again and you can continue on the compound.
 
It would have been easier to use the compound for the 6JT taper but I needed the taper attachment for the B&S 7 taper. The taper is longer than my compound.
I get that. I guess the only reason I commented is that on my South Bend... that silly little scale for the taper attachment is just useless. Even when I use the SB taper...I ignore the scale and use a dial indicator.
 
I get that. I guess the only reason I commented is that on my South Bend... that silly little scale for the taper attachment is just useless. Even when I use the SB taper...I ignore the scale and use a dial indicator.
I had to keep adjusting the taper until I could get close enough. I would have needed to keep adjusting the compound as well since the angle was around 1.48 degrees.

The 6JT was the side nearest the headstock so I couldn't test fit it. After I cut the piece out, I tried it and it was a good fit. Checked the runout on the mill, removed arbor and added Loctite 680. Knocked the arbor back in and rechecked the runout. It read the same and I called it a day.

The Jacobs replaced the Craftsman. Craftsman only went up to 3/8 but I didn't like the runout.
 
My customer (my Auntie) is coming to pick this up now. I’ve been working on this for a long time. It cost the customer $1,200. This used to be a bed, and the material is 110 years old.

She is going to get it powder coated, and you will note that it has a fair amount of High Heat JB Weld on 2 columns that I had to bend back to being straight; I failed to clamp that part when I was welding on the arms. Absolute nightmare of a project. The material was extremely rusty. It started out covered in lead paint.

C2BE9AC1-0526-46FB-9766-C1C0427CB02F.jpeg

9EAEA12B-63F0-46C1-B1B5-A0BA1E533DC2.jpeg

DC273D7C-31AB-4599-B944-C2736F9AFCFD.jpeg
 
Last edited:
My customer (my Auntie) is coming to pick this up now. I’ve been working on this for a long time. It cost the customer $1,200. This used to be a bed, and the material is 110 years old.

She is going to get it powder coated, and you will note that it has a fair amount of High Heat JB Weld on 2 columns that I had to bend back to being straight; I failed to clamp that part when I was welding on the arms. Absolute nightmare of a project. The material was extremely rusty. It started out covered in lead paint.

View attachment 356407

View attachment 356408
Very nice. Would love to see pix after it's powder coated.

Regards

P.S.: How do you like your Sky Hook? Do you use it much?
 
Back
Top