-
Welcome back Guest! Did you know you can mentor other members here at H-M? If not, please check out our Relaunch of Hobby Machinist Mentoring Program!
- Forums
- THE PROJECTS AREA
- PROJECT OF THE DAY --- WHAT DID YOU DO IN YOUR SHOP TODAY?
- Project of the Day Mega-Thread Archives
You are using an out of date browser. It may not display this or other websites correctly.
You should upgrade or use an alternative browser.
You should upgrade or use an alternative browser.
2020 POTD Thread Archive
- Thread starter eugene13
- Start date
- Joined
- Sep 5, 2013
- Messages
- 3,981
Hmm, interesting. I’ve only ever made them with a single tooth but I can see how two or three might be beneficial. I really needed the clearance in the back on this though — I only had about 1/4” before running into a chuck jaw. I don’t think I could have pulled it off using three teeth 
- Joined
- Sep 28, 2013
- Messages
- 4,411
Hardly up to the caliber of some of the other projects appearing on the board today, but I put my parting tool holder through its paces on some decently-sized aluminum this evening. At 3-1/4” diameter it took a little time but I got there. To be perfectly fair I had scooped out the centre part already so really just parted off the ring, but I was still pretty pleased it worked as it did. Not sure I’m 100% sold on these P-style blades yet though, but maybe I just need more time on them.
-frank
View attachment 312680
nice work, I love seeing other 618s in action
For your threading, perhaps try chamfering the start of the thread. Makes it easier to thread on to something and prevents a burr being raised too.
what's it for?
- Joined
- Sep 5, 2013
- Messages
- 3,981
Ahhh, my secret project of course 
Okay, not secret, just haven’t spread it around yet. I’m working on a home built setup for tool and cutter grinding. End mills and horizontal cutters mostly. The nut is part of an elevation adjustment. It may work or may not, but I am compelled to try.
Yeah I hear you on the chamfering and do do it but always after. Partly because it cleans up all the burrs, and partly because I forget to do the lead-in before I start threading ... Definately enhances the end product though, and also looks better.
Had to interrupt the regular nut programming this afternoon to make a T-nut for guy. I usually make mine on the lathe but this time I used the horizontal as well as the shaper. Went pretty fast, and same size lathe as mine so easy to fit. Thanks for the comments, Matt.
oh, I did not trepan the centre. Just scooped it like you rough out a bowl blank — back forth and advancing carriage and cross slide simultaneously. Cleaned up the edge with a boring bar after. Lots of chips but not too much time.
-frank

Okay, not secret, just haven’t spread it around yet. I’m working on a home built setup for tool and cutter grinding. End mills and horizontal cutters mostly. The nut is part of an elevation adjustment. It may work or may not, but I am compelled to try.
Yeah I hear you on the chamfering and do do it but always after. Partly because it cleans up all the burrs, and partly because I forget to do the lead-in before I start threading
Had to interrupt the regular nut programming this afternoon to make a T-nut for guy. I usually make mine on the lathe but this time I used the horizontal as well as the shaper. Went pretty fast, and same size lathe as mine so easy to fit. Thanks for the comments, Matt.
oh, I did not trepan the centre. Just scooped it like you rough out a bowl blank — back forth and advancing carriage and cross slide simultaneously. Cleaned up the edge with a boring bar after. Lots of chips but not too much time.
-frank

Last edited:
- Joined
- Dec 15, 2018
- Messages
- 818
Decided I couldn't live without a chamfering machine. A buddy gave me several 60 degree pointed carbide burrs that needed a purpose, thats how it started. To get a 45 degree chamfer I made a mount for an air die grinder that tilts it 15 degrees.
The top was some 1/2 inch plate I had, the base is 16 guage sheet I bent.


Need to do some plumbing now and maybe use a ball valve as a switch.
Greg
The top was some 1/2 inch plate I had, the base is 16 guage sheet I bent.


Need to do some plumbing now and maybe use a ball valve as a switch.
Greg
- Joined
- Feb 2, 2020
- Messages
- 146
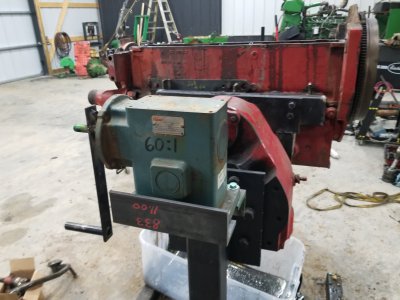
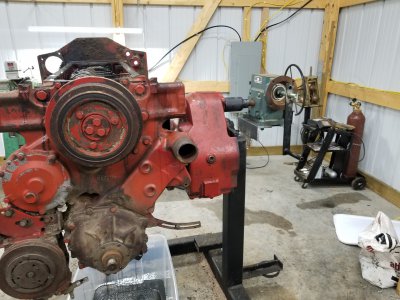
Finished up my engine stand today. I tried using it without the worm gear but quickly realized it would be too dangerous. The rotating part is a final drive off a combine. Between the final drive and the worm gear (60:1), my final ratio is around 300:1. The motor spins easily now.
The motor in the picture is from a combine that I'm overhaul. Part on the sleeve busted in the bottom allowing water and oil to mix. I caught it in time before any damage was done to the crank and journals.
The motor in the picture is from a combine that I'm overhaul. Part on the sleeve busted in the bottom allowing water and oil to mix. I caught it in time before any damage was done to the crank and journals.
Attachments
- Joined
- Sep 28, 2013
- Messages
- 4,411
francist - nice, sounds like a hell of a project! I hope you make a build thread when you're ready, I'd like to see it.
Highly recommend grinding a trepanning cutter. Looks like a cut off/ grooving bit, but with a curved heel/ bottom to clear the side of the bore. Saves a ton of time and material, plus you can use one to face cut grooves eg. for o-ring seals.
Highly recommend grinding a trepanning cutter. Looks like a cut off/ grooving bit, but with a curved heel/ bottom to clear the side of the bore. Saves a ton of time and material, plus you can use one to face cut grooves eg. for o-ring seals.
I really liked that project. It too is on my list. Mark really made some great projects. All first class stuff. Beautiful craftsmanship all the way around.Making Mark Frazier's tool and cutter grinder, I should say trying to. Need to find a motor and get some hand wheels and a base as well. I bought an X Y table but it's still sitting in the box. Long way to go.
View attachment 311694
- Joined
- Dec 6, 2015
- Messages
- 836
I had a chance to get into the frozen tundra of the great white north, I mean the shed that I pretend is my shop. It was the sketchiest clamping I'd ever done. I had a 5" angle plate, the base of the indexing head is 6", so I picked up some 1-2-3 blocks. I did a rear clamp, and an upper clamp (the Harbor Freight mini mill forced me to install it at an angle on the table, which isn't a big deal since I'd be milling on a circle.


I calculated the outside to the inside edges for the bolt circle, found the edge, and the end mill for the pocket loosened the backplate and spun it off, so I had to reset again. The next attempt, I clamped to the backplate, as well. I only had 6 clamps on the mini mill. It was clamp the back plate, mill the pocket, unclamp the backplate, and rotate 120 degrees (twelve hole index ring meant move four holes in between each pocket). On the Harbor Freight mini mill, I didn't have enough space to use the drill chuck, so I could only install a center drill in a collet and get the holes started. Those holes were finished on the drill press.


The chuck register surface was not quite small enough (I'd rather go large than small, actually). I threw the back plate into the freezer for an hour and a half. I put the chuck into the oven after that for 15 minutes or so. Those temperature differences should give enough deviation in expansion/contraction based on the heat differential. I grabbed the parts out of the oven and freezer, and bolted them together.

Next step to make this perfect is to chuck up a rod in the lathe, then bear down on that with this chuck so I can take some material off the back and not have so much overhang. It will also give me a chance to do some thread clearance so it will fit perfectly on the dividing head.


I calculated the outside to the inside edges for the bolt circle, found the edge, and the end mill for the pocket loosened the backplate and spun it off, so I had to reset again. The next attempt, I clamped to the backplate, as well. I only had 6 clamps on the mini mill. It was clamp the back plate, mill the pocket, unclamp the backplate, and rotate 120 degrees (twelve hole index ring meant move four holes in between each pocket). On the Harbor Freight mini mill, I didn't have enough space to use the drill chuck, so I could only install a center drill in a collet and get the holes started. Those holes were finished on the drill press.


The chuck register surface was not quite small enough (I'd rather go large than small, actually). I threw the back plate into the freezer for an hour and a half. I put the chuck into the oven after that for 15 minutes or so. Those temperature differences should give enough deviation in expansion/contraction based on the heat differential. I grabbed the parts out of the oven and freezer, and bolted them together.

Next step to make this perfect is to chuck up a rod in the lathe, then bear down on that with this chuck so I can take some material off the back and not have so much overhang. It will also give me a chance to do some thread clearance so it will fit perfectly on the dividing head.
- Joined
- Mar 17, 2018
- Messages
- 1,397


