What size dovetail cutter? Mitutoyo test indicator

I finally realized what this cutter needs to do.

I’m making a form tool to follow the darn tool clamp.
Breakthrough! You've got the profile down. Have you figured out how to use the 180 degree latch on the indexing collet holder to grind your back relief (that allows clearance between the cutting point/edge and the body of the tool)? Also, remember to take a little rake cut off the bottom as well. Basically preserve the cutting edges and open up room on any part of the tool that is not in cutting contact with the work.
 
I cut a 60 degree groove in the lathe. I’ll use this to continue my quest for a proper, sharp cutting tool.
I was able to fit the test indicator successfully. (This is my sacrificial part)
Too many burs. The next one will be better.
I‘m learning!! That’s what it’s all about.
 

Attachments

  • 4886AA41-0A68-41AB-8A6A-E3942674EE12.jpeg
    4886AA41-0A68-41AB-8A6A-E3942674EE12.jpeg
    257.8 KB · Views: 19
  • D4234C1C-8030-466F-A9D3-7EED1994732B.jpeg
    D4234C1C-8030-466F-A9D3-7EED1994732B.jpeg
    208.1 KB · Views: 18
Last edited:
There are some things in life we just can't seem to accomplish.
A blind person can't drive a car-yet.
A man can't give birth-yet.
I will never be able to dance or be able to grind a small dovetail cutter :)
For now, I'm throwing in the towel.
My frustration level is just too high at this point. I found one on ebay. It should be here by the end of March!
Only $17. I'll probably break it.
 
Jeff, what are your challenges on grinding the cutter? The one you made had the profile you need, it just didn't have relief cuts at all. That means you need to grind relief all around the tool, except for the edge that does the cutting. Small little tools are quick to grind, so messing a few up and experimenting with the rest shouldn't put you out like having to regrind a 5/8" lathe blank. Sharp, fine corners are a matter of wheel dressing before the cut. You've got this, man!
 
Mr. pontiac, I got it.
I wasn’t happy with the rough edges on the part. It just wasn’t right.
I’ve made at least six prototypes to finally come up with a cutter that I’m comfortable with.
I hardened it and tempered it back to about 50hrc. Based on the Japanese files.

I have the numbers documented so I can proceed with confidence. I didn’t have that before.
I’ve worked too hard to screw up this last piece!

Time for an adult beverage . It’s been a week messing around with this.
 

Attachments

  • 49621CFC-D25D-4E9E-845C-896BF31CC187.jpeg
    49621CFC-D25D-4E9E-845C-896BF31CC187.jpeg
    253.4 KB · Views: 26
  • C4A344D5-60F3-4B2C-97F5-399E4AB75AAA.jpeg
    C4A344D5-60F3-4B2C-97F5-399E4AB75AAA.jpeg
    227.2 KB · Views: 27
  • 4A48DAF1-26F2-4942-85EA-3BB05F20035B.jpeg
    4A48DAF1-26F2-4942-85EA-3BB05F20035B.jpeg
    389.2 KB · Views: 23
  • B56F42F8-A3D4-4089-92CC-FC15F87995F5.jpeg
    B56F42F8-A3D4-4089-92CC-FC15F87995F5.jpeg
    406 KB · Views: 24
  • 500DF287-F8FE-4884-8764-A03761C0498F.jpeg
    500DF287-F8FE-4884-8764-A03761C0498F.jpeg
    499.7 KB · Views: 26
Jeff, what are your challenges on grinding the cutter? The one you made had the profile you need, it just didn't have relief cuts at all. That means you need to grind relief all around the tool, except for the edge that does the cutting. Small little tools are quick to grind, so messing a few up and experimenting with the rest shouldn't put you out like having to regrind a 5/8" lathe blank. Sharp, fine corners are a matter of wheel dressing before the cut. You've got this, man!
Mr. Pontiac,
I really struggle with small parts.
The depth wasn’t right, the angle didn’t seem right even though I cut it on the lathe with a 60 degree tool.
It wasn’t deep enough, it was too deep, the edges weren’t cutting cleanly etc.

I appreciate your encouragement and guidance.

Thank you!!!
 
Quick, record all your settings. Keep a notebook under your grinder. Nothing I find more discouraging than going back 3 months from now and not being able to duplicate my results. Evens some photos of the setups. Print them out for the notebook.
 
Man Jeff I can see by your last pics you have been grinding. I really thought your first take was a good one, just needed to have a little material removed behind the cutting face and at its rear. I can appreciate your exhaustion/frustration tho. Maybe step away from it for a day or so. A fresh look might be all it takes….. or your new one will show up early.
 
You got it. Chip clearancing can be as aggressive as it needs to be to help chip removal- something especially important with aluminum. With such a fine cut, you don't want to be dragging chips and gumming things up. When you rub soft metal chips under great speeds and pressures between the back of the unclearanced cutting tool and the work, it turns into smeary caca. That is the technical term for it.

Keep in mind, you can take as much metal off to clearance the tool as you want, as long as you preserve the cutting edge and leave enough material to provide adequate strength. I would leave the bottom dished at 1 degree like an end mill for some clean-up action on the base of the cut, but that only needs to include half of the tool diameter to work- the back half of the tool does nothing but support the cutting edge and get in the way of exiting chips. Split the difference between the two to suit the job,

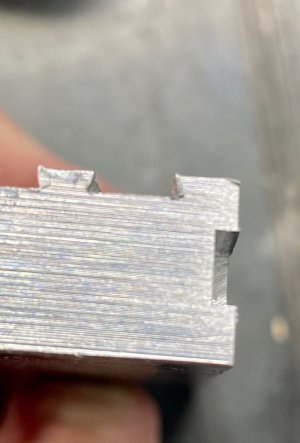
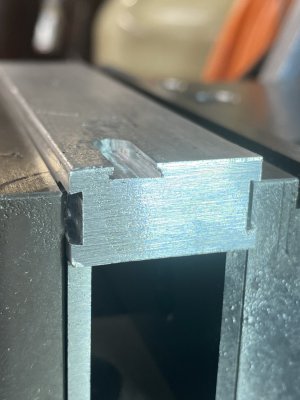
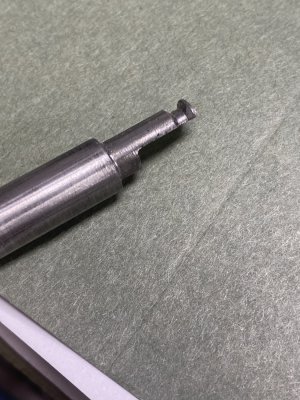
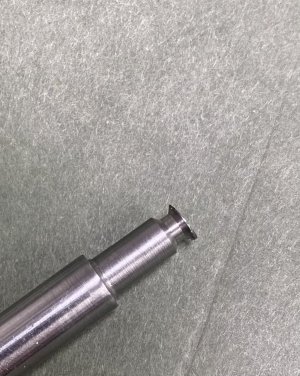
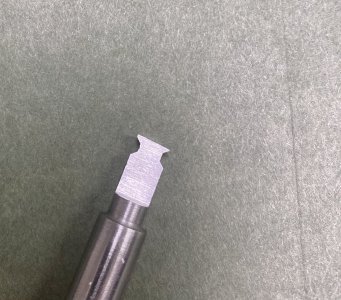
The reason the neck of the dovetail isn't coming out well is that part of the tool isn't clearanced as you did with the base of the tool. The way I make my d-bit clearance cuts is really simple using the dividing workhead on the Sheckel (Shars cloned Deckel). It is going to take a wall of six dollar words without pictures and videos, but I can give it a shot. It might be better than trying video on my phone. I am pretty sure Stefan Goetteswinter covered the technique in his introductory d-bit Deckel video, though. You grind the back side and meet the point. Conceptually it's that simple, but there are some setup tricks to pulling it off with the Sheckel as it's equipped. I kinda pick stuff like this up without much input, so I don't have too bad a time navigating areas that are sparse in documentation. The Deckel manual is the gold standard on this subject. There are several models and manuals over the years, so looking at them all and aggregating the information is helpful. Then Harold Hall covers cutters well beyond the d-bit chapter in his workshop practice book. Some of the good texts that cover d-bits go back 120 years, I like to look up the tool and cutter chapters in any shop manuals I find. Kurt Moltrecht is easy to read, he has a chapter on d-bits too.

I guess the only equipment consideration is the wheel; that small profile might be easier to cut with a sorta cheap 1/16" CBN cutoff wheel. A tool that small can be ground on three edges of the CBN wheel, and its narrow kerf would make grinding the cutter's waist easy. I have a $24 Shars wheel that I double-mount with a flaring wheel (2 wheels, one mount) for those critical gash cuts on the faces of end mills- the ones you can't sharpen the mill without. That's what I'd reach for if I were grinding your d-bit pattern.

Last comment since finish is important (and I'm avoiding feeds and speeds because we all own mills here) is to not just stone the tool, but hone it. Hone it until you cut yourself, then go for the next finer stone. You want to be afraid of that tool when you touch the edges.

Nawww, not the last comment. 50 HRC is just fine, it'll cut right through aluminum. If you want a longer lasting tool you can aim for more hardness, but for a few short, slow cuts there is nothing to worry about.
 
Back
Top