VN12 Spindle Project of 2013

Shopsweeper,

Have the drawings been completed on this VN12 Spindle? I have a similar situation with my Van Norman 12 spindle, where it has been converted to an R8 taper. Even worse, rain water has gotten into the cutting head and destroyed the bearings and maybe the spindle. I am going to attempt to dismantle the head today and hope for the best. I do need new ring and pinion gears for the head, so if I cannot find them, I will have to have them made. The remainder of my machine is in fairly good shape.

Pete
 
The Van Norman 'C' taper (which Hardinge calls 5V) is well suited to the machine. New collets, Weldon-shank endmill holders and shell mill holders are available from toos4cheap:

Unfortunately, Jeff at tools4cheap has discontinued the 5V.
I learned this after I picked up a VN6 requiring 5V.
I'm covered now, but was disappointed at the time.
Regardless, I applaud tools4cheap as a credible supplier.

Daryl
MN
 
Shopsweeper,

Have the drawings been completed on this VN12 Spindle? I have a similar situation with my Van Norman 12 spindle, where it has been converted to an R8 taper. Even worse, rain water has gotten into the cutting head and destroyed the bearings and maybe the spindle. I am going to attempt to dismantle the head today and hope for the best. I do need new ring and pinion gears for the head, so if I cannot find them, I will have to have them made. The remainder of my machine is in fairly good shape.

Pete


iron.oxide,

Nope. I have not found the right person to scan this up for me yet. I thought I did, but not yet.

I DO have some updates on my project that may be relevant for you. Let me try to post some data and pics.

Shopsweeper
http://www.hobby-machinist.com/member.php?u=32273
 
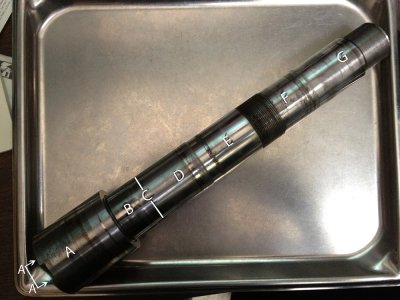
Before I sent my spindle off to be digitized (not done yet) I had a good friend take it to verify the hardness of the piece at his workplace. Here are the results:

photo.JPG
Tested at 0º, 240º, 360º
Location A-A (Tested on Large Shaft End Flat) 60.5, 61.4, 59.5 Roc C
Location A (Tested on Shaft Dia.) 60.3,58.4,59.5 Roc C
Location B (Tested on Shaft Dia.) 62.4,58.7,62.4 Roc C
Location C (Tested on Shaft Dia.) 20.9,20.4,19.0 Roc B
Location D (Tested on Shaft Dia.) 91.3,89.0,88.1 Roc B
Location E (Tested on Shaft Dia.) 80.8,86.7,82.0 Roc B
Location F (Tested on Shaft Dia.) 99.0,95.5,97.2 Roc B
Location G (Tested on Shaft Dia.) 96.7,98.7,94.6 Roc B

TEST INSTRUMENT: Krautkramer Microdur II
PROBE: 5.0 Kg. S/N - 1299
REFERENCE TEST STD: Yamamoto HRC 65 Block

I'm no expert but some of these seem wildly hard, and some way too soft. Work hardening?

photo.JPG
 
And the Materials identification report of my spindle is as follows:


C 0.51, Si 0.06, Mn 1.21, Cr 0.07, Mo <0.01, Ni <0.02, Al <0.007, Co <0.010, Cu 0.039, Ti <0.002, V <0.005, W <0.040, Pb <0.008, Fe 98.0

This was done using a Spectrotest Model TXC using spark mode.


I hope some of this is helpful to anyone needing to have a spindle made up.
 
Great information. Thanks!

I suspect that they only hardened the nose of the spindle. No clue why section C would be so much softer than the rest.

Cal
 
Back
Top