Tips for Your Electrical Panels!

Tip #14: Schematics and Spare Parts in your enclosure

When you are done building, place a bag with all the things you will need to troubleshoot or repair your electrical panel. This should include a couple of spare terminal blocks, terminal screwdriver, fuses, jumpers, spare lights, replaceable relays, etc. You might also want to print out your schematics and place them in a large plastic bag as well. This will be a life saver when you need to fix something far in the future.

AutoCAD Electrical is available for free 3-year educational licenses from Autodesk. Bit of a learning curve but a very powerful and capable program.
 
Tip #15: Grounding, Bonding, and EMI

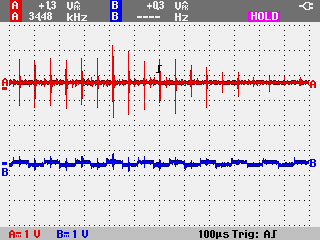
You should really pay attention to grounding your electronics and separating noisy wiring (AC power, Stepper motor outputs, VFD outputs, large relays, etc.) from your clean signals (I/O, encoders, DC power, etc.). Use shielded cable where necessary/possible, and give high frequency noise a low impedance path back to ground. I could write an entire paper on this topic, but if you’re interested, there are lots of good references online.

1573953946636.png

Troubleshooting electrical noise coming from servo drives in my latest panel design. Pain in the 1573954000428.png
 
Great Stuff Marcadoso. Few things are more frustrating that trying to troubleshoot a problem in a panel that looks like spaghetti with no labels or standards. It can take hours even days to find an fix an issue that could have been resolved in minutes if a little care had been taken to follow standards and proper labeling such as what Marcadoso has outlined.
 
Tip #12b: Cable Entry
On cables coming into the panel always leave enough length to to route it nicely to the furthest point in the panel, even if initially it is just going to be terminated close to where the cable comes in. Excess can be stored neatly in the wire duct and it allows for future modification.
 
An old geezer's two cents worth, probably a quarter now-a-days.

A rule of thumb I learned way back in the sixties (1968) was for a new cable entering a panel, leave the length from the entry point to the farthest corner and then to the diagonally opposite corner. It's easy to cut off the excess, but adding a couple of inches is a real PITA. Wire is cheap, avoid splices at all costs. If it's too short. land on a terminal strip and use new wire from there. Once lost a half a day's production chasing one such in a panel for a casting machine, at $1000/minute production in the '70's.

Panduit is beautiful stuff. I originally learned to tie with lacing twine, and then with small Ty-Raps. Then Panduit came along and things took a (or two or three) giant step(s) forward.

Having learned my craft on ships, as well as industry, I have an aversion to "crimped" connections. My preference for stranded wire getting a loose "whisker" is to strip and then immediately solder the end. Not to anything, just converting stranded to solid for the last half inch. I can't say it has paid off, but I have seen crimps get corroded and come loose after a couple of years. Wire landed under a screw gets an inch or better tinned. Otherwise, avoid soldered connections.

Every electrical man has his own preferences that developed from varying experiences. Each is different and none is really "better" than the other. The above are a sampling of my experiences only.

.
 
1573953368993-png.306001


That's a few more pins than I've done, but my electronics experience in the Navy was primarily communications, and I've terminated more 56 pair cables to that sort of connector than I care to think about. Some were crimp on pins, some were solder cup type. You learned early on in the process to triple check the color codes to be sure the right wire was going to the right pin...:eek:
 
An old geezer's two cents worth, probably a quarter now-a-days.

A rule of thumb I learned way back in the sixties (1968) was for a new cable entering a panel, leave the length from the entry point to the farthest corner and then to the diagonally opposite corner. It's easy to cut off the excess, but adding a couple of inches is a real PITA. Wire is cheap, avoid splices at all costs. If it's too short. land on a terminal strip and use new wire from there. Once lost a half a day's production chasing one such in a panel for a casting machine, at $1000/minute production in the '70's.

Panduit is beautiful stuff. I originally learned to tie with lacing twine, and then with small Ty-Raps. Then Panduit came along and things took a (or two or three) giant step(s) forward.

Having learned my craft on ships, as well as industry, I have an aversion to "crimped" connections. My preference for stranded wire getting a loose "whisker" is to strip and then immediately solder the end. Not to anything, just converting stranded to solid for the last half inch. I can't say it has paid off, but I have seen crimps get corroded and come loose after a couple of years. Wire landed under a screw gets an inch or better tinned. Otherwise, avoid soldered connections.

Every electrical man has his own preferences that developed from varying experiences. Each is different and none is really "better" than the other. The above are a sampling of my experiences only.

.
Regarding soldering, NFPA79 states that wires shall not be soldered unless the device to be connected requires it. NFPA79 applies to machine tool wiring requirements.
 
That's a few more pins than I've done, but my electronics experience in the Navy was primarily communications, and I've terminated more 56 pair cables to that sort of connector than I care to think about. Some were crimp on pins, some were solder cup type. You learned early on in the process to triple check the color codes to be sure the right wire was going to the right pin...:eek:

Ugh, that doesn't sound fun at all. I just did a few dozen of these. That being said, they just work! No fuss or anything.
 
Regarding soldering, NFPA79 states that wires shall not be soldered unless the device to be connected requires it. NFPA79 applies to machine tool wiring requirements.

Huh... Never knew that code existed but great to know!

13.1.1.5 Soldered connections shall only be permitted where terminals are provided that are identified for soldering.
 
Nice review. Pretty much follow most of what you have outlined, I prefer to use spades with terminal blocks in some applications. Typically I just tap the back plate for mounting, reduces cost and something like a VFD/braking resistor will sit flush against a metal surface which aids in heat dissipation. Would use threaded studs for heavier mounts like transformers/chokes, etc. Shielding and grounding can be a big problem, and often is not as straight forward as one thinks. Keep your signaling wire away from AC and higher voltage wiring. Read the manuals and follow what they recommend as a starting point. Test your systems thoroughly, I always build in safety redundancy in my designs when possible.

Soldering of wire is not recommended for terminal connections and crimps, it will cold flow and loosen. In addition it is associated with breakage due too fatigue in wiring that experiences vibration/repeated movement. I recommend using higher end crimps (like T&B) that are nylon insulated and have a double wall crimp typically of copper alloy which fuse with the wire. I have tried pullout tests and the wire breaks before it can be pulled out. There are a few exceptions to soldering seen in the marine environment where salt will get into crimps and eventually corrode the wires. What I read a while back was you always crimp the wire first and then flow the solder at the tip of the crimp, being careful not to flow too much solder so it does not wick down the wire. This is outline in certain cost guard guidance's. An alternative is using crimps (like 3M) that have fusible shrink tube insulator, this seals the wire completely after crimping. I cannot emphasize enough the importance of a good crimper with the proper die for the type of crimp used. I use to have all kinds of poor contacts until I upgraded to better crimps and a decent crimper that ran around $70.
 
Back
Top