Tips for Your Electrical Panels!

macardoso

H-M Supporter - Silver Member
Joined
Mar 26, 2018
Messages
2,724
Hi all!

I am probably an oddball here who really enjoys the process of building electrical panels. I have two CNC mills (Sherline and a G0704) for which I have built several electrical panels over the years. At my day job, I design industrial control panels for some special applications. I often think the electrical side of machines gets overlooked in the hobby realm and I wanted to share some of my experience and tips for building great electrical panels.

I would love this to be a place for anyone to share their electrical experience and knowledge so please chime in if you have something to share!

-Mike
 
Tip #1: Buy a big enclosure

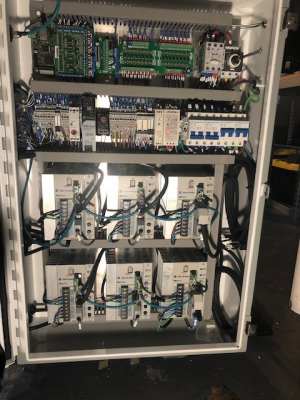
OK, before we even go there… buy a real electrical enclosure. I often see people trying to build electrical enclosures out of wooden boxes, welded sheet metal, Rubbermaid tubs, etc. Unfortunately, it is really hard to make a professional looking panel without a good canvas on which to build. I would recommend Automation Direct or eBay for enclosures, but if you are buying used, really try to get one without holes drilled in it (and yes, I know they’re expensive). Second, buy a big enclosure. Whatever size you think you need is going to be way too small – get one twice the size. When I bought my 24x36 enclosure for my G0704, I thought there would be absolutely no way I could ever fill it. I figured I could add new projects in the extra space, however now the box is 100% capacity without any extra projects. It is crazy how much room you really need and how awful it is when you realize you have run out of space.

1573922400833.png

Picture above is of my current CNC control panel on my G0704.
 
Tip #2: Get a subpanel for your enclosure

This is an easy one. Most real electrical enclosures will have threaded studs inside the box to support a subpanel. This allows you to build your design on a bench before attaching it inside the enclosure. It also means you don’t need to put holes in the outside of your fancy new enclosure to mount your parts. You should really aim to do as much wiring of the subpanel outside of the enclosure as possible.
 
Tip #3: Plan on your electrical panel to take a long time and a lot of effort

I think that in the machining community (CNC especially) everyone brushes the panel build off until the last minute and almost treats it as an afterthought. Although it doesn’t require much machining, there is a lot of work that goes into an electrical panel. Make it fun for yourself and plan on it being a major step in whatever you are building.
 
Tip #4: Design your enclosure ahead of time

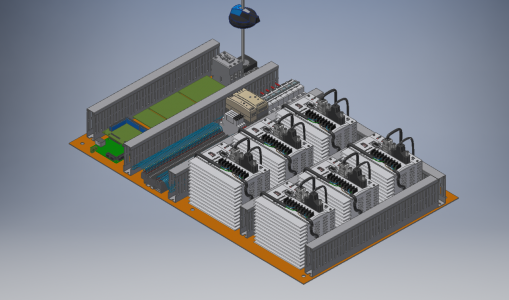
At work we spend months designing our panels in CAD before we ever start to have them built. At home this is unrealistic, however I try my best to make sure I have everything planned out before I buy the enclosure or start wiring. Draw all your circuits out, make sure you know every component you will need, how many terminal blocks, what kind of wire, etc. Make sure you follow the installation instructions for your components to give them adequate room for ventilation. My most recent and most complicated home-built panel was modeled in Autodesk Inventor before I bought anything. This allowed me to drill all the mounting holes directly from the dimensions on the model (and everything fit perfectly!).

1573922844161.png

CAD design of my panel.
 
Tip #5: Rivet nuts!
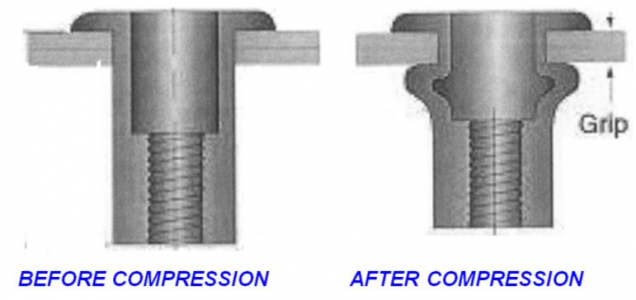
I used to mount my components to my subpanel with screws and locknuts on the rear of the panel. I quickly learned that this was not wise when I had to remove the entire subpanel to replace a single dead stepper drive. In my most recent panel, I installed a rivet nut for every hole which used a #8 or larger screw and tapped the subpanel for the smaller screws. Rivet nuts install in a similar way to pop rivets, but give you a threaded insert permanently mounted to the subpanel. This means everything screws in from the front and you don’t need any nuts on the back. I think I spent $30 for a cheap rivet nut tool and a few bags of nuts. Worth every penny.

1573925299660.png
 
Tip #6: Circuit Protection
Circuit protection is absolutely required by electrical code and for good reason. If something goes wrong in your panel, like a short or a failed component, the circuit protection will prevent damage to your equipment or a fire. I typically recommend DIN rail mounted circuit breakers for most applications; however, fuses are good for low current protection, very high current applications, or where space is a concern. You should size your breakers for just above the max load that branch of the circuit will see, or better yet, follow NEC guidelines for breaker sizing! Please don’t rely on your home breaker panel to protect your equipment unless you plan on running 12 AWG wire to every connection in your panel. Even then, just don’t!


Tip #7: Use the right wire

While you can certainly wire your panel with any kind of wire (assuming it meets your ampacity needs), your enjoyment of the process will a lot better if you use good quality stranded hookup wire. For almost all of my panels and some of those I do at work I use MTW (Machine Tool Wire) for my hookups. Solid core wire often used in homes will never lay nicely in your panel and is hard to make terminate cleanly.

 
Tip #8: Ferrules and Crimpers
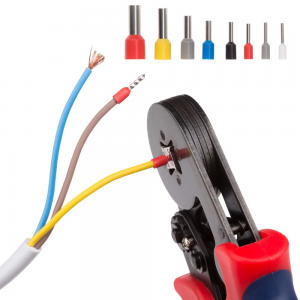
Get yourself a set of wire ferrules and crimpers. Seriously, this one is huge. Wire ferrules crimp on the ends of your wires and prevent the loose strands of wire from fraying. They are permanently and securely installed by a crimping tool. The professional tools are quite expensive (~$300) but I use a set at home that cost me $20 on ebay and came with a ton of ferrules. The off brand crimpers are perfectly fine to use, but I think that Panduit ferrules are significantly better than the cheap ones. I wouldn’t ever want to do a panel without ferrules on my wires.

Link Here

I have no affiliation with that link, nor have I bought those exact ones, but that is the kind of kit you want to look for. There are lots of styles of ferrule crimpers, however I prefer the 4 jaw style.

1573929830569.png
 
Back
Top