This seems too simple - differential screw adjustment, am I missing something?

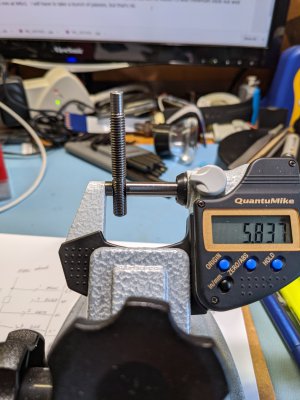
Finished the differential screw, but the M6x0.75 part is undersized. Major diameter is 5.838 at one end and 5.808 at the other. Minimum Major diameter should be 5.838. Will make another one. I screwed up at the end by hand screwing an HF M6x0.75 die on it. It was finger tight, meaning I could turn it using my fingers (not with a die stock), but it did shave some fine metal. The M6x1 is a little on the high side, but it is within the spec, so that was good.
PXL_20210430_223535357.jpg
Well, I'm buying some real taps and dies for this size, as I now know they are not true to size (6g). One day I'll replace the whole (wretched) set with something decent.

The third attempt will go a lot faster. (Kind of know what to do now!) The single thread wire method seemed to work ok, but you really need to clean the screw, no burs and no chips in the threads. Otherwise you get readings which don't repeat. I was threading under a magnifier so I could pick up the thread again, and to watch when to stop. That made it easier for me. (One day I can see adding a microscope camera to this set up. Magnification helped a lot!)

What messed me up in the beginning was using the dead center. Since it is no where near the spindle axis, the misalignment added a taper to the rod, which made subsequent operations more difficult.

I will SPT the rod in sections. First SPT 15 mm of M6x0.75 with minimum stick out and then put out the rod and SPT 25 mm at M6x1. I will have to take a bunch of light passes, on the 25 mm section but that's ok.

Thanks for the encouragement. Hoping the rest of this adjuster will be a lot more straightforward.
 
Getting frustrated by some of the old cheap tooling that I have. I took a "low quality, otherwise known as HF" M6x1 die and it loosely spins on both a known good M6x1 screw and my SPT M6x1 rod. ... Is there a way to measure tri-lobed stuff?

If you can use wires to measure diameter, you can also use wires to measure radius. Either mounting a tap between
centers, or in a collet, you should be able to determine radius with a height gage or dial gage, against
a known-radius test rod. Three lobes, so to calculate one diameter, you want 2/3 of the sum of three
lobe measurements. A lathe makes a bulky, but usable, measuring jig.
This is food for thought. What an interesting idea! Wow, learn all kinds of tricks here. Thanks, I will try this, just to satisfy my curiosity.

I would imagine the best way is between centers, but that presumes the centers ARE centered. So far, my tailstock is not aligned. (Purpose of differential screw was to adjust my tailstock.)

With a collet, is one assuming low spindle TIR, and low TIR for the tap, or do the errors wash out due to the "averaging"?
 
If you deliberately introduce an angular misalignment in the right direction, you should find one position of the TS quill where the tip of the dead/live center is on-axis. At least on one plane, this won't help vertical misalignment. You COULD do the same for the vertical misalignment but it would be difficult to simultaneously achieve alignment on both axes. A pack of shims could get you there but I bet it would be a very fiddly procedure.

To do this, you'd shim one side of the vertical boss so the TS rotates a little bit, then move the quill back & forth to find the sweet spot. If you choose to go the extra mile and attempt vertical alignment, insert shims on one side or the other of the base.

One fairly easy mod that helps in this regard is to reverse the screw that holds the top and base together so you can access the screw head from the top. To do this you drill out the threaded hole in the top and put a square nut in the base (the nut is sized to fit in the slot). I did this to make it easier to adjust the height and horizontal position of the TS.

While I was at it, I milled the base so the heads of the screws had flat surfaces to bear on rather than the sloped, bumpy casting surface. That could introduce some variability when installing the TS on the lathe. My TS doesn't have a cam lock so I replaced the locking nut with a home-made one that tightens with a tommy bar, much easier to use than a wrench and a lot less involved than making a cam lock.
 
I've been making some basic measurements on the tailstock. Nothing super precision, just something so that I can make the initial drawings. I am going to use the basic idea from LMS tailstock adjuster drawing. However, since I have different screws I have to modify the drawing. I need to ensure there's enough meat to put in 6mm screws rather than the 10-32 (sort of 5mm) screws. This means I have to modify the nut and mousehole for the nut. The good thing about the design is one can turn the nut and not the screw to get the basic average adjustment. This means that I could still adjust the TS to give me a taper, (and have 250 um/turn). I need to elongate the hole for the camlock to do this. It is 13mm in diameter, whereas the camlock post is 10mm. There is only +/- 1.5mm of total movement assuming no binding for the stock unit. If I extend the 13mm hole with a 1/2 end mill for another 4.5mm, I think I could do a taper. If I thought this through enough, there should be nearly 6mm of travel from nominal.

That being said, I can see there's lots of places to put in some adjustments. I think @petcnc has quite a few of the mods photographed at petcnc's tailstock alignment thread. The TS and base have play of about 0.25mm. Tightening a single screw makes the base and TS kiss each other on one surface. If that surface isn't perpendicular to the spindle one is in trouble. Of course, just looking at this TS it is obvious there are loads of basic errors (tolerances). It's kind of amazing it was "sort of" close. Not machinist close, but close enough to fool people.

I will make that square nut. That's a much better idea to lock it from the top! It will limit displacement a little, since there needs to be room for the square nut, but it is still a very good thing.

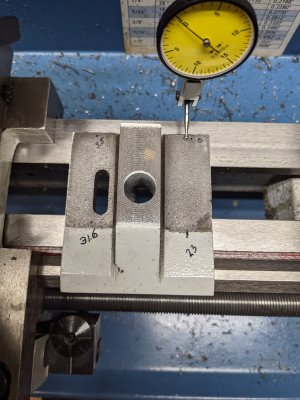
As for the vertical, I will have to mill it. The bottom piece surfaces are quite rough, and some have paint on them. It appears it was spray painted post "alignment" like most mini-lathes. I scraped off some of the oversprayed paint that got on the flat near the "0" in the picture and indicated the bottom piece.
PXL_20210501_210705880.jpg
The values are deviation in thousandths. Top right was 0. Bottom right was +0.023", bottom left was +0.0316" (eyeballed), top left was +0.0035". Measured this 3 times, since initially didn't believe it. Measurements repeated very closely. So the front is high relative to the back, and everything is pointed up. But this measurement isn't necessarily bad, however disappointing, since all that matters is the sum of all the errors. I wouldn't be surprised that there's significant error in the boss features as well. And how the ram was bored, ... etc. If this was done to counteract natural ram droop, some of error would be reduced. All I know is that I have always had issues with drilling both with center drills and regular ones. The chuck would seem to "jump". What I was really seeing was the effect of a large tailstock misalignment.

This thread is deviating really far from a simple question and answers thread. It's turning into a "fix my lathe" thread. Is it possible to move it? Where would it go? Under mini-lathes?
 
If you round the corners of the square nut you can get a little more adjustment range. It really depends on whether you want to offset the tailstock to cut tapers or not.

When I measured the base on my TS I found about a .010" height difference from front to back. The left and right sides were similar in that regard. The bottom of the upper section also was out of whack but I don't recall by how much. These things have many surfaces that have to align, and, clearly, the manufacturing procedures and/or tolerances don't work in favor of achieving that.
 
what did you move to get to each of the corners to make a measurement?
 
I moved the carriage to get from one side of the tailstock base to the other side. I used the cross slide to go fore and aft. The TS base was left in place. I did not clamp the tailstock base to the ways.
 
Back
Top