Tell me about this 14-1/2 x 6’

It is a sick feeling as you watch a machine line that roll over onto it's side. Seems like slow motion. It happened to me when I got my first lathe about 15yrs ago.

Now, if I'm going to lift, move or shift the machines in any way, I'll hook up the engine lift as a safety. Nah, it isn't strong enough to lift the entire machine, but, God willing, it will stop any tipping at the incipient stage.

I used a hoist as a safety when jacking it up to put it on the skid at Uncle’s hangar. But my hoist was at the lower level across the back of the shop, and I didn’t want to drive on wet yard to fetch it. Yup, dumbassery on my part.

Anybody know where I can find a cross slide screw? After I get it apart, I’ll start a new thread. I may have to see who would be able to make one.

Rick “disassembly posing some challenges” Denney
 
Last edited:

It’s certainly not the first top-heavy load I have rigged. :)

Heh. This post was liked today. It is a testimony to my hubris, though the rigging was solid. I did all that right. I screwed boards down to the trailer bed to keep the skid from shifting. I used ratchet straps for much bigger loads, with the straps woven around the bed cross bars to lock it against lateral movement as well as pulling it down, and I used two ratchet straps in rack end with a shallow enough angle to resist lateral movement as much as vertical movement.

The mistake was lifting the headstock base from a single point without a safety either in the form of a hoist from above or by building up cribbing blocks as the lathe went up. My helper was grabbing those as it went over.

And I needed to have move the carriage and tailstock back to the tail to help weight down the tail end. I had done that at the origin point, too.

I will have to live with the result.

Rick “finding a place to hoist it up after the fall was not easy” Denney
 
Jeez , another lathe down ? Just saw @pontiac428 's lathe went down also . One GOOD thing is the Kubota was spared . :)
 
I started another thread seeking advice for the repair, and then almost immediately was able to source nearly all the parts need to make a complete repair.

But a couple of folks suggested the lathe wasn’t worth the trouble. It’s actually a fair question, and I spent the evening inspecting things.

I removed the cross slide this evening. I made a spanner for the handle retainer nut using a 3/8-drive flathead screwdriver socket from McMaster. Very nearly didn’t work—the existing slots in the nut were badly chewed up. I cut new slots with a Dremel and a cutoff wheel.

The front shaft with the cross slide power-feed gear is in good condition—no damage. The cross slide, after I cleaned and reinstalled it with the gib properly adjusted and way oil on the dovetail, moves as smooth as glass with no play that I can detect. It and the saddle are undamaged, except for the chip around one of the bolts that holds the connecting bar in place.

The saddle moves smoothly in the bed and the power feed works fine using the half nuts. I need to repair the handle in the power feed shifter, but that was a known problem already.

I also replaced the belt and ran the headstock a bit. All good except on the highest speeds, which are a bit draggy and created some warmth (not hot, just warm on the main headstock journal after 15 minutes at top speed). I don’t think the headstock has the right oil in it.

First blush at checking headstock bearing clearance is that it is “okay”, meaning that my quickie measurement with a 0.001 indicator while lifting sa 12” bar in the 3-jaw didn’t show anything obviously out of spec. I’ll check it in more detail later, when I replace the felts in the headstock.

I installed the three-jaw chuck and chucked up a 12” bar for that quick check, and measured .005 TIR at the chuck, and the outside of the chuck showed a TIR of 0.001. None of that indicates a problem.

The tailstock works perfectly.

Next step is careful leveling with my Starrett 98-12, and servicing the apron and headstock.

One discovery: the speeds are weird. First: This lathe was originally sold to one of the oldest steel mills in the US and the largest mill in the world at the time. Officially, South Bend supplied it without a motor (see the serial number card upthread), but handwritten on the card are specs for what seems to have been the motor that Bethlehem Steel installed: 1410 RPM, 3-phase, 550 VAC at 25 Hz. No power company has ever supplied such power so far as I know, so I suspect Bethlehem generated their own power originally and at least up through the 40’s.

The motor in it now is a 2-HP single-phase Dayton 5K482, wired for 120 VAC and running at 1740 RPMs. I wondered if they changed the motor pulley, but apparently not with one that preserved the official speeds. I measured 38 RPMs in slow speed using the back gears, and it’s supposed to be 27. That’s a bigger change than is explained by going from 1410 to 1740 RPMs, so they probably used whatever three-sheave motor pulley that was convenient. If so, top speed will be 1125 RPMs at the spindle instead of the specified 800, and the plain bearings might not be too happy about that.

I left the bull gear disengaged after disengaging the back gears, and the motor ran the freewheeling headstock pulley very fast. With the spindle engaged, it could not sustain that speed. Again, I’m wondering if the oil in the spindle is too heavy. I filled the cups with Velocite No. 10, but it would take a while for that to make it to the journals.

I’ll at least pull the caps on the headstock bearings to replace the felts. I’ll do that before actual use.

But I’m not seeing anything to suggest it won’t be a serviceable lathe. I certainly spent a LOT less than I would have for, say, a PM 1440. My mishap may have moved it out of the good deal category, but it did not ruin it.

Rick “on reflection, headstock behavior no different before mishap” Denney
 
Last edited:
I'd say that extra 300 RPM won't stress the plain bearings unless you're going to be doing this full time. As a hobby machine, it just won't be used that much, and how often is top speed called for?
As for the oil, hasn't the lathe been sitting for a long while? Oil dries out, leaving a gummy mess. I would dribble some tiki torch fuel (same as kerosene, but cleaner with less smell) in the cups and run it at the 38rpm to flush out the old stuff. Followed by some good oil, once convinced it was clean.
 
I just finished going though the headstock. It disturbed me that that it wouldn’t run at top speed—that’s either an oiling problem or a bearing adjustment problem. I just couldn’t put that off.

These were the shims in the front bearing:
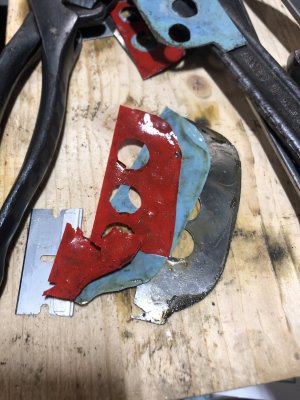
image.jpg

They added up to 0.018, and similar shims in the rear but thicker. The blue and red stuff is intentional but appears to be plastic and thin. At first I thought the shim was painted and that’s what had peeled off. The rear bearing shims were similar but thicker at 0.027.

I ordered a set of brass shims. Even though I have shim stock and punches, I hate making shims :)

Before pulling the caps, I measured deflection using a test bar as described by South Bend. An approximate 75-pound lift at 12” from the spindle is supposed to raise it 0.0007 to 0.0015. Mine was 0.0002. Oops! And the felt in the expander was missing, which I could see from the top. I ended up with a 0.021 stack, and that got me a deflection of 0.0012.

The rear bearing was flapping in the breeze by comparison, with 0.008 of deflection when lifted by the test bar. I ended up with the same 0.021 shim thickness as the front, and the deflection is still a bit over tolerance.

Once I had that figured out, I pulled the spindle to clean out the oil reservoir and install new wicks and felts. Getting it back together took several tries—something was binding on the rear bearing and I had to take it apart several times.

I can’t say I’m completely ecstatic about the result. I now have high speed, which I am excited about. But the bearings have a lot of stiction and the belt wants to slip rather than starting when in high speed, unless I give it a little help. I don’t like having to help it start, but once it does, it will run indefinitely and not get even warm. I’ll live with it. Of course, I’m using Mobil Velocite No. 10, which is the specified spindle lubricant.

And because I had the end gear cover off, I cleaned the end gears up to the gearbox.

Next task: Apron. I have to get deep enough to extract the idler cam so I can repair it, and that’s all the way, so I might as well overhaul the apron completely.

Rick “this week” Denney
 
So, the apron is presenting some challenges, but really only to correct the broken idler gear cam for the power cross feed.

I did discover why it was broken. The idler gear lockout (that prevents engaging the half nuts when the cross-feed is engaged) was barely able to move because of hardened greasy grime. Given the state of the oil wicks, I'm not surprised, though all the shafts and gears were well oiled when I took it apart. The cam was unable to actuate that lockout, and I'm sure somebody tried to force it.

There is some evidence of ham-handed mechanic work in the past, but nothing that can't be put right. And the Ilion Press rebuild book didn't get everything right, either, and I barely avoided ruining an allen-head set screw in the worm-gear collar because they instructed the reader to drive out a pin in that spot. And they gave rather terse instructions for lathes with star-handle clutches instead of cam-lever clutches, leaving out a couple of important details.

Now, to the idler cam. The part is simply not deep enough for me to want to thread one side of the failure plane to tighten the other side against. I only have the thickness of the cam (maybe a half inch) behind the break, and the idler gear spins bang up against that cam surface.

So, my current plan is to drill a tight clearance hole the length of the handle shaft, and countersink the back side for a 3/8-16 countersink bolt. I'll put a nut on the front side. I'll wrap the two pieces together with tape, fill up the hole with industrial epoxy, insert the bolt into the uncured epoxy, and tighten a nut to squeeze the two parts together. After it cures, I'll drill the current taper hole through the new bolt with a drill that is undersize, and ream it to the taper. (I do have a set of taper reamers, plus a collection of taper pins. That way, I'll be able to use the current taper-pin hole on the handle.

If that breaks, then my plan is to make a new handle shaft with a half-inch bolt thread where it would go through the cam plate, and drill and tap the plate for the screw-in replacement handle shaft. I'll drill through the thread and drive in a small dowel pin, South Bend style, to keep it from unscrewing. But I'd need the lathe to be operational to make that part.

The key to the repair working, however, is for that lockout to work smoothly and freely, and that will be a priority when reassembling the apron.

Rick "I love the smell of acetone in the morning" Denney
 
And the Ilion Press rebuild book didn't get everything right, either, and I barely avoided ruining an allen-head set screw in the worm-gear collar because they instructed the reader to drive out a pin in that spot.

This is most likely a previous owner's "mod" - especially if you find a hole in the shaft under the collar.
 
This is most likely a previous owner's "mod" - especially if you find a hole in the shaft under the collar.
Yes, that could well be. I have to say it's an improvement, as long as I don't lose the set screws. :)

Rick "remembering now that he forgot to reinstall them in the collars for safekeeping after removal" Denney
 
Okay, so this lathe has been overhauled in the past. Lots of bronze sleeves in the apron, and then I made the big discovery: the saddle’s V-ways are lined with bronze.

So, lots of measurement in my future. Maybe what was done was an improvement, maybe not. Bronze would be a poor choice for a productionn machine, maybe but for my purposes may be no issue.

The apron is back together and the repaired power feed shift cam is working fine. I’ll post later about that with pics.

Rick “film at 11” Denney
 
Back
Top