Superfly Cutter

ddickey

H-M Supporter - Gold Member
H-M Supporter Gold Member
Joined
Apr 21, 2016
Messages
3,582
I made my own cutter body and bought the tool bar for SEHT Insert.
My surface finish has never been very good. Although bright and shiny there is a small amount of ripples on every cut. The back cut takes the ripples out for the most part if the mill is trammed perfectly. Anyway I noticed the wear under a new insert I put in. I'm wondering if the wear is indicative of some small amount of incorrect angle when I made it.
Sorry the pic is not very good.
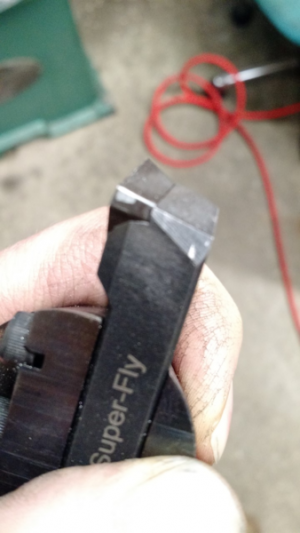
1512003849245.png
 
Tilt the head so that the tool cuts on one side only, dragging the tool over the back side will result in more tooling marks and poor finishes.

By tilt I mean just enough to clear the following part of the tool, depending on the machine and part holding of course, this may be as little a .001" across the tool path, if the machine is a bit wobbly the chances of a nice finish when recutting on the backside with a fly cutter approach zero.
 
If you tilt the head from perpendicular. Your fly cutter will not cut a flat surface. It will be concaved. A perfectly aligned head to table with the pass of a cutter will leave cut marks leading and trailing. I find that pattern of cut very acceptable and shows a well aligned machine. Or it's time for a surface grinder:)...Dave
 
My vote is for Wreck's method. Kick the head very slightly out of tram (so the return cut has slight clearance). I don't disagree with Dave, that the surface will be slightly concave. You can set the fly cutter to cut a wider track than your work piece (example - for a 2" wide part, set a 4" wide sweep, and with a 0.001" clearance on the back side, it will only be 0.0005" concave). This is a flycutter on a mill - that half thou out of flat is probably a smaller error than other flatness / squareness tolerances. As Dave pointed out, if that isn't good enough then get a surface grinder.

Also, that back side cut of approximately 0.000" drags the cutting edge, causing it to dull more quickly. If you are cutting a tough material, it can be tricky to complete a pass with the tool still being sharp.

In terms of surface finish with a fly cutter, I find that the brazed carbide bits, sharpened with a very small radius (almost to a point) and a keen edge, and the head tilted slightly out of tram, just so the back side clears - usually produces a very nice finish.
 
I made my own cutter body and bought the tool bar for SEHT Insert.
My surface finish has never been very good. Although bright and shiny there is a small amount of ripples on every cut. The back cut takes the ripples out for the most part if the mill is trammed perfectly. Anyway I noticed the wear under a new insert I put in. I'm wondering if the wear is indicative of some small amount of incorrect angle when I made it.
Sorry the pic is not very good.
View attachment 248377

Sorry, Duane. We cannot see the area of wear clearly, although there is a blob of light just below the flat of the insert - is that it? I just checked my insert and there is no wear in the area of your light blob.

My column is trammed within 0.0005" of dead flat, which is adequate for most work. I get a cut on the front and back with my fly cutter but the finish is adequate. I'm not sure if it is the angle of the tool in the holder or the tram of your mill that is causing the wear but I suspect the former.

Have you tried indexing the cutter to see if the pattern repeats? If the insert wears in the same place then you have a real issue.
 
If you suspect the holder isn't quite perfect, then maybe what you're seeing is some rubbing behind the cutting edge. My superfly doesn't have any of it.

Before you fiddle with the head tram, maybe try sticking a thin, narrow shim on the back of the tool bar at the top ('top' when it's in the spindle). The shim should be no more than 1/4" the width of the toolbar and full-length of the pocket. The idea is to rotate the tool bar in the holder a bit to take out some of the positive rake to give yourself a little more relief on the back side. Should take about a minute with some brass shim stock, and you can snug up the tool bar good and tight. Aluminum pop can might be even better as it's a bit more 'grabby' than brass, but it may be too thick.

Another thing to check is if the cutting edge is truly flat on the surface. You will be adjusting the bar angle in the holder a little bit to get the cutting edge flat. I did mine by putting a fly-cut aluminum chunk in the vise and rubbing a bunch of sharpie ink on it. Once it's dry you can lower the head and rotate the cutter by hand until it just starts to scrape off the ink. Adjust the tool angle until you're scraping off the full width of the cutting edge. This helped quite a bit with surface finish on my mill.
 
Yes Mikey. Its a wear mark or rub mark. The insert is a Kennametal - SEHT43 KCPK30.
My mill is trammed in about the same as you. I get a cut on the front and back going in both directions. I think I must've screwed up the angle slightly when I made the body. Spumco is on to something as I noticed the insert was not cutting on the full face when I turned the cutter by hand and barely took a scrape. I'll try the shim the angle but I'm back to work tomorrow night so will have to wait until my next days off.
 
Tilting the head will cause a concave surface. The wider the surface the more it will be noticed.
 
If the spindle is truly square to the work, the leading cut will be heavier, and with the material already having removed, the trailing cutter will be doing very little actual cutting, but will leave marks on the work. The marks left on the finished work should be visually about the same, a light crosshatch, if the head is truly square. I actually find that finish appealing. If it needs to be smoother, use a surface grinder or other method.
 
Yes Mikey. Its a wear mark or rub mark. The insert is a Kennametal - SEHT43 KCPK30.
My mill is trammed in about the same as you. I get a cut on the front and back going in both directions. I think I must've screwed up the angle slightly when I made the body. Spumco is on to something as I noticed the insert was not cutting on the full face when I turned the cutter by hand and barely took a scrape. I'll try the shim the angle but I'm back to work tomorrow night so will have to wait until my next days off.

Let us know how it works out. I think you'll find improvement with just setting the cutting edge flat - my cutter needed some tweaking straight from Tormach.

If it doesn't get better, I'd be interested in your material & feed/speed WOC and DOC. My superfly can really rip chunks off, but surface finish suffers unless I keep it down to 0.01" and moderate feed on aluminum.
 
Back
Top