Rough Threads Single Point Threading

Larry may be on to something with them being fake inserts. The Mitsubishi catalog at this link does not even list 11 size inserts for external threading. Do you have a link to the catalog you saw these are good for 8-48 tpi?


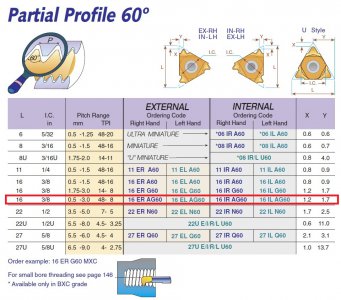
11ER inserts are small, so they typically are available as A60 that can do 48-16, MSC does not list any AG60 insert in the 11 size, so I’m thinking you are at the limits of the inserts, and they are fake so might not be cutting well to begin with. Can you try a 20tpi thread and see if you have the same problems? A finer thread that is not at the limits of the insert might work better.
 
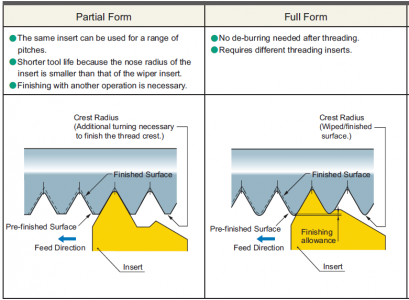
I would use the correct pitch insert for the job, it will form the crest and root rads accurately. I would never use the multi pitch inserts as they usually give a sharp root rad & don't finish off the crests.
Here are 12 different methods you can try to see which suits your job best. They all have the compound set at zero, but don't plunge in & no tools are upside down.
 
Looking at the inserts in more detail, I think they are fake. There are no grade markings on the side. However, under 40X magnification, the cutting edges and tip look very good. I need to measure the tip depth to see if it is not deep enought to cut a 16 TPI thread and is tearing the tops.
 
Great video! Lots of food for thought. I'm probably too set in my ways to do use anything other than the conventional method, but pretty interesting. I'm sure I'd mess up the alternating leading/trailing edge cut...
GsT
 
The insert tips measure fine. Tip to base is .045 (1.14mm) vesus a published .047 (1.2mm) with any difference likely a combination of measurement error and/or tolerance.

My threading dial was off about 1/3 the distance between marks - my dial has 8 marks. I adjusted the gear position so it's as close to a line as as I can get it.

I verified tool height by facing with the turning insert. It was about 1/4 turn of the adjustment nut high. It is now as close to on center as I can get it.

The compound and cross side are rigid without any play when yanking on them. I removed and disassembled the compound any. It is now clean and smooth running with gibs well adjusted. Again, I can feel no play.

I'm taking a break. Later, I'll put a test indicator on the compound and yank away to check overall rigidity. If good, I'll try threading with cross slide infeed and another with compound feed set at 29.5 deg. I'm also going to up the rpm if my old man reflexes are good enough to stop in time.
 
The threading depth of a UNF 3/4-16 is about 1.1 mm (depending on the insert type). On my hobby bench lathe, I make that thread (CNC) in 21 passes (Constant Volume Cut). The first pass at 0.25 mm DOC, the last one at 0.03 mm DOC using an infeed angle of 0°.
On my lathe, there is not much difference between 0 or 29.5° infeed angle. That is also not to be expected because both cutting edges of the threading tool cut metal so the cutting edge length is the same. If I need to reduce the cutting forces, I switch to a 30° infeed angle.
In general, I use insert tooling for threading and run them at 300 RPM. For coarse threading I use a fresh grind HSS tools because these are sharper than my insert threading tools and will reduce the cutting forces. HSS tools don't break/chip so easy so they last longer than an insert threading tool.
 
If the tip to the base is 0.045" then it is an A60 insert and not an AG60, Mitsubishi does not list an AG60 inserts and the only one I have seen listed are those sold on eBay. With a partial thread insert you do not thread to the full depth of the insert like a full thread insert. Carmex has AG60 inserts but only in the 3/8" and 1/2".

1691879927470.png
Laydown Threading inserts 16 AG60 .jpg
 
I routinely use carbide AG60 insert using the cross slide and get perfectly good threads, you also indicated that that the threads were worse with HSS, so I think it is a mechanical/technique issue. That being said, you may have initially been running the speed/SFM too slow, I would thread at least at 120 RPM, you indicated 180 RPM which should work well in most materials. The tear out seems to be at the tips. which leads me to suspect that your major thread OD you started out with is too big and you are exceeding the depth of the cutter as well as threading too deep for the TPI. The crests get torn off if you try to reduce the major diameter with threading, the somewhat periodic tearing may also indicate some rigidity or oscillation effect. I tend to start out threading in 0.01" depth increment passes, and tapper down the last 2-3 passes and only take one spring cut where I advance the last pass 0.001". I would also use a flat file to knock down the crests. The total depth of thread for a 16 TPI is indicated as ~0.038" so you have exceeding the thread depth by about 3X and just pushing the metal back and forth on the crests toward the end, thus the tear out. Since you are using a partial thread insert you do need to thread a bit deeper, so I would expect a total cutting depth in the 0.06-0.07" range. Try to start with a material diameter of 0.740-0.745". You should be using cutting oil (apply to the threads with a brush or oil can), clean the threads periodically with a metal bristle brush and knock down the crest with a file with the last 2-3 passes. Also your cutting tip height may be incorrect.

I have Mitsubishi AG60 threading inserts, but if from eBay the are probably knock offs. I have been using the same the Carmex AG60 BMA coated threading insert for years, done hundreds of threads and have had no issues cutting fine threads and as well deep as 11 TPI threads. Below is a 1" - 14 TPI thread (both external and internal) I just did the other day in 1045 steel. The external cutter depth was ~0.094" for this 14 TPI, but that also depends on the starting material OD.

View attachment 456697
Your knurling looks great. What type of knurler are you using?
 
I use Eagle Rock scissor type knurlers, I have had them for many years so they are the older style where the pins need to be pressed out to change the knurlers. I recently replaced the scissor nut with a handle for tightening the scissors. I knurl at around 160 RPM, most of the time the knurls come out well but every once in a while there is mistracking.
 
To clarify, the thread I am going for, it is a 3/4-16 class 3A. Major diameter for 3A is larger than 2A and can go to the full nominal diameter. Tolerances are MjD .7500 to .7406, PD is .7094 to .7056. The part I made with the poor threading is a prototype for fitment. It is a kingpin for a Porsche 944 with modified suspension. I'm making these for a friend since his previous supplier is no longer making the parts. We want a close thread fitting because of the way it clamps even though it has a nylon insert locking nut. The prototype's threading is intentionally at the max end of the 3A tolerances with measured major diameter of .7494 and PD of .7735 over .040 wires or .7076 actual PD, smack in the middle of the PD tolerance range. I want to get the threading to look better for the final part before I make 10 of them out of 8620.

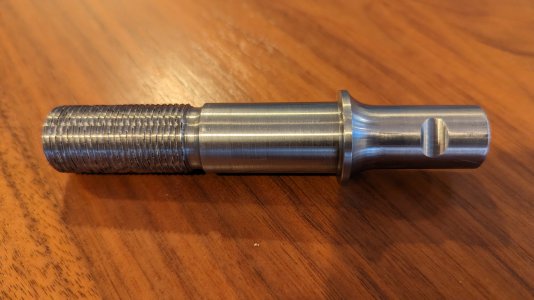
Here is an overall picture of the part. Note the 3/16 formed radius at the top end. There was no chatter even with full engagement of the tool. That makes me believe that rigidity is not a problem. I also put a test indicator on the compound and yanked it about the best I could without toppling the lathe. I got no perceptable vertical movement and only about a half thousandth horizontal movement. I know that this is not indicative of cutting forces but it does give some indication that the gibs are well adjusted and there is minimal backlash in the nuts.

I'm inclined to believe that the threading insert does not have the required clearance between the tip and the base of the insert. I'm calculating a required depth of around .044 with the major diameter at near .750. The insert has a measured dimension of .045, so I think the thread crests may be hitting the base of the insert.

Rather than continuing experimenting with the insert, I'm going to grind a couple of HSS tools, one for threading toward and one for away from the headstock. I'll post how that turns out.

PXL_20230813_182918980.jpg
 
Back
Top