Rough Threads Single Point Threading

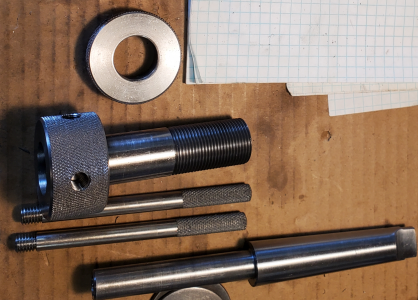
Machine is a PM-1236 so it should be rigid enough. I cut dry and didn't use cutting oil or coolant. I don't normally use oil or coolant on 12L14 and get a good finish. The dry cuts for the other parts of the part were fine with no chatter and excellent finish, only the thread. It looked to me like it was tearing rather than cutting. The tool holder was a Chinese SER1010H11 with minimum stickout from the tool holder. Insert was a Mitsubishi MMT11ER AG60 which is supposedly good for 8 to 48 TPI according to their catalog. Initial cuts were at 65 but I increased to 180 after the first 2 or 3. Infeeds were .011, .009, .008 .007, .006, .005, .004 and several spring passes. My threading with HSS tends to look just as poor. Alignment was made with the flat edge of the insert to the faced end of the part. Tool is on center using a tool center height gauge I made which works perfectly with other tools. I used the threading dial and used the same number every time. I did not keep the half nut engaged and back out of the cut.

Sounds like it may have been a cutting oil issue. I normally don't use cutting oil with 12L14 when turning but maybe I should when threading.
 
Looking at the threads under a loop the only poor areas are the tops of the threads. The sides of the V look nice and bright.
 
It appears to me that there has been at least one pass that was engaged incorrectly, on the wrong number on the threading dial. It looks like the point of the tool has made at least one pass on the crest instead of in the gullet.
 
I've used that insert myself on lots of different materials including 12L14 and even 304 and 316 SS, even at low speeds. 12L14 is easy cutting, so I doubt it's lack of lube that is your issue, although I wouldn't thread dry if you can avoid it. My suspension is that your cutting tool/tip isn't at centerline, or that you have a rigidity issue dealing with the compound. Personally, I don't use the compound for threading - I'm not a believer that going in a 30° is a benefit. Instead I go in straight-on. I have a PM 1340GT, so not that different from your machine, but for everything except cutting tapers, I have removed the compound and replaced it with a solid tool post. In my experience, the compound on this size mill is the source of a LOT of rigidity issues that show up most often in parting operations (see attached). But cranking out the compound, especially if you haven't gone to the trouble of precisely fitting the gibs is asking for trouble with threading too. Pull you compound in so it's not cantilevered, check your tool height, and your threading could improve. Or better yet, make a solid tool post. Plans for that are documented here.
 

Attachments

  • Parting on the Lathe - Good Practices 7-2022.pdf
    3.5 MB · Views: 3
I suspect that your defects have to do with the way you're using your tooling. Threadcutting inserts are meant to be fed with the compound, not straight in with the cross slide. When doing the latter, both flanks of the insert contact the flanks of the thread and you have those marks you see at the top of the theads. This can be compounded by taking too deep a cut near the end of the thread. You should be taking 0.001-0.002" deep passes max near the end, with a few spring passes thrown in for good measure.

I suggest you set your compound at 29.5 degrees and learn to thread that way for now. Be sure the tool is absolutely perpendicular to the work and is dead on center. Make a 0.001" deep scratch pass, then 0.004", then 0.005", then 0.004", then 0.003", then 0.002", then 0.001" until you're done. Make a spring pass (no infeed) every 0.010". At this point, this is not a race so don't get in a rush. Check for fit early so you don't overshoot. You do know how to estimate thread depth, right?

Try this. I bet things will get better. Once you can cut clean accurate threads at will, you can try other methods.
 
Thanks to everyone that responded.

I agree that the tops look like there may have been an improper half nut engagement. At 16 TPI I think you can engage anywhere. However, I did not engage the half nut on any number other than 1. I could not have engaged the half nut incorrectly unless it is possible to incompletely engage with the lever in the fully depressed position. Is there some adjustment on the half nut to assure that it engages completely?

I'm fairly confident that the tool is on center. I use a cylindrical bar cut to centerline height and resting on one of the flat ways to set height. I check height by rubbing my finger nail across the top of the bar and onto the tool to see it the nail catches in either direction. This method gives me dead flat faces with other tools so it should be fine with the threading tool. The insert was aligned to the faced end of the stock ala Tom Lipton as I noted previously. I'll try to rotate the tool post to see if I can do a light face cut with the threading insert to verify tool height setting.

I didn't notice any chatter and I did have the compound wound back so there is virually no overhang. It was set at about 60 deg to the spindle axis to keep it out of my way and the tailstock. I'll check the gibs just in case. I don't think it is chatter because the V grooves are nice and shiny without any chatter marks.

As far as straight in or 30/29 compound infeed, I see reputable professional machinists disagree on the best way to do it. I think either way will work if you use reasonable feed in rates and have reasonable rigidity. See Joe Pie at
. I'll try a 29/30 compound input to see if it makes a difference in my situation.

The technique I used got me within a few tenths of what I was shooting for on the pitch diameter measured over wires. I'm comfortable with the technique. I'm just getting lousy looking results. I'll post tomorrow on results after checking with a face cut, gib tightness, and trying a 29/30 compound infeed.
 
I'm looking at that, and while I won't rule out a bad number on the dial, that's not what I'm seeing. It's a little funny in the picture, light/shadows probably, but what I think I see is tearout on the top of the thread, and it's intermittant, where a bad number on the dial would be 100 percent start to finish.

I have but one carbide threading tool, as I have much better results doing my own HSS tools, so don't mistake me for an expert.... But this looks a LOT like when I tried to use my threading tool to cut a thread "slightly" too large for it. It was acting like a "topping" insert, forming top on the threads. While it does have some built in geometry that "looks" like it can do that..... I can't find any documentation as to if it's supposed to or not. It made a thread for me that looked very similar to what I think your pictures represent. But on smaller threads where the point is pointy enough, but the cut never goes deeper than the "V" portion of the insert, it does fine.

I would suggest while you're looking into other very valid suggestions, that you take a peek at how stuff is engaging and cutting with this insert, see if using the insert to profile the top of the threads is A, actually happening. B, is it actually designed into the insert or is it just an edge that's there as an artifact of manufacturer. And C, I suspect that you're plenty good on this one? but is your lathe up to actually using a profiling insert. I doubt mine is, but maybe... I havn't pursued it much, I just chose the easy way out, and use ones I've ground.
 
I've been using Joe Pie's method ever since he posted it. I use hand ground HSS. I lock the compound for most work, fully retracted. The angle of the compound makes no difference since I feed with the cross slide. Cutting away from the headstock allows higher speeds to be used and is a lot less stressful. My lathe is a PM1440HD, Chinese. 12L14 should give perfect threads. I suspect the insert is the problem. Try HSS with exactly the same setup and see if that is the case. It could be that the "Mitsubishi" inserts are cheap knock offs packaged to look like the real thing.
 
I routinely use carbide AG60 insert using the cross slide and get perfectly good threads, you also indicated that that the threads were worse with HSS, so I think it is a mechanical/technique issue. That being said, you may have initially been running the speed/SFM too slow, I would thread at least at 120 RPM, you indicated 180 RPM which should work well in most materials. The tear out seems to be at the tips. which leads me to suspect that your major thread OD you started out with is too big and you are exceeding the depth of the cutter as well as threading too deep for the TPI. The crests get torn off if you try to reduce the major diameter with threading, the somewhat periodic tearing may also indicate some rigidity or oscillation effect. I tend to start out threading in 0.01" depth increment passes, and tapper down the last 2-3 passes and only take one spring cut where I advance the last pass 0.001". I would also use a flat file to knock down the crests. The total depth of thread for a 16 TPI is indicated as ~0.038" so you have exceeding the thread depth by about 3X and just pushing the metal back and forth on the crests toward the end, thus the tear out. Since you are using a partial thread insert you do need to thread a bit deeper, so I would expect a total cutting depth in the 0.06-0.07" range. Try to start with a material diameter of 0.740-0.745". You should be using cutting oil (apply to the threads with a brush or oil can), clean the threads periodically with a metal bristle brush and knock down the crest with a file with the last 2-3 passes. Also your cutting tip height may be incorrect.

I have Mitsubishi AG60 threading inserts, but if from eBay the are probably knock offs. I have been using the same the Carmex AG60 BMA coated threading insert for years, done hundreds of threads and have had no issues cutting fine threads and as well deep as 11 TPI threads. Below is a 1" - 14 TPI thread (both external and internal) I just did the other day in 1045 steel. The external cutter depth was ~0.094" for this 14 TPI, but that also depends on the starting material OD.

1691851693790.png
 
I don't think it is the insert either, I have been using AG60 16ER and most recently started using the 16IR and threading away from the chuck. For the most part I go very slow, when threading toward the chuck like 75 RPM and I think the threads look good.

I still use the compound when threading set to roughly 30 degrees, because of the angle of the compound near the end I am only taking less then .001 cuts. I take quite a few more passes than you do and probably more then I need to but I'm still learning as I go.

Here is my first attempted at threading away from the chuck, 10-32 in brass with an AG60 16IR insert at somewhere around 150 RPM.
20230807_202235.jpg
 
Back
Top