Plugging large holes in 1in plate

OP here:

I mis-poke, my apologies. The existing holes aren't 0.375in diameter. Two are 0.485in and two are 0.520in. So the plot sickens. Now I'm not sure how I should proceed.

Yes, I do not have a welder.

The only welder I know charges $85 to flip the switch on his welder.

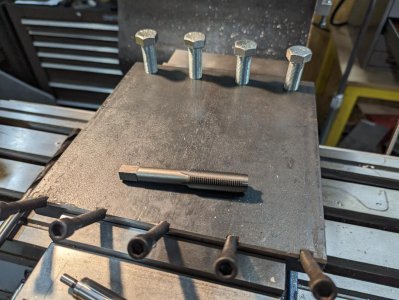
After plugging the big holes I will be drilling new smaller holes on a grid that may overlap the edges of the old larger holes, so I think adhesive (either JB Weld or LocTite) along the entire length of the threaded plug would be more solid vs welding at both ends.

I have a Procunier tapping head to help tapping the holes once I determine which size holes to tap.
I'm a bit of a drive from you (probably under an hour) but I've got five welders and I'm not half bad using them. With the price of gas the local guy might be cheaper in the long run, but I wouldn't take a penny for it...lots of folks have helped me with similar things over the years.

If it was me, I'd probably make plugs that were fairly snug and short enough so there would be a 1/4" or so depression on each side, plug weld over that and then machine flat. You wouldn't have any problem drilling holes through that area going forward and they would never loosen up.
 
Get a cheap inverter arc welder, couple of packets of general purpose rods, watch a couple of youtube vids on how to weld, a bit of practice and then follow
We used to do it all the time when building prototype machines. Sometimes a component only needed to be moved an inch or even fraction of an inch for better performance.

The procedure was similar to what most have forwarded so far.
1. countersink the hole from both sides
2. make or find a piece of the same material that will press fit into the hole
3. cut the stock slightly shorter than the hole
4. chamfer both ends
5. press it in the hole leaving it equal distance from either end
6. weld in place
7. machine the surface back to proper thickness

As a caveat we never admitted to making mistakes. If a component needed to be moved it was because it was called out wrong on the print, not because the print was read wrong. That's my story and I'm sticking with it.
Once you have a welder you will wonder how you did without one.
Unlike most of our equipment its a metal putting on machine.
 
If you do go with the welding process, one suggestion I would have make sure the plate is preheated up before welding the holes up. Otherwise if the welder just fills the small spots without preheat, the welded area will be very hard. No problem is just grinding flat, but probably will take the edge off a mill cutter.

Drilling and tapping will be a bugger too in this area.

If proper preheat is not done, you can heat the area back up afterwards to anneal it, but in one inch plate it will take quite a bit of heat, especially if you need to anneal the entire depth.


Here is a short utube video explaining part of the story of welding. Welding process is the best way in my opinion, but done wrong will have you hating the process.


Sent from my iPhone using Tapatalk
 
I wanted to say almost the same as TopR above. I think I'd probably braze the holes closed and then machine the area flat.
Now aren't you glad you asked for opinions?!?! LOL :p:D
 
Chamfer the holes top and bottom. Make press fit rods that are longer than the holes by about .050” on top and bottom. Press them in. Peen the two ends down into the chamfers and file flat. Rivets have used for centuries.
 
A toolmaker once asked me: What is the difference between a machinist and an engineer?
Answer: When a machinist makes a mistake its called a f'up. When the engineer does same, its a design revision :grin:
In engineering and design its what is the difference between a F^$# up and a Screw Up? A screw up is something you catch before the customer sees it of it goes out the door and a F^$# up...... well I think you get the picture....
 
OP here again:

Excellent discussion everybody!

To those who wonder why I don't have a welder.

I did have a nice new MillerMatic 211 but I used it so seldom, and was so out of practice each of the few times I used it, I decided to sell it after a few years. I needed the floor space more than the welder so off it went. I had a welding booth around it to contain the sparks from my wood walls, and it was just too big.

I decided to proceed with my "bolt plug" idea. Almost went with the solid plug and press fit idea, but I had the proper tap and tap drill on-hand for 9/18-18 holes. Next time I need to plug holes I'll try another approach.

The bolts are just sitting loose in the holes in the pic below. Now I need to figure out how to cut the bolts to the proper length so they sit a little proud at each end after epoxying or loc-titeing them in, then milling or fly-cutting them to the surface. I have a horizontal band saw but the bolt heads make it a little problematic as far as work holding. Tried to find 9/16-18 threaded rod at the local hardware store which would be snap to cut to length, but no stock at two stores. Didn't feel like buying on-line then paying shipping and waiting.

Thinking about gluing them in, then milling the heads off, etc. Or slitting sawing them off.

The object of the exercise is to make an adjustable mini-pallett as the pic below.
 

Attachments

  • Mini_pallett_bolt_plugs.jpg
    Mini_pallett_bolt_plugs.jpg
    145 KB · Views: 18
  • 20150607_094222.jpg
    20150607_094222.jpg
    253.9 KB · Views: 17
Last edited:
I decided to proceed with my "bolt plug" idea. Almost went with the solid plug and press fit idea, but I had the proper tap and tap drill on-hand for 9/18-18 holes.

Where the heck did you find that tap? :cool:

Next time I need to plug holes I'll try another approach.

There's a lot of ways to skin that cat. It's cool to know many, and what it takes to make it happen, and what it looks like when you're done. Sometimes it just doesn't matter. Other times... One or another might be just right.

The bolts are just sitting loose in the holes in the pic below. Now I need to figure out how to cut the bolts to the proper length so they sit a little proud at each end after epoxying or loc-titeing them in, then milling or fly-cutting them to the surface. I have a horizontal band saw but the bolt heads make it a little problematic as far as work holding.

Marking threads can be a real bugger. The bolts thread in easily with your fingers, right?

Put the bolts in so that the bottom sticks proud enough that the threads are fully formed and full diameter. Leave a washer on the head end. Or use something (anything) a sixteenth of an inch (or more, or less, whatever) right next to top side of the bolt. A scrap of sheet metal, a junk steel rule, whatever. With a hack saw, lay the blade on the washer or shim, and start a cut that's "just" deeper than the thread. You can pick that up dead nutz to drop a blade into later. It'd take five minutes to cut them in the vice with a hack saw. (The longest five minutes of your life, but still not that long), or how far is the band saw blade from the vise? Could you stick another one in the opposite side to steady the jaw? Or free hand cut them on the band saw? Not sure what you've got. But the take away is marking that way, with the saw and the shim, takes into account the "incomplete" and sometimes messy start of a standard rolled thread that's tough to measure from.

If by chance the bolts didn't quite spin in by hand, or more likely won't spin in with goop on the threads- You'll have a good chunk (a solid eighth inch, maybe more) on the start of the threads that needs to be cut off... Take that hack saw (or your band saw if it allows free hand cutting) and stick a screwdriver slot in it that will be milled away later. Either end would work fine really, so long as there's enoug left over that you don't leave a screwdriver slot in the final piece.

Tried to find 9/16-18 threaded rod at the local hardware store which would be snap to cut to length, but no stock at two stores. Didn't feel like buying on-line then paying shipping and waiting.

you're better off with bolts. Strength, it's no comparison, even in ungraded bolts, but I doubt that's an issue here. For making the top and bottom flush, unless you're buying specialty stuff, threaded rod is made to a crappy spec. You'll have noticably bigger "gaps" between the plate and the repair. It's worth the couple of extra minutes to use the bolts. Not that they're perfect, but way better.
Thinking about gluing them in, then milling the heads off, etc. Or slitting sawing them off.

The setup time and getting that all fixtured and secured with bolts sticking out both sides will probably far exceed the time it would take to do it with a simple hack saw. If I were you, standing there in your shop, looking at options- Oh, wait. No. never mind. I'd probably spend an hour monkeying around and getting things out, only to spend another hour cleaning stuff up and putting it away, just to get out of five minutes of hacksawing. As you were....

The object of the exercise is to make an adjustable mini-pallett as the pic below.

Nice.
 
Where the heck did you find that tap? :cool:

Put the bolts in so that the bottom sticks proud enough that the threads are fully formed and full diameter. Leave a washer on the head end. Or use something (anything) a sixteenth of an inch (or more, or less, whatever) right next to top side of the bolt. A scrap of sheet metal, a junk steel rule, whatever.

If by chance the bolts didn't quite spin in by hand, or more likely won't spin in with goop on the threads- You'll have a good chunk (a solid eighth inch, maybe more) on the start of the threads that needs to be cut off... Take that hack saw (or your band saw if it allows free hand cutting) and stick a screwdriver slot in it that will be milled away later. Either end would work fine really, so long as there's enoug left over that you don't leave a screwdriver slot in the final piece.

you're better off with bolts [Than all-thread]. Strength, it's no comparison, even in ungraded bolts, but I doubt that's an issue here. For making the top and bottom flush, unless you're buying specialty stuff, threaded rod is made to a crappy spec. You'll have noticably bigger "gaps" between the plate and the repair. It's worth the couple of extra minutes to use the bolts. Not that they're perfect, but way better.

Nice.
Thanks for the tips Jake.

Don't know when or where I acquired the tap or the tap drill. Was pleasantly surprised to find them both in my "stuff". Thought I might have to buy one or both.

Not sure I'll be able to hack saw the bolts off. I'm currently suffering from a suspected torn rotator cuff on my dominant shoulder, awaiting likely surgery now. Might have to utilize a more "automated" procedure.

Bolts spun in nicely by hand. But I also considered the drag of the epoxy changing that equation Cutting a screwdriver slot ahead of time is a good idea.

Next trick is to clean all the drilling/tapping oil off to aid adhesion. Will probably soak in acetone. A little concerned about lateral cutting forces after epoxy curing weakening mechanical joint strength.
 
Last edited:
Don't know when or where I acquired the tap...

Sorry, I was poking a stick at you... That was clearly a typo. You had it correct later on.

I'm currently suffering from a suspected torn rotator cuff...

Ouch. I already consider a hack saw to be a necessary evil. I guess that would make me dislike them even more.
Next trick is to clean all the drilling/tapping oil off to aid adhesion. Will probably soak in acetone.

On clean metal with clean oil as you presumably have now, a half second shot of brake clean would have it clean enough that as long as you're not doing NASA parts, or testing the limits of your materials, it's as good as perfect. There is some margin. Clean it well obviously, but if you think it's clean, it's clean.

A little concerned about lateral cutting forces after epoxy curing weakening mechanical joint strength.

Once it's set up, and this goes for epoxy or Loctite, and most any thread locking/retaining concoction, the cutting forces of "normal" milling won't bother it. That is, if the tool cuts well, the mechanical strength is there. The only thing that might bother is heat, and it takes a significant amount. And in that one inch plate, it's a a giant heat sink. If your tool is not cutting well, making things "abnormally" hot, and yo do wreck the adhesive, it still won't go deep enough to bother.
 
Back
Top