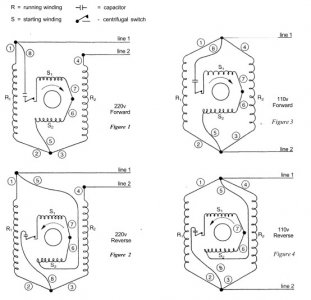
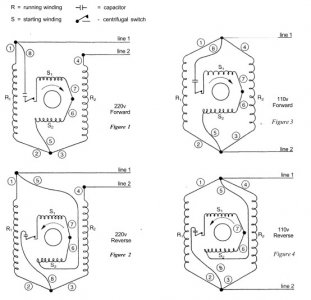
Lets see if I can save you a trip, although if this doesn't work I'm happy to look at your motor and drum switch. There should be 4 wires coming from the motor to the drum switch. Two will be to the starting windings and the other two will be to the run windings. The start windings determine the direction the motor rotates and are taken out of the circuit by the centrifugal switch after the motor starts. The start windings should have a slightly higher resistance than the run windings. This is typically only in the 1 ohm difference range. You need to know which are the start windings and which are the leads to the run windings in order to wire your drum switch correctly. That said, here are some diagrams and excerpts from an article in HSM from the mid 80's.

Lead No. 8 is the one usually attached to the capacitor or centrifugal switch. Leads No. 6 and 7 are usually buried somewhere in the motor and aren't seen. If three leads are twisted together, they probably represent two running winding leads and a starting winding lead. According to an article in Model Engineer the starting windings have a slightly higher resistance than the running windings. On my Brooks 1.5 hp motor, the starting windings have a resistance of 2.2 ohms and running windings have 1.2 ohms of resistance. Take the utmost care in making these measurements since a dirty contact will alter the measurement. If only four leads come to the terminal board, two are probably running winding leads and two are probably the starting winding leads No. 5 and 8. I can't cover all the possibilities, but that should help you in getting started.
Figures 1 and 3 show the comparison between a motor set up to run on 220v versus one wired to run at 110v. Note that the starting windings are connected in series with one of the running windings when the motor is wired to run at 220v. If operated on 220v, place the starting windings in series with the running windings so that they would absorb some of the current going to the starting windings and capacitor, prolonging their life expectancy.
REVERSING THE ROTATION AND WIRING DRUM SWITCHES
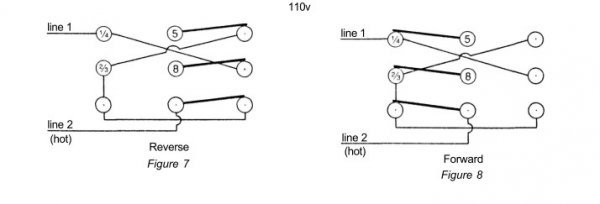
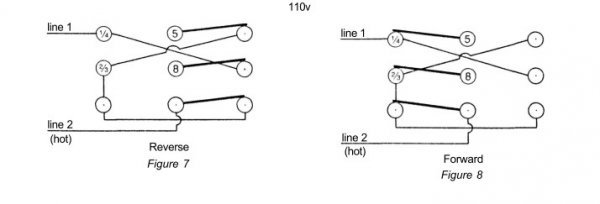
Reversing the rotation of a motor is often desired. From Figures 1 through 4, it is evident that reversing the connections of the starting winding leads No. 5 and 8 is all that isnecessary. In Figures 5 and 6 are the wiring diagrams for the terminals in a drum switch controlling a 220v motor. Figures 7 and 8 show the same switch wired for a 1l0v motor. Note that the only difference in the internal wiring of the drum switch between 1l0v and 220v is a link between the terminals on the lower left. Pay attention to the fact that in Figures 7 and 8 Line 2 is the hot or live wire.

I hope the images of the diagrams come through. When I preview the post they only appear as image links.


