- Joined
- Nov 23, 2020
- Messages
- 788
$57.50 delivered Thursday from Amazon. Done.Get the Starrett. It is the best. Or make one.

$57.50 delivered Thursday from Amazon. Done.Get the Starrett. It is the best. Or make one.
I do as well. Will be keeping my eyes out for a nice handle type in the future. I think the 93C will serve well for the majority of what I do...but may eventually need more leverage down the road.I like this style. Mine is a starrett from a garage sale.
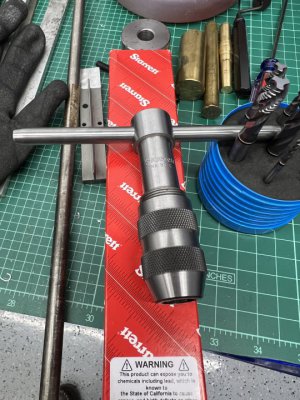
93C has a divot in the handle so you can use a spring loaded tap guide. If you tap the hole immediately after having drilled it, your tap will be perfectly aligned. Works both on a mill and a lathe. Makes tapping a lot easier.I do as well. Will be keeping my eyes out for a nice handle type in the future. I think the 93C will serve well for the majority of what I do...but may eventually need more leverage down the road.
I want to make one of those for the experience, but not sure I am there yet.93C has a divot in the handle so you can use a spring loaded tap guide. If you tap the hole immediately after having drilled it, your tap will be perfectly aligned. Works both on a mill and a lathe. Makes tapping a lot easier.
everything I have seen is for a mill, and not for a lathe where the chuck can free spin. Something like Joe Pie has, but I am not confident I can make one yet. Id buy the chuck and straight arbor, but not confident I could drill the sliding fit part for the tailstock.
yep, having been using a 2 jaw for a few years, I would not go back to a 4 jaw. Remarkable difference.So I received the tap wrench today. To be honest, I was thinking to myself "how much better could this be over the other T-handle wrenches I have used in the past?" The answer, just after holding it and clamping a tap? ORDERS OF MAGNITUDE.
I may buy a General one in the 'A' size to replace my junker that came with my junk tap and die set.yep, having been using a 2 jaw for a few years, I would not go back to a 4 jaw. Remarkable difference.
BTW General makes the same wrenches. You don't have to give up a leg for one. But I understand, that red box makes us feel good.
Do you happen to know the part number of a C sized tap wrench by General, with the two jaws? Need a quality 93C like tap wrench.yep, having been using a 2 jaw for a few years, I would not go back to a 4 jaw. Remarkable difference.
BTW General makes the same wrenches. You don't have to give up a leg for one. But I understand, that red box makes us feel good.