Looking to get a 3D printer soon.

Last edited:
A search for printing issues will provide quite a few results. One of them is this guide.
Another is this one. https://www.3dsourced.com/rigid-ink...shooting-guide/#issue-stringing-and-oozing-13

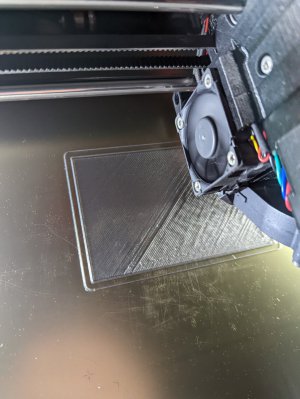
Edit: I see you did reference the Benchy troubleshooting guide. As AlanB pointed out, the first layer of your Benchy has the nozzle too far from the print surface. Those lines you see should be squished, resulting in a more homogenous surface.
The Prusa pictures online are either out of focus or low resolution, I'm having difficulty knowing how far to go. My second Benchy is better, but I'm lacking the experience to know what's good enough and what needs to be fixed NOW. From the test of the zig zag it appears the lines have different widths depending on location of the bed. How uniform should they be? What's good enough to start? I'm used to measuring things, this visual stuff (with crappy pictures) is tough.

For all I know, I didn't torque the bed to the plate uniformly, resulting in different heights. For that matter, I didn't measure the spacers under the bed.
 
try the command "dmesg"
Ah, yes. Of course. Guess I can check $ lsusb as well.

I think Octopi is having issues with the cheapo Logitech webcam from eons ago. It isn't always recognizing the webcam on a reboot, or cold start. When it identifies it correctly it works fine, it's just that that is rare. Probably have to fiddle with the settings in /boot/octoprint.txt. I tried ID'ing the camera as only on USB, but that is just as bad as AUTO.
 
I looked up Prusa's first layer calibration page, and I find it rather straightforward. The pictures do not seem blurry to me. Prusa Help - First Layer Calibration
The first layer can be challenging and does take some fiddling. For example, Prusa points out that the live Z adjustment can be between -0.400 to -1.500. When I calibrated my Z, the value that I ended up with was about -0.725. Yours will not be the same, but I am pointing out that every printer is different. Even if you had ordered a ready-to-go printer from Prusa, the first layer calibration would still need to be done due to shipping.
Attached is a picture of a print I did last week, more to show my buddy, who is getting into 3D printing, what the first layers can look like. The right side of the print is too low, but the left side is just right.
I just put a new heat block on my printer and changed out the nozzle, so I had to do this all over, although once you do it a few times it only takes a few minutes to get back up and running.
 

Attachments

  • PXL_20221104_185824692.jpg
    PXL_20221104_185824692.jpg
    226.6 KB · Views: 51
Octopi via lsusb has identified my web camera as 046d:0991 Logitech QuickCam Pro for Notebooks. But there's no output in the GUI (today).
The tag on side of the cable on the webcam says: M/N V-UBU48, P/N 860-000026, PID LZ803BP

On https://community.octoprint.org/t/usb-webcams-known-to-work-with-mjpg-streamer/21149 there is a listing of known working webcams.
Logitech, Inc. QuickCam Pro for Notebooks M/N V-UBU48, P/N 860-000026, PID LZ725BA

Beats me if it should work... Only thing that is different is a higher PID. Tried forcing the resolution and frame rate in octopi.txt and rebooting...
edit: changes in octopi.txt

Code:
camera="usb"
camera_usb_options="-r 640x480 -f 10"

Camera came up after a reboot, so that is good. Probably reboot a couple more times, because it might be a coincidence...

And it was a coincidence. :( 2nd and 3rd reboots fail to have the camera back up. lsusb detects the camera fine. Drat.
 
Last edited:
I looked up Prusa's first layer calibration page, and I find it rather straightforward. The pictures do not seem blurry to me. Prusa Help - First Layer Calibration
The first layer can be challenging and does take some fiddling. For example, Prusa points out that the live Z adjustment can be between -0.400 to -1.500. When I calibrated my Z, the value that I ended up with was about -0.725. Yours will not be the same, but I am pointing out that every printer is different. Even if you had ordered a ready-to-go printer from Prusa, the first layer calibration would still need to be done due to shipping.
Attached is a picture of a print I did last week, more to show my buddy, who is getting into 3D printing, what the first layers can look like. The right side of the print is too low, but the left side is just right.
I just put a new heat block on my printer and changed out the nozzle, so I had to do this all over, although once you do it a few times it only takes a few minutes to get back up and running.
I find the photos hard to interpret. Perhaps it is my uncorrected residual astigmatism, but I find it difficult to discern the gradation difference between "good" and "too low". Yes there is a different look (sort of to me) but not the exact features that I am looking for. This is undoubtedly due to experience as well. I understand the basic idea, but not the practical side...
 
Last edited:
Camera started to work after deleting the frame rate command.
New edit to octopi.txt
camera_usb_options="-r 640x480"
Seemed to survive ssh shutdown -r now, and octoprint restart.
 
If the nozzle is too high the plastic stream will fall to the bed and flatten on the bottom but not on the top. As the nozzle is lowered the nozzle meplat will begin to flatten the stream and force it against the bed. You want this to some degree, but not excessive. My experience is that to a novice it looks ok when it is still too high. If you keep lowering it and go through optimum toward too low it starts to become obvious that it is too low. I have been able to measure the thickness of the stream or the flag at the end and when it is close to 0.20mm it looks good, at least with the flat PEI surface. Try not to go too low and scratch the surface.

The printer can remember the Z offset for more than one printbed plate, each should be calibrated separately and stored in one of the memories.

The alignment wizard process at the end of the kit build should tell you if the frame is adequately square and the belts are within a good tension range.

The bed mesh will compensate for minor misalignment of the frame and belts. I use a marble end table surface since my surface plate is not large enough when building the frame to get it flat which contributes to squareness. You can use plugins with Octoprint to plot the bed mesh and see how flat things actually are. Some people go the extra mile and use a nylock nut mod to fine tune bed flatness.
 
I adjusted the nozzle down a little again. Seemed ok to me, but, really what do I know? Hardly anything in this subject.

Ran the slicer on an stl that I found and sent it to the printer via a drag and drop operation. Feels like flying blind, but might as well give it a go.

Can anyone explain projects in PrusaSlicer? What are they? How are they used?
 
Back
Top