Lathe installation without a precision level?

Would this make sense? (haven't tried it yet)

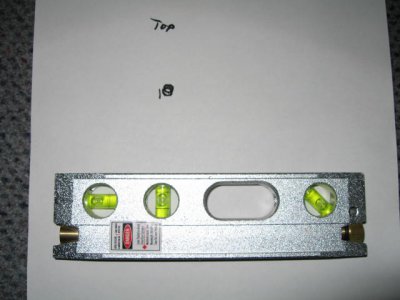
Use a laser level (something like this: http://www.harborfreight.com/2-in-1-magnetic-torpedo-laser-level-67800.html )across the bed near the headstock and mark the spot it makes on a far wall. Do the same at the tailstock and compare the height of the spots. I could be making a logical error somewhere but It seems to me it would measure the twist (or lack of twist) in the bed very accurately.

The logic is clear but there are a few practical challenges. The problem with entry level laser levels is the beam width. It would not provide what I call a pinpoint on the wall but more like a blotch. Plus, the one I tried in the past under different circumstances had poor repeatability. Moving the level from one place to another and back did not always give the same reading. For the present application, even if a very expensive laser was used, it would be tricky to measure the height of the spots on the wall in a way that would only reflect twist in the bed and not also reflect other sources of error.
 
I haven't used these lasers and I didn't realize they weren't repeatible, that is strange... I have seen inexpensive ones with a pretty small spot though. As far as comparing the dots, I didn't say it but I was assuming the laser would be turned slightly at each end so as to focus on the same spot on the wall, then it would be easy to compare dots down to close tolerances (depending on spot width of course). The error of this angle (and of the measurement itself) would depend on the distance to the wall.

This might be a waste of time but it sure would be quick and easy if it worked.
 
You can solve the problem of the sloped floor by using 3 points under the cabinet (Kinematic mount principal). Many machine tools sit on 3 points to eliminate twists. In a shop I am rebuilding a grinder at has issues with a rough floor, so they used leather super glued to steel plates so the plate would not slip, if you want to spend some money you can buy wedge leveling mounts (http://www.reidsupply.com/products/leveling-devices-vibration-control/machinery-leveling-mounts/) . Place them under the lathe cabinet; put 2 under the head-stock end and one under the end of the Tail-stock end.

Moparfever for your information I am a Journeyman Machine Tool Rebuilder, have been aligning and leveling lathes for over 40 years, I manufacture machine levels and teach way scraping and rebuilding / building and have probably rebuild or helped build new machines, (a good guess would be) 1000 lathes and level aligned 5000 lathes in my career. Turning a test bar is the easiest way and most precise method as it duplicates the actual cut you're making when it's being used. (even if the ways are worn) to do this with and with-out a level!. Like I said before, I'm trying to help you with proven methods and not guesses. If you want to experiment to satisfy your curiosity go for it, but don't tell someone it won't work as I know it will !!. I was taught this method when I was an apprentice and it works. Many new machine builders tell their customers to use it for the final test after leveling. I can send you a pdf on how to do it if you PM me your Email Address. I can also send you the info we use to align tail-stocks and turrets.
 
Last edited by a moderator:
I haven't used these lasers and I didn't realize they weren't repeatible, that is strange... I have seen inexpensive ones with a pretty small spot though. As far as comparing the dots, I didn't say it but I was assuming the laser would be turned slightly at each end so as to focus on the same spot on the wall, then it would be easy to compare dots down to close tolerances (depending on spot width of course). The error of this angle (and of the measurement itself) would depend on the distance to the wall.

This might be a waste of time but it sure would be quick and easy if it worked.

Tigtorch, your method looks promising. I dug out the laser level and did a test as you mentionned aiming the beam at a wall 13 feet away. The beam from both ends were aimed at the same spot on the wall as you suggested. It is definitely has potential for me. More details later. THANKS.
 
Richard, I would like to PM you once I figure out how to do it.
 
On the left is my name of the page. Click on it and a box comes up and says private message click it and a new page appears and you can write in a Email type looking box and go down and hit send. I need to scoot now, but will email it tonight. Have a good day. Rich
 
Tigtorch,
These are the details on how I tested your idea.
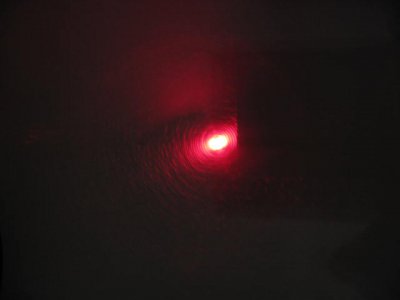
The laser level is 6.75’’ long and was placed on a quartz countertop 1.25’’ thick. A section of counter 36’’ wide was used that is facing a wall 13feet away. A piece of paper was taped to the wall opposite the midpoint of the36 inch counter section. The level was placed at one end of the counter andfocused on the paper. I traced the circumference of the beam on the paper as best I could. The beam is very bright in the center which measures approximately 0.2’’. The beam has a hallo and fades out away from the center so it does not have a clear edge to trace. The level was then placed at the other end of the counter section 36’’away and focused to the same point on the paper. This second beam was also traced after several attempts to get it on the same vertical plane as the first. The second beam was approximately .08’’ above the first one.
By calculation, the .08’’ difference at the wall represents approximately .0035’’ in deviation of the surface under the level.

The level is a lowend version that was purchased many years ago. I could feel some rocking on the quartz surface. The deviation found in this test is more likely explained by the lack of precision of the level than by actual twist in the quartz countertop. Fortunately the level is all metal so I plan to lap it and repeat the test.

Please let me know what you think.

Laser test 002.JPG Laser test 003.JPG
 

Yeah, that's the one. So you might wonder what the ancients did before the professional level?

One way they did it I discovered, was to use a "Norweigan Level"

In the case of a lathe. Simply get a pan, maybe a cake pan. A glass pan would be even better b/c you could tape or glue a scale to the millionth. Set pan on ways, fill with water and see where the water is in relation to the rim. Then move pan down ways and do again.
 
Did a repeat of the laser level test after lapping the level. There was no rocking of the level on the quartz this time (duh).
Also, the beam was projected on a flat black surface. The beam at 13 feet was still the size of a pea but without the halo.
This time the beams showed up at the same spot, one on top of the other. Using a laser beam as a comparator in this way seems to work although it is not clear how sensitive it is.
 
Back
Top