Index mill, possibly a 40

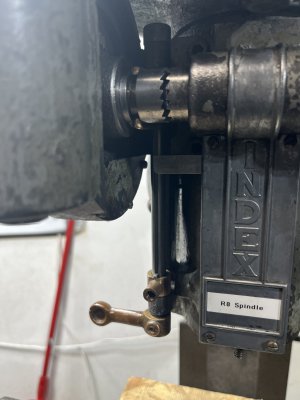
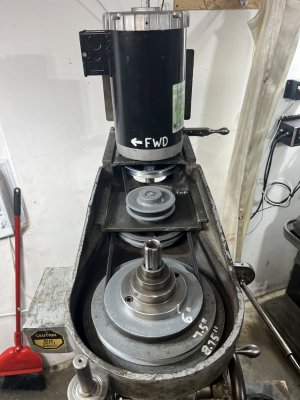
Re-installed the spindle.

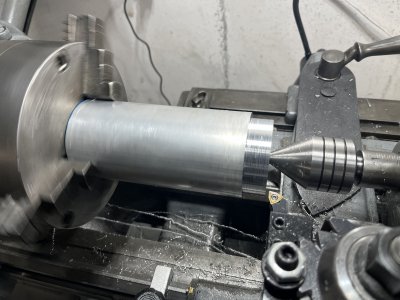
Had a motor laying around but it needed some mods to work. Turned down the rest of the shaft to 3/4” on the lathe (only about 1.5” at the tip was 3/4” diameter with key ), then extended the 3/16” keyway on another mill. Also welded a mount to the motor body.

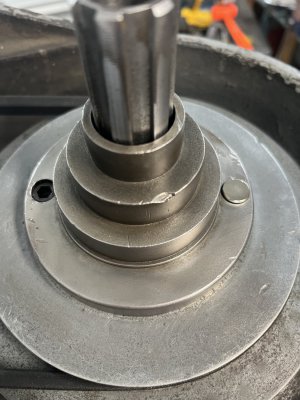
installed new bearings on that middle pulley shaft, keeping the spindle pulley and the bottom middle pulley that mates with it using a new Gates 2346 (4L346) belt.
For the motor pulley I’m using a new 6” pulley, mating it with a 3.95” pulley for the top middle pulley using a new 4L300 belt. With the spindle and lower middle pulleys both at 6”, this will max out at about 2600 RPM. Had to put both the new motor and upper middle pulleys on the lathe to get them to line up properly, given how long the motor shaft is (should have turned more of the shaft down to 3/4”). With all that done, both belts snug up well at the first “click” of the belt tensioning mechanism.

Reassembled the down feed with new bearings and a new taper pin, which had to be cut to make it flush.

I’m going to try and make the upper down feed housing, stepped flat pulley and idler roller assembly when everything is done.

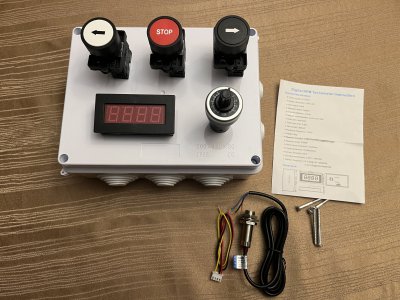
Started laying out the vfd controls along with tach on a box that will be mount on the mill. Also need to wire up breakers / vfd into a box and the x-axis feed motor.

Almost there… here are sone pics.

FE3535B3-826F-4133-A827-33D687666BF8.jpeg

62980DC8-1FE0-4B26-94C7-42CDA9BA919B.jpeg

3263C84D-2CB0-4DD0-98EB-C0E4BC3F7993.jpeg

E0FB8653-71F9-473D-8FFC-E3BB2768DDF3.jpeg

F262115E-91F1-4CD6-95F6-7AD3EBF8DACB.jpeg

2F88114B-07D9-428E-8C3A-E94F11D9636E.jpeg

7D947A0C-C82F-4ECD-B61D-5ED06449E78C.jpeg

AF18120A-8D05-43B2-AD8E-A26BC2973510.jpeg

854B410E-D2D5-4A26-947E-55841F935091.jpeg

E9D58D60-0558-4404-BB07-CE2EAE33E7D4.jpeg
 

Attachments

  • E95F1037-C507-45E3-8931-A70AC8ADFA0D.jpeg
    E95F1037-C507-45E3-8931-A70AC8ADFA0D.jpeg
    369.7 KB · Views: 2
  • EE63D009-21FB-4433-BCB6-38A828496913.jpeg
    EE63D009-21FB-4433-BCB6-38A828496913.jpeg
    657.1 KB · Views: 3
  • 7D80FAD4-C271-4C6A-8D06-9B7309F134C3.jpeg
    7D80FAD4-C271-4C6A-8D06-9B7309F134C3.jpeg
    311.4 KB · Views: 3
  • FA7D6745-D3EB-4D0A-AE74-F9B9C300FCC5.jpeg
    FA7D6745-D3EB-4D0A-AE74-F9B9C300FCC5.jpeg
    175.8 KB · Views: 2
  • 2088A3B7-8316-4B5E-B7D4-06F0D521944C.jpeg
    2088A3B7-8316-4B5E-B7D4-06F0D521944C.jpeg
    265.7 KB · Views: 2
Waiting for more stuff to arrive. Installing a new motor on my lathe as well (to make the flat pulley for the down feed), so that frees up some time to install the electrical box, breakers and VFD.

Still need to wire up the remote panel (waiting for the 18-9 cable) and program the VFD for it, but I fired up the mill for the very first time today using the local controls. That was very satisfying.

I also need to put back together and re-wire the motor for the x axis feed, but that will be after I take the saddle/table off for cleaning.

Here are some pics:
19F4F424-E07A-44D3-B7D7-CDF6D3C57F2B.jpeg7860B25A-37B1-49E7-9EDF-696BA43B027B.jpeg22C6EA57-7CDF-4955-AB7B-102147CAD6F4.jpegA7E4C362-B687-42CA-9280-96CC25E16375.jpeg486C6230-5605-40C5-B044-9D9C286764C2.jpeg86C6BFD5-AF9C-4BF4-9798-38DCCE33E4E5.jpeg

B027F8C7-3C90-4690-ABC2-CF5A5767C2FF.jpeg
 
Mounted the panel today. Need to wire it up and program the VFD, then it’s on to the drive motor for the x axis. Gotta figure out how I want to mount the 110v outlet for the lights. After that, the saddle / table and some fab work to make what’s missing on the power down feed.

Some pics:

9F684ACB-2695-4D0A-B1E7-5E26023F77C0.jpeg


A71EB746-D612-46DF-9C34-5E6CEA2E3487.jpeg

24DEC968-FE39-4030-BF18-D8E204A0E0D0.jpeg
 
Other than a fan for the summer, the electrical panel and control are done. I even added a 110v outlet for two magnetic LED lights and the spindle tach display. There are 3 breakers, one for the mill, one for the X feed motor (reversible 110v) and the final one for the 110v outlet.

I now need to figure out how to mount the tach pick-up sensor. Where it is now, it may interfere with the down feed belt, but I won’t know until I fab all the missing parts to get the down feed going. I may just mount it as-is with the expectation to only put the flat belt in the slowest speed position only.

I still need to adapt/mount the new pulleys for the X feed, but the motor is mounted, connected, runs and reverses.

A few pics:

4036DD05-E305-49C3-8DAC-5BB55DC8D06A.jpeg

215D0ED4-03DA-4432-896A-E8A9BD1E91C8.jpeg

FAF4DF3A-4603-429A-B83B-8BDC0BC3721B.jpeg

02B106CE-C90A-4BC1-86F8-3A3BC8C53F7B.jpeg

EDFB79ED-7E7E-4266-A222-6A2FC3CD617F.jpeg
 
X axis feed works now. New pulleys. 16mm bore with 5/8”-1/2” sleeves. The pulleys needed to be drilled/tapped and so do the sleeves. Motor and x axis pulley shafts not keyed, just a flat spot on the shaft.

Thinking about replacing the motor. It runs but barely. Shaft is bent and noisy.

070664E3-74A2-4A72-9F5A-C0F189E86952.jpeg
 
I used a hammer on the shaft and got most of the wobble out which greatly improved the vibration/noise while running.

Made a 1/2” square crank handle using some scrap. Used a scrap 1/2” square crank from an old bicycle. I heated it up before bending.

Finally got to mounting the tach sensor. Used some scrap metal. I think it used to be a connecting piece for a garage door opener. It’s thicker than 1/8” so it should be rigid. After some drilling, cutting, and bending, I got it just right. Mounted everything up and nothing on the display, then I remembered that the sensor is magnetic pole specific. Flipped the magnet and got it going.

Finished up the loose ends (cable management) with some zip ties.

Up next, fabbing up the missing down feed parts.

Here are some pics.


2B19D590-E28B-4283-9DB8-86D10AB55B18.jpeg
CA0EFBC8-B68D-41C5-8C88-9360F7CD6527.jpeg
ED000AE2-82D2-497C-B0D3-FC4E32E357CE.jpeg
CDE84A32-8DE6-485F-B7F3-9755AB95EC69.jpeg

8A7BD10B-1989-4DF9-9313-BD261A892DEA.jpeg
9C81569E-644A-4440-B7C2-2D2EBA34416B.jpeg
 
Stepped flat belt pulley on the down feed done. Next up, the belt tensioning mechanism and the belt/pulley housing.

Pics:

B65B8F87-A81A-4D68-A7A5-CED83D41C3EC.jpeg


6915828E-1FC3-4BD1-8275-6534683529F4.jpeg

FBF0D013-CA90-4514-B313-4BE4135E7AF0.jpeg

AB9E4CE8-AC1B-455C-93AC-40D8AB662CD0.jpeg

96F4EE6A-AA78-487A-9543-B48C177DF16E.jpeg
 
Been working on rest of the missing auto downfeed parts.

Almost there… lots of trial and error on my part. Here’s some pics on my progress so far:

8D7CD987-61B6-429B-8DB4-0544B7237EA5.jpeg
333227ED-D52A-452A-A50E-EC5792974F98.jpeg
CA91D173-D2A0-4566-8AE3-819A48815755.jpeg
0217EE84-5283-45F7-A6A1-20F123A0BE62.jpeg
6588E86D-7E93-4CB0-A807-E72AEAE14622.jpeg
F1B50798-9B08-4A7D-BF25-1C178CC7CA21.jpeg
F562E34B-6D64-4B53-B396-26CFE006B461.jpeg
EA7DA0F2-B5E5-4D92-BBE2-634AFC3C5F0A.jpeg
2D298411-019E-4274-A384-B68EC3C3B517.jpeg
7C1C895B-AF12-4DD3-9FB4-B5D25B2DE1F0.jpeg
B16D0150-F653-4F4C-913A-66A7D10BCF92.jpeg
845401F5-CF38-4E62-8FB2-7DFA2E760531.jpeg
F8152511-E488-41F5-8500-957AC77B23A3.jpeg
30F9916B-31E5-4C6B-81E8-64B3E1982549.jpeg
AFB8B5C1-6083-4E32-BCCA-0CB43AFFE2EB.jpeg
EDA82306-BFCB-4CAE-886E-C08898DC508E.jpeg
89FB19D8-0E6E-4D92-9AF6-6F888509B5D7.jpeg
42AC150C-4246-4985-B5D8-B49F2BE6FD18.jpeg
AE6A4519-B0A2-4675-9068-F8E13B40E71C.jpeg
F278788A-29A9-489A-AB69-F9845DE3C354.jpeg
 
Back
Top