I bought a Lagun! Now I have questions.

Don't get me wrong, I'm not saying it can't happen, but we're talking about hobby use of 3-5hp motors. A 3hp in the case of this Lagun mill. That's only a bit over 2000 watts of total energy available when it's maxed out. You would have to have a VFD that is either woefully mismatched for the purpose, or have the correct VFD configured all wrong to produce enough stray energy to induce enough of it into the bearings and actually coke the grease. Even in an industrial setting, I can't see this happening on 5hp( 3750 watts ) and under applications. This is also assuming one uses best practices when it comes to the electrical installation on both sides of the VFD.
The stray rotor currents are a freq ( square wave artifact) thing and Independant of hp, I agree with you that vfd mismatch (undersized VFD) makes things worse I also agree that if best practices (I have no way of knowing what pratices he would use) are used It more than likely will not be an issue. Bottom line IMO adding a grounding wiper on the shaft is good cheap insurance. But it is your motor so run it how you see fit. Rotor grounding, higher voltage insulation and insulated bearings are part of best pratices. You are not going to get insulated bearings or rewind the motor but a shaft grounding wiper is relatively easy to add. Often times the first bandaid tried on a problematic instilation is a grounding wiper, most of the time it solves the problem (assuming premature bearing failure is the problem).
I'm not saying that you cannot or should not run an old motor on a vfd, I'm pointing out the easy parts of best pratices that can be used.
 
Last edited:
I've been busy with the mill but appreciate all the comments and discussion. Here is a summary - I may start separate threads on some of these items because a) they are specific and b) I wish I would have found more info on them when I was looking.

1. I fixed the way-oil pump and (partially) re-plumed the oil distribution. I dissasembled the pump and got the piston out (which had been broken off flush with housing), and drilled and tapped it for M6-1.00 thread, and attached a handle using that. I also installed a new oil-cup for the quil feed (was missing - broken off). All this makes me wonder and worry a bit about the lubrication of this tool in recent past.

2. I discovered that the x-axis (longitudinal axis) lead-screw nuts were really shot. The lead-screw itself is worn, but not horribly - I can live with it. Lagun wanted $1700 for a new screw/nut and $700 for just the nut. FWIW - my (old) model has a split nut, but they now use a single nut. I made my own for $200 using some bronze lead-screw nuts from McMaster Car. Actually still in process - turned to OD and length, but I need to re-assemble the mill with old nuts in order to mill the keyway groove in new nuts, then pull leadscrew/nuts back out and put in new nuts. (I don't have a broaching tool for my lathe).

3. I purchased a Lapond K-100 series VFD (Amazon) rated for 2HP/1.5KW, and installed it in an enclosure. It works. I've limited frequency range to 50Hz-70Hz in consideration of the age of the motor and just to be safe. Gives a nice range of RPM's for a given pully step - time will tell how useful that is.

And a LOT of cleanup! Mostly cosmetic, but it looks much better and makes me happy. Here are some photos:

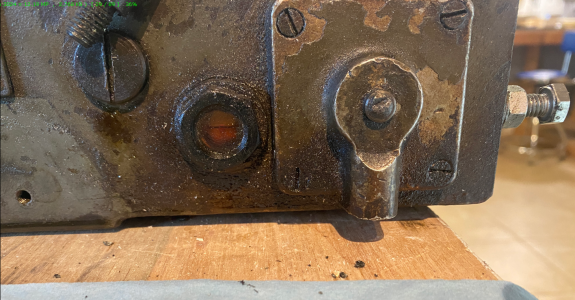
Way-oil pump flange with just a nib of shaft extending where handle was broken off.
1709233937427.png
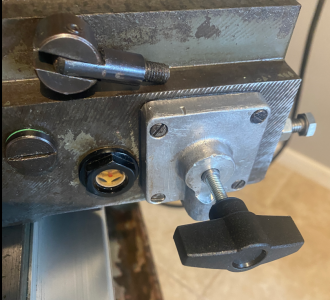
After cleanup and new handle. Works fine - I will shorten the stud on the handle and probably leave it off unless I want to pump some oil - I suspect it was broken off for a reason (is in the way).
1709233955334.png

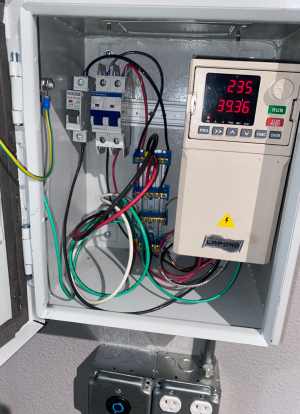
The Lapond VFD in it's enclosure. I pulled 10-3 wire from a new 30A 240V breaker in my main panel. The "-3" means I have the otherwise not-needed neutral, so I could pull off a 20A 120V circuit from either leg of the 240V, which I separately fused (breaker) in the enclosure and ran that to a 2-gang box with four 120V outlets. I'll use this for the DRO, x-axis feed, lamp, bench grinder, etc. I was short 120V circuits in the shop. Motor draws less than 7 Amps so I can share 20A on either leg for two 20A 120V circuit (used other leg for a 120V line to an air compressor in the garage). The VFD works fine and I am mindful of all the cautionary comments. The manual sucks - I was an EE before I was a Physicist, and have worked with control systems much of my career, and it still was hard to decipher. Lots of information, but so poorly translated. But simple in the end.
1709234109867.png

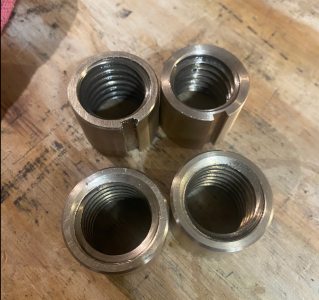
Old and new leadscrew nuts. Was a bit of a trick to turn these down to diameter - I will create a separate thread on this because I think it could be useful for others. As you can see, the new nuts do not yet have the keyway slot. I thought quite a bit about how to do this, and easy answer is "If I only had a mill." I will re-assemble the mill with old nuts, cut the keyways and then take out the leadscrew again to put new nuts on. After you've done this once, it really isn't that hard.
1709235041329.png
 
I've been busy with the mill but appreciate all the comments and discussion. Here is a summary - I may start separate threads on some of these items because a) they are specific and b) I wish I would have found more info on them when I was looking.

1. I fixed the way-oil pump and (partially) re-plumed the oil distribution. I dissasembled the pump and got the piston out (which had been broken off flush with housing), and drilled and tapped it for M6-1.00 thread, and attached a handle using that. I also installed a new oil-cup for the quil feed (was missing - broken off). All this makes me wonder and worry a bit about the lubrication of this tool in recent past.

2. I discovered that the x-axis (longitudinal axis) lead-screw nuts were really shot. The lead-screw itself is worn, but not horribly - I can live with it. Lagun wanted $1700 for a new screw/nut and $700 for just the nut. FWIW - my (old) model has a split nut, but they now use a single nut. I made my own for $200 using some bronze lead-screw nuts from McMaster Car. Actually still in process - turned to OD and length, but I need to re-assemble the mill with old nuts in order to mill the keyway groove in new nuts, then pull leadscrew/nuts back out and put in new nuts. (I don't have a broaching tool for my lathe).

3. I purchased a Lapond K-100 series VFD (Amazon) rated for 2HP/1.5KW, and installed it in an enclosure. It works. I've limited frequency range to 50Hz-70Hz in consideration of the age of the motor and just to be safe. Gives a nice range of RPM's for a given pully step - time will tell how useful that is.

And a LOT of cleanup! Mostly cosmetic, but it looks much better and makes me happy. Here are some photos:

Way-oil pump flange with just a nib of shaft extending where handle was broken off.
View attachment 480675
After cleanup and new handle. Works fine - I will shorten the stud on the handle and probably leave it off unless I want to pump some oil - I suspect it was broken off for a reason (is in the way).
View attachment 480676

The Lapond VFD in it's enclosure. I pulled 10-3 wire from a new 30A 240V breaker in my main panel. The "-3" means I have the otherwise not-needed neutral, so I could pull off a 20A 120V circuit from either leg of the 240V, which I separately fused (breaker) in the enclosure and ran that to a 2-gang box with four 120V outlets. I'll use this for the DRO, x-axis feed, lamp, bench grinder, etc. I was short 120V circuits in the shop. Motor draws less than 7 Amps so I can share 20A on either leg for two 20A 120V circuit (used other leg for a 120V line to an air compressor in the garage). The VFD works fine and I am mindful of all the cautionary comments. The manual sucks - I was an EE before I was a Physicist, and have worked with control systems much of my career, and it still was hard to decipher. Lots of information, but so poorly translated. But simple in the end.
View attachment 480677

Old and new leadscrew nuts. Was a bit of a trick to turn these down to diameter - I will create a separate thread on this because I think it could be useful for others. As you can see, the new nuts do not yet have the keyway slot. I thought quite a bit about how to do this, and easy answer is "If I only had a mill." I will re-assemble the mill with old nuts, cut the keyways and then take out the leadscrew again to put new nuts on. After you've done this once, it really isn't that hard.
View attachment 480681
line up the nuts on your lathe cross slide with some vice put an endmill into the lathe and use the lathe to mill the slots?
you solution to the VFD old motor dilemma will most likely work without issue if used as you describe, your panel looks nice!
if your VFD has an option to set the carrier freq, set it as low as works good that will limit the voltage artifacts your motor sees.
 
line up the nuts on your lathe cross slide with some vice put an endmill into the lathe and use the lathe to mill the slots?
Hmm. That would take some fixturing/rigging but it is a thought. It is a 6mm slot and lacking a 6mm collet and end mill I was planning multiple passes w/ a suitable, smaller end mill. But multiple passes at (precise) different heights with that lathe setup would be tough. However, I could buy a 6mm end mill and hold it in my 3-jaw chuck or (don't tell) a 1/4" ER collet on my lathe and do it in a single pass, or at least multiple passes just for depth, not slot width. Worth considering, thanks.
 
Hmm. That would take some fixturing/rigging but it is a thought. It is a 6mm slot and lacking a 6mm collet and end mill I was planning multiple passes w/ a suitable, smaller end mill. But multiple passes at (precise) different heights with that lathe setup would be tough. However, I could buy a 6mm end mill and hold it in my 3-jaw chuck or (don't tell) a 1/4" ER collet on my lathe and do it in a single pass, or at least multiple passes just for depth, not slot width. Worth considering, thanks.
as Blondie says a lathe is just a mill on its side.
 
Hmm. That would take some fixturing/rigging but it is a thought. It is a 6mm slot and lacking a 6mm collet and end mill I was planning multiple passes w/ a suitable, smaller end mill. But multiple passes at (precise) different heights with that lathe setup would be tough. However, I could buy a 6mm end mill and hold it in my 3-jaw chuck or (don't tell) a 1/4" ER collet on my lathe and do it in a single pass, or at least multiple passes just for depth, not slot width. Worth considering, thanks.
install the vice and the part make a pass and then shim the vise up?
 
I decided to take the safe, maybe easy, route and complete the re-assembly of the mill and then cut the slot on the new nuts there, instead of on the lathe. To that end - I got it all back together today, and made "first chips"! First cut making those first chips was to make a 6mm wide by .115" deep slot in a piece of scrap Al, which is the slot I need to make in the nuts. Used a 3/16 end mill, came out as expected, no problem. Simple task I know, but you have to realize that the last time I had my hands on the controls of a milling machine was over 25 years ago! I did a lot of machining back then, but it was "back then". Just as with the lathe (which I just got in December), it all comes back quickly, but I want to be careful with these nuts because I have $200 invested at this point! I will finish tramming before I cut the key-way slots (head was rotated 90-deg for the move-in). But the mill is functional - nice milestone. I'm happy.
 
Back
Top