[How-To] Harig Grind All #1 Disassembly and adjustment

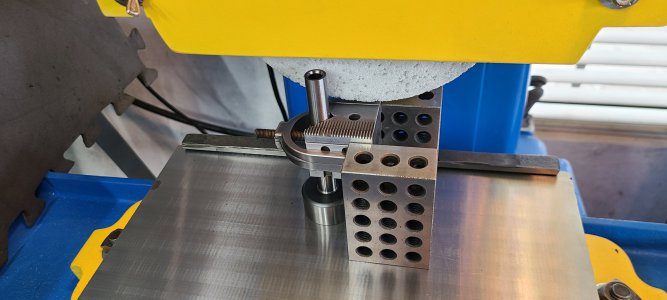
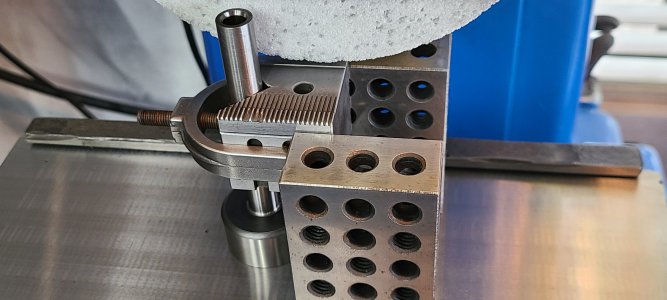
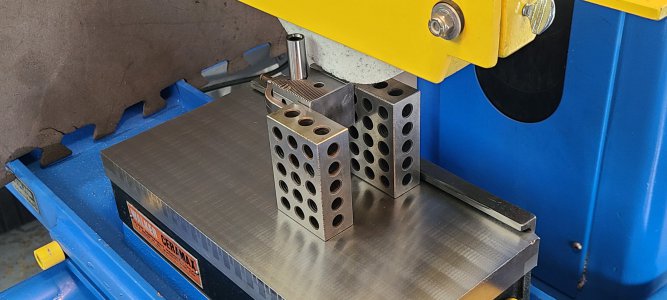
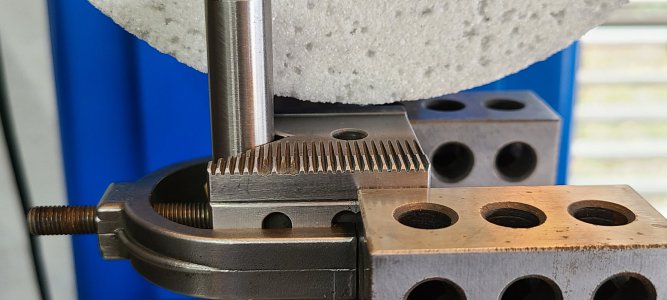
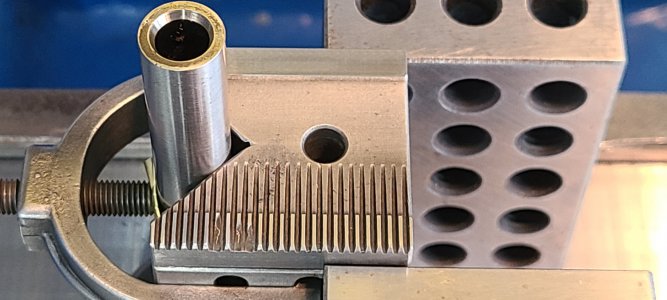
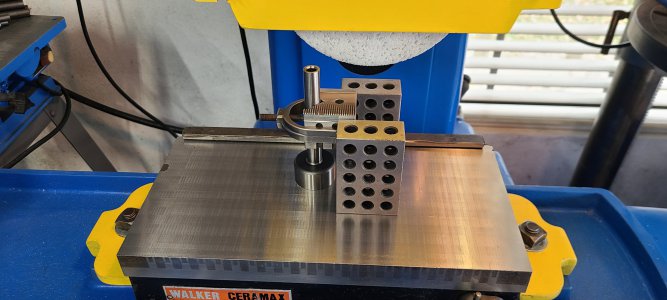
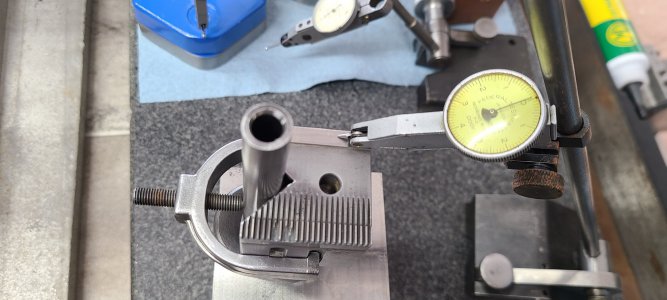
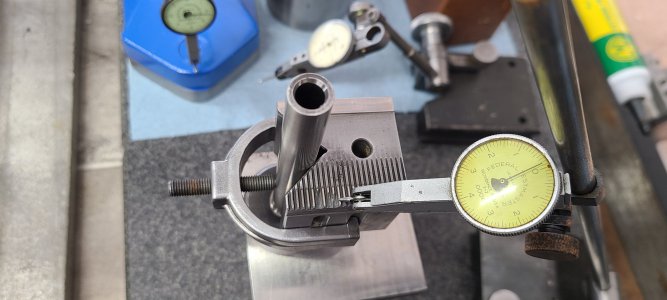
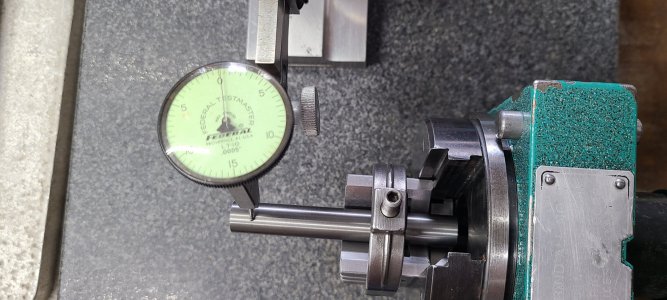
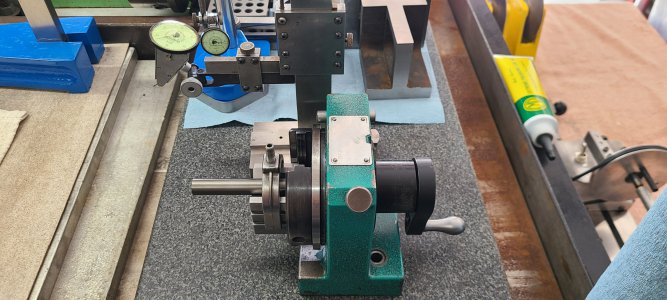
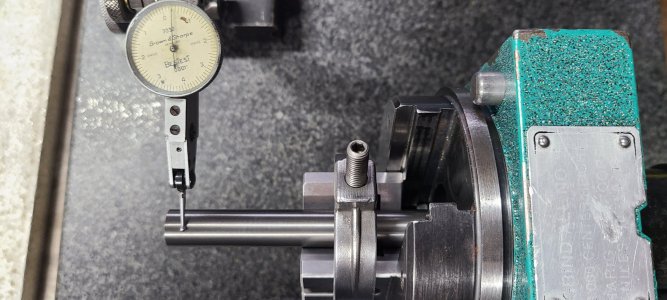
Placing the V-block on the surface plate and indicating it showed some problems. Here is where some input would be appreciated. There is perfect flatness on one side of the V-block on the mating surface. The side with the grooves for the adjustment are off .0015 lower laterally from the opposite side of block previously measured. Then it has a slope from the beginning of the teeth to the end of the teeth of .0005
So now the question is Remedy?

Little trouble following this, but I think I see what you are getting at. Does this error in the V block match the error you are seeing in the pin at +/-90 degrees? If you can corroborate the measured error in both setups, then you are more sure you have the culprit.

I'd probably start with just skimming everything down until the it's flat, using a cyl square as your work holding on the surface grinder. Probably want to leave the teeth in place, the little pinion may still engage and work as expected even with .0015" removed from the rack.

For $125, it's probably worth some work getting it in shape. If everything about the base checks out fine after cleaning it up, it might even be worth that $400 V block.
 
I was hoping someone would confirm that as an option. I'm second guessing myself here at times. There very well may be enough material left to just skim the block and still have a working fine adjustment screw as you stated. I'm wearing out the surface plate sliding everything around the house on it today.
I do think your right and as you stated, removing material to flatten everything might bring things back home. Lets flip a coin and head back to the grinder. I like your idea of using the cylinder square to align it all on the grinder. It worked great on the plate to blueprint the V-block and since it's our baseline for the workpiece, everything should be aligned to it.
Thanks for the input. I'm going to use your advice and grind with the cylinder square..
Will be back later with results..
Thank you..Great idea!
Maybe check your cylinder square before you grind. Just to be sure...If yours isn't, might need different work holding, etc.
 
Maybe check your cylinder square before you grind. Just to be sure...If yours isn't, might need different work holding, etc.
Thanks for the reminder. I've recently had my plate reground and certified. My angle plates have been reground and my cylinder square is perfect. Good advice.
 
Ok, I took dkemppai's suggestion of grinding the V-block attached to the magnetic cylinder square. I know my square is almost perfect as I've checked it recently. My surface granite was just recertified and ground to AA labratory and I ground my Angle block to .0002. I'm confident my measuring and setup tools are closer than my skill level.
Heres the results of grinding the V-block.
See attached pics...
Using the mag cyl. square, I attached the V-block to it. Placed the mag square on the mag chuck. Supported the V-block sides with 123 blocks to give added support. Started on high side of block on the known flat and true portion. Gradually, skimmed down a few tenths and cleaned up surface. Moved down and front to back in increments of .0002 until I contacted the low portion of block, which is the damaged teeth part. Took several skim passes until I finally reached a depth of .002 The measured error was .0015 from high to low so they now are flat and parallel. Everything should be concentric to the centerline and square in my mind since Everything is ground with the V-block as the baseline reference surface. Thank you dkemppai!
Grinding the .002 off did the trick to bring the V-block back to flat and true.
After removing the block it was back to the granite. As I hoped and expected, the block measured true and square. I initially suspected damage to the edges and was expecting to have to add material of some kind to bring it back to dimensions. After grinding the damaged side which is the contact surface...It restored the block to within .0005. I have to say, at this point I'm back in the game. Will never need anything more accurate than that in my home shop. Not to say I'm not going to "Tweak" it some more but, that is far better than the .005+ I started out with. UPS is bringing the screw today and I will update as to if it will function properly since I've ground on the rack portion of the block. The error I had when I rotated the block 90° and 180° is gone. Total runout is within .0005. I'm still thinking the inner race might need another .0002 off to tighten the preload a bit more. As far as the damage to the V-block...I would say from measurements I took, it's home free. Any further error once I do a test grind and test centricity I'm thinking is going to be related to the remaining preload..or lack of. No way to test the preload except by feel. Seems like it could use a squeek bit more. It's not like the bearings are spinning like the crank in an import car on test and tune night. I used general purpose grease in the bearings. I didn't have any white molybodium or whatever it's called, so out came the multipurpose grease.
The attached pics show the process on grinding the V-block.
This process even though it was a severe out of spec challenge was nothing too hard or complicated to achieve. I understand the apprehension of working on a $4300.00 piece of equipment and wondering if it will spend the rest of it's life attached to a rope and living in your boat. There is only 4 major parts to one of these and the only part that wouldn't be easily repairable would be the outer race which is ground into the body and would need special equipment to regrind. Every other part can be repaired from your tooling as I did. Other than extra brain cells and help from other members posts on here, it's almost a no-brainer. I hope this will help someone else who might be having trouble with one of these.
Pics to follow..
 

Attachments

  • 20230209_105631.jpg
    20230209_105631.jpg
    362.1 KB · Views: 16
  • 20230209_105645.jpg
    20230209_105645.jpg
    381.8 KB · Views: 12
  • 20230209_105653.jpg
    20230209_105653.jpg
    431.5 KB · Views: 13
  • 20230209_105705.jpg
    20230209_105705.jpg
    388.2 KB · Views: 14
  • 20230209_111058.jpg
    20230209_111058.jpg
    344.3 KB · Views: 13
  • 20230209_111110.jpg
    20230209_111110.jpg
    413.8 KB · Views: 15
  • 20230209_111634.jpg
    20230209_111634.jpg
    395.7 KB · Views: 15
  • 20230209_111704.jpg
    20230209_111704.jpg
    356 KB · Views: 13
  • 20230209_112355.jpg
    20230209_112355.jpg
    499.4 KB · Views: 14
  • 20230209_113432.jpg
    20230209_113432.jpg
    563.1 KB · Views: 17
Quick update...I cleaned all surfaces and replaced my .0005 indicator with my .0001 indicator and with a final inspection, runout is .0003. 4" carbide rod checked 2" out from V-block.
I am satisfied with that. Big thanks to all the members for the suggestions.
 

Attachments

  • 20230209_172333.jpg
    20230209_172333.jpg
    465.5 KB · Views: 10
Little trouble following this, but I think I see what you are getting at. Does this error in the V block match the error you are seeing in the pin at +/-90 degrees? If you can corroborate the measured error in both setups, then you are more sure you have the culprit.

I'd probably start with just skimming everything down until the it's flat, using a cyl square as your work holding on the surface grinder. Probably want to leave the teeth in place, the little pinion may still engage and work as expected even with .0015" removed from the rack.

For $125, it's probably worth some work getting it in shape. If everything about the base checks out fine after cleaning it up, it might even be worth that $400 V block.
All things considered...you may just be right about the $400 "investment" into the V-block. Looking at the unit in all it's glory now it doesn't seem too bad. Last thing anyone wants to do is put lipstick on a pig. It turned out pretty well even as bad as it initially was. Thanks for your suggestions.
 
All things considered...you may just be right about the $400 "investment" into the V-block. Looking at the unit in all it's glory now it doesn't seem too bad. Last thing anyone wants to do is put lipstick on a pig. It turned out pretty well even as bad as it initially was. Thanks for your suggestions.
Update on the finished project. I ordered a label plate, pinion screw and priced the "Updated" list price for the V-block...$450.00 All things considered, after I checked the runout with the new screw to adjust the V-block, it's holding under .0003. I think everything turned out well. This was a shot in the dark and I certainly value everyones opinions and input helping with this. My next adventure is a Harig cylindrical grinder fixture. I just rebuilt one of those and haven't did a grind with it yet. I will post some info on its beginnings. I have a 2.5" cylinder square that needs a refinnish. I think it will be a good project to share with people. Plus...This is one I really don't want to screw up. More later..
 
Back
Top