Graduated Dials, and Stamping the #s

How to stamp rifle barrels and machine dials

This is how I stamp rifle barrels and the same way to stamp the numbers on the dial I made for my Atlas lathe.
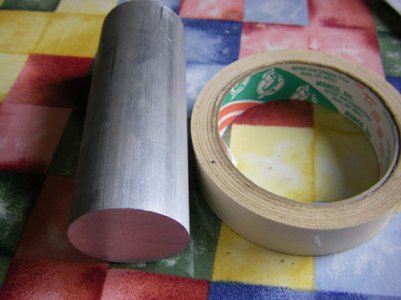
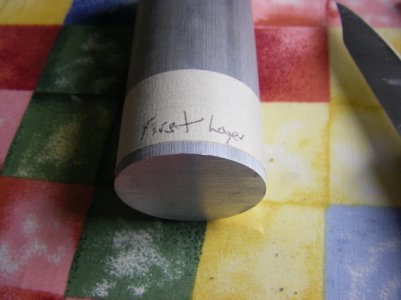
Wrap masking tape around the dial, making sure to cover the area you are stamping the numbers on. This layer of tape is to give some grip to the stamps when you hit them, they are less likely to slide off.
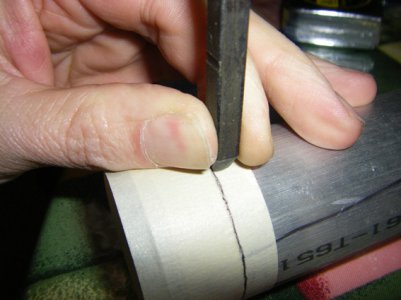
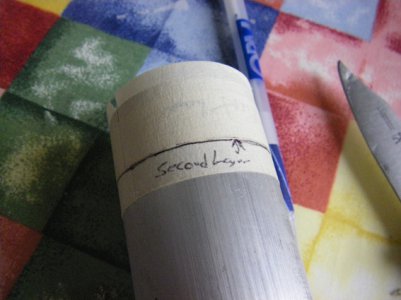
Next wrap 1 or more layers of masking tape, but don't cover the stamp area. You are using the tape to build a shelf to register the line that the number stamps are going to sit on.
I made a few pictures showing what I mean.

On a rifle barrel you will be stamping in line with the bore in most cases while for the dials around the dial.
Pierre
ready-to-stamp.jpg second-wrap.jpg dial-blank-ready-to-tape.jpg first-wrap.jpg
 
Tony
That is probably the only real way to correct the stamps, I think your suggestion can be done. The only problem would be after modding the stamp to centre it. It wouldnt be a tight fit in the holder. But,, I guess a cheap set of feeler gauges could be modded to make proper size shims to keep it all sqaure and tight. Possibally engrave shim thickness, on the side of the stamp that needs it. So, yes I think that your Idea is very doable. Spending the time to get the set right, could save lots of time down the road. Thanks for mentioning that ;)


Pierre
Looks as though your on of the few guys that can stamp free hand. I could only wish. I dont have trouble with the stamp sliding , but free hand stamping as you are doing, I can see the tape working well. A great tip either way. Thanks for mentioning that ;)

Well, at this point, I think I.ll try to get these stamps trued up. Its not all of them that are bad. On the # set, its 3 or 4 that could use tweaking. That should be a good start to a better stamping job.

If any of the members have any more input, or pics of home built jigs for stamping, Id sure like to see them.

Thanks to all that posted
Paul
 
When I had to do some stamping on a surface without any reference, I drew a line with a Sharpie, using a flex scale if it were a round surface. Most of them came out well enough to please the customer. It does take a bit of practice, though. I hated doing it for a couple of hours. My thumb and forefinger became so numb I would send the stamp flying from a wayward blow. Sometimes aimed right an area most undesirable to hit with force.

The main problem I seemed to have, after getting used to the stamp set I sequestered in my tool box, was still not in the vertical alignment, but the width. A character such as "W" or "M" for example, is much wider than an "I" or a "1", even though the stamp shank is the same. Short of machining all four sides of a stamp, I don't see much of a way to fix that.
 
Jim how much of a sliding fit is that holder?

On getting it done on alloy it is not a problem most times as the metal is soft, but on steel like barrel etc, it takes multiple hits. I use 3 to 5 hits, and they are not that heavy either. On round stock I found that it is best to hit once straight up and then a few little hits, tilting the stamp back and forth to fill in the rest of the stamping.
 
Interesting tool jim has made up.
As mentioned by Jim, not having much luck with muliple hits. Then Pierre is using 3 to 5 hits.

From my own stamping trials, I found a few things. I myself could not get the stamp done in a single strike. Never did any aluminum, only steel. For me, its multiple hits, all very light. I seem to have better control with the depth that way. I rather go at it progressive, and get the depth I want, than a single hit thats sends it too deep.

Another thing I did notice while trying different things. When I did try a single strike, it almost seemed the stamp would bounce. When using the boring bar to hold the stamp with the set screw to put a bit of drag on the stamp, it seems not to happen.I allso found that if the stamp wasnt held with a tight tolerance, a hit might produce a double stamping, from the stamp bouncing and shifting out of position I suppose.

I also know exactly what Tony says about his thumb and forefinger hurtin, and going numb. Makes me wonder if there is a way to build a holder that would keep a small amount of pressure on the stamp, spring loaded perhaps? The other thing I wonder about is the hammer used to strike the stamp. Anything special used here? Maybe part of a good stamp job, could be in the hammer.
A hammer with a hard face, that acted like a dead blow hammer would be nice, would help with the bouncing problem?

The more posts on this topic seems to bring more things to my attention, and more problem area,s come to the surface. Im going to experament some with this. I think because stamping is done so few times,the mistakes show up on most if not every job.I would think its better to make some trail runs on scrap, till the stamp jobs turn out atleast to a acceptable level.

Thanks for the input guys, and if anyone has more tooling to show, and infro on the way you do it, its more than welcome.

Paul
 
Your mention of hammers reminded me of something. many of the parts I stamped were ring-shaped, fairly thin-walled and short. Like 6 to 9 inches OD, 5/8-3/4" wall and 3-4" long. Those were about the hardest to stamp well. A smaller hammer (16-20 oz.) seemed to do best on those parts, even when held in a vise. Other parts were somewhat larger, with more mass. Some were 8-10" OD and perhaps 72" long or more, and had an ID of only 2-3 inches. On those, I ended up preferring a 4 lb hammer, and with confidence and conviction, hit it one time. After a while, I learned to make a decent impression without too much effort. Lots of chasing flying stamps, regrinding the striking end after flaring them out, but it wasn't all that hard. But then, I am talking about several years off and on restamping heat numbers on each part, part numbers, serial numbers, PO numbers....and anything else the customer wanted. I was elated when the chief inspector from one of our main customers decided an air pencil was acceptable. It was a CP carbide tipped mini-jackhammer. He gave me one, and I still have it. It's just like writing with a (madly vibrating) pen or pencil.

On parts that were to be nitrided, or otherwise case-hardened, all impression marking had to be done beforehand. Afterwards, on any part that was ground or lapped, often I would mark with the electrochemical etch method. On some materials, there were one of two other stamp styles used. One was a dot stamp, and the other was a low-stress round face. Both were to prevent stress risers from forming on the skin of high tensile steels.

In the end, I won the battle to have all the marking possible done on the machining centers. It was easy, and very nice looking. Consequently, I have probably 10 or more sets of steel stamps in storage, from 3/32 up to 1/2". And lots of partial sets where some were lost, some were dulled from popular use.

There are commercial stamp holders for striking, but I never could get the hang of placement, so gave up on them. Perhaps if you had only a single character?
 
I've seen one of those, not up close, but it was a nail set for trim work. I don't think that particular one would be strong enough to stamp steel, unless it were for small stamps. Softer metals, probably adaptable.
 
I predict a project developing out of the ideas generated by this discussion. :thinking:

Take Paul's idea of how to support and position the stamp, combine it with Tony's idea of making all of the stamps uniform size (and length), add an XY table to hold the workpiece and rather than strike the stamp with a hammer add an over-center type ram to push the stamp into the workpiece, sort of like a mini press brake. If the stamps were all the same length, the depth of the numbers and characters could be made precise and repeatable.

Tom
 
Just a thought on spring-loaded hammers (or hammers dropped from a set height). Different characters on the stamps have different raised surface areas. An 'M' would take more force to reach a set depth than an 'I'. I suppose a drop hammer could have a scale on the side that was marked for the best starting height for a given letter or number. Trial and error stuff to set it up. After that, it could be fairly consistent.
 
I know I mentioned Mathews stamps before, but they do make a press as described, sort of.

http://www.matthewsmarking.com/distributors/marketing/literature/IMPACT.pdf

They also make a series of stamps that are already ground ans sized to fit holders where you can stack figures and characters in proper alignment. So ina way, we are re-inventing the wheel, but homebrew. I like the idea. Mathews ain't exactly cheap. I have had thoughts more along the lines of engraving over stamping, simply because of the use of less force, and the versatility of font.
 
Back
Top