-
Welcome back Guest! Did you know you can mentor other members here at H-M? If not, please check out our Relaunch of Hobby Machinist Mentoring Program!
You are using an out of date browser. It may not display this or other websites correctly.
You should upgrade or use an alternative browser.
You should upgrade or use an alternative browser.
Fixturing and toolpaths for noobs
- Thread starter koenbro
- Start date
-
- Tags
- beginner cnc machining fixture mill
- Joined
- Feb 23, 2016
- Messages
- 424
I tried to use sidecutting today, and even made the sure in teh setup that the part touches the edge of the balnk, and set the entry point of the cutter there. . I must have done smth worng because I broke the cutter. So I replaced and went back to ramping and multiple shallow cuts.
The cutter has to do essentially a slot, thus two different cuts and that may be the reason for it breaking? Or was I feeding too fast?
1/8" 6061 and a 1/8" 2 flute HSS cutter.
CL 0.001, Spindle 4100 rpm, feedrate 5ipm, 135 SFPM
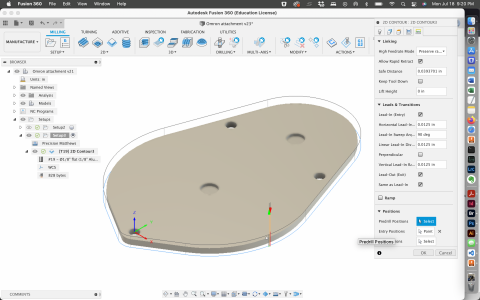
This is how I fixtured:

After spot drilling, now it's the 5.1 mm (0.201") which is my go to drill as it also allows tapping for 1/4"-20

Broken cutter:

Maybe cut the blank down to almost size and do adaptive clearing from the edge in (instead of 2D contour), so that there is only one direction of cutting?
It seems that the toolpath strategies are different between 2D cutting (processing a sheet) versus 3D milling.
The cutter has to do essentially a slot, thus two different cuts and that may be the reason for it breaking? Or was I feeding too fast?
1/8" 6061 and a 1/8" 2 flute HSS cutter.
CL 0.001, Spindle 4100 rpm, feedrate 5ipm, 135 SFPM
This is how I fixtured:

After spot drilling, now it's the 5.1 mm (0.201") which is my go to drill as it also allows tapping for 1/4"-20

Broken cutter:

Maybe cut the blank down to almost size and do adaptive clearing from the edge in (instead of 2D contour), so that there is only one direction of cutting?
It seems that the toolpath strategies are different between 2D cutting (processing a sheet) versus 3D milling.
Last edited:
- Joined
- Feb 8, 2014
- Messages
- 11,144
1/8" 6061 and a 1/8" 2 flute HSS cutter.
CL 0.001, Spindle 4100 rpm, feedrate 5ipm, 135 SFPM
That gives you a CL of 0.0006 which is fine for 0.125 2 flute cutter. What was the step over, or optimal engagement? And more importantly, what did your tool path look like?
Can you post the tool path or a drawing so I can understand what was happening there.
- Joined
- Feb 23, 2016
- Messages
- 424
- Joined
- Feb 8, 2014
- Messages
- 11,144
OK, I see the problem. You are trying to do a full depth contour into a solid piece. Not possible without ramping in. The entire cutting strategy is wrong for that part. There is no possible way that the tool could straight plunge in and make that cut. The good news is that it was a cheap tool bit and no real harm done.
It is possible to make that cut if you use a spiral ramp to depth and then contour, but even that has some major problems with chip clearing since you would be making a full width cut. And with a small end mill it's really hard to get the chips out of the slot, even with high pressure flood coolant. So you have to choose a cutting strategy that allows for chip clearing. Then I'm also trying to figure out how you were planning to hold the part after on the final little bit of cut.
This is all part of the learning experience, and we've all been there. So lets figure out a better cutting and work holding strategy.
I'm going to make a quick drawing and a tool path for a part that is roughly equivalent to your part, and I'll post it in a little bit.
It is possible to make that cut if you use a spiral ramp to depth and then contour, but even that has some major problems with chip clearing since you would be making a full width cut. And with a small end mill it's really hard to get the chips out of the slot, even with high pressure flood coolant. So you have to choose a cutting strategy that allows for chip clearing. Then I'm also trying to figure out how you were planning to hold the part after on the final little bit of cut.
This is all part of the learning experience, and we've all been there.
I'm going to make a quick drawing and a tool path for a part that is roughly equivalent to your part, and I'll post it in a little bit.
- Joined
- Feb 8, 2014
- Messages
- 11,144
OK, that took longer than I thought it would
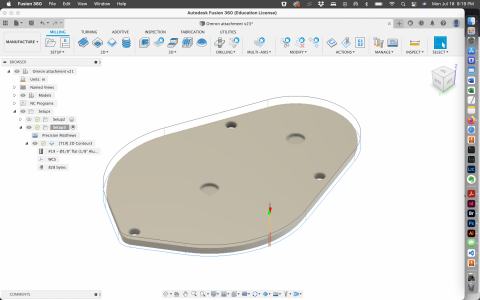
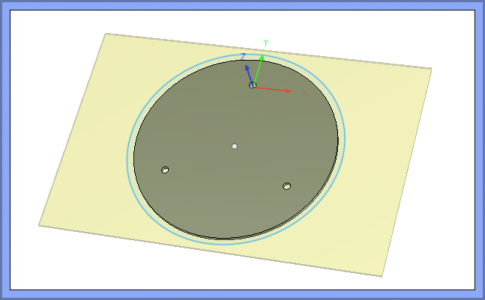
Here is the layout, just a disk with 3 holes in it, but a toolpath equivalent to your part. The three .25 holes can be used to screw the disk down to something, the outside raw material can be held with clamps. The circle outside the disk is the outer bounding box to keep it from cutting all of the excess material, which it would do if it's not constrained.
\
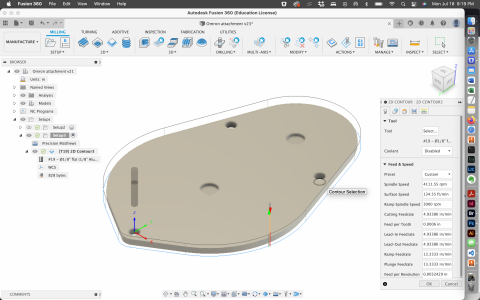
And the roughing toolpath
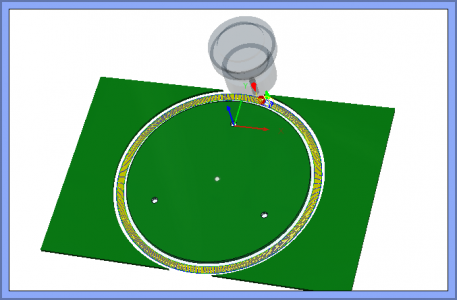
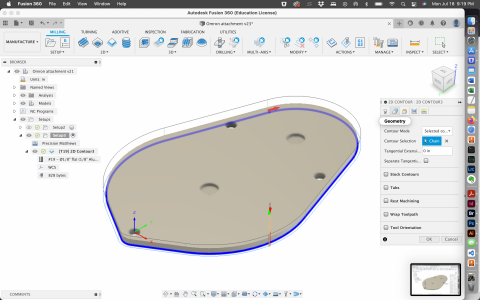
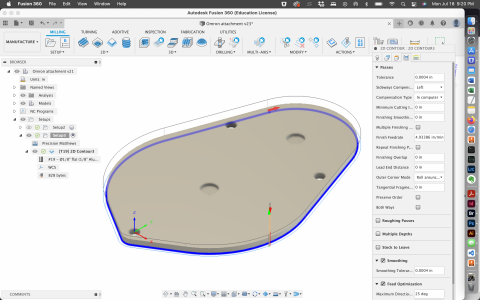
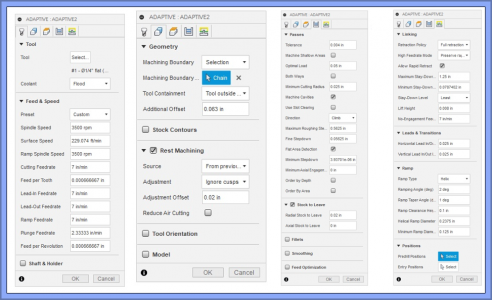
Here are the setup parameters for the adaptive cut. I chose to use a 1/4'' endmill could have been a 1/8 with some parameter changes.
This video shows the adaptive roughing pass, leaving 0.020 for finishing, and then a spiral down finishing operation for final cleanup.
Here is the layout, just a disk with 3 holes in it, but a toolpath equivalent to your part. The three .25 holes can be used to screw the disk down to something, the outside raw material can be held with clamps. The circle outside the disk is the outer bounding box to keep it from cutting all of the excess material, which it would do if it's not constrained.

\
And the roughing toolpath

Here are the setup parameters for the adaptive cut. I chose to use a 1/4'' endmill could have been a 1/8 with some parameter changes.

This video shows the adaptive roughing pass, leaving 0.020 for finishing, and then a spiral down finishing operation for final cleanup.
Last edited:
- Joined
- Feb 23, 2016
- Messages
- 424
Very grateful for the effort you put in to show the different tabs of the operation (and the video!). I went through this and recreated the adaptive cutting and simulated it. It is a very different way of thinking about the toolpath than I did before (I think I was still stuck in 2D cutting with a router). Very interesting and I might redo the cut just to see it real life.
After you leave stock (tab #4 "Stock to leave"), do you go back with an additional operation to clean it up and smooth it?
After you leave stock (tab #4 "Stock to leave"), do you go back with an additional operation to clean it up and smooth it?
- Joined
- Feb 8, 2014
- Messages
- 11,144
My pleasure. I always like to pass on what I learn. I do have to admit that I was stuck in the same mindset as you, ''this is the way we've always done it'', 50 years of doing it the same way is hard to overcome. My son finally beat me into submission and changed my thinking.Very grateful for the effort you put in to show the different tabs of the operation (and the video!). I went through this and recreated the adaptive cutting and simulated it. It is a very different way of thinking about the toolpath than I did before (I think I was still stuck in 2D cutting with a router). Very interesting and I might redo the cut just to see it real life.
After you leave stock (tab #4 "Stock to leave"), do you go back with an additional operation to clean it up and smooth it?
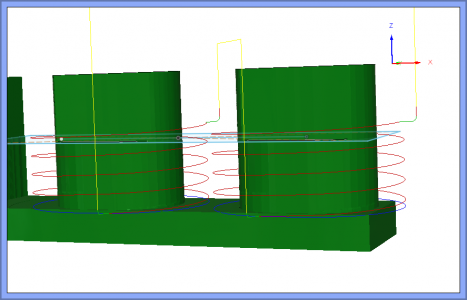
Watching this run on your machine or my machine is like watching paint dry, just because of the limitations of the machine. It looks slow, but it's really removes material faster than multiple step downs, uses more of the endmill, and is more efficient. When running on the Haas, it no longer looks slow, RPM maxed out at 6000, 80 to 120 IPM feed, frightening to watch. Because of the shape of the tool path, chip evacuation is greatly facilitated and this is really important, little to no recutting of chips. One thing you will see when doing adaptive cuts is faceted cuts on arcs, this is normal (it's a roughing operation) and is why you leave stock and make a finishing contour pass. You can use the same tool for both operations, or use a roughing endmill for the adaptive operation, then come back with a finishing endmill to contour.
If you look at the video again, there are actually 2 operations. The adaptive roughing operation, followed by a finishing contour helix cut, using the helix ramp function. I like to do helix finishing cuts where the tool actually cuts a spiral down with a 0.05 to 0.25 step down per pass around the OD of the part. This is not an actual step down, but is controlled by the ramp angle. It's a continuous cut around the OD (or ID) using all 3 axes in a continuous motion.
- Joined
- Feb 23, 2016
- Messages
- 424
Hi @JimDawson, I have made several cuts with the method you suggested and I like it a lot.
With a .25" cutter it is faster, of course, as the chipload I use is 0.001" per tooth. I can appreciate how much material is removed.
Just to clarify, the second step -- the spiral smoothing is done as a 2D contour, or not? Thank you.
With a .25" cutter it is faster, of course, as the chipload I use is 0.001" per tooth. I can appreciate how much material is removed.
Just to clarify, the second step -- the spiral smoothing is done as a 2D contour, or not? Thank you.
- Joined
- Feb 8, 2014
- Messages
- 11,144
Happy to hear that works out for you.Just to clarify, the second step -- the spiral smoothing is done as a 2D contour, or not? Thank you.
Yes, in most cases I use a 2D contour.


 at least for now)