-
Welcome back Guest! Did you know you can mentor other members here at H-M? If not, please check out our Relaunch of Hobby Machinist Mentoring Program!
You are using an out of date browser. It may not display this or other websites correctly.
You should upgrade or use an alternative browser.
You should upgrade or use an alternative browser.
Extreme Air Mail! Mailing Tube Rocket Project!
- Thread starter Weldo
- Start date
- Joined
- Sep 7, 2019
- Messages
- 674
Here you can see how the polyurethane glue foams up. We'll see how it holds when I start cutting.

This is the set up I arrived at to drill the new dowel hole. I set everything by using a torpedo level. First I leveled the drill press then plumbed the table at 90*. I then clamped an angle to the table making sure it was plumb. Finally I clamped the wood to the angle. It should be close. Closer than eye-balling anyway!


The new dowel is a huge improvement over the 3/8" piece I used before! This one is 1" red oak. I had a 1" square laying around from some other project so I turned it down. This should be a decent platform for the next steps.


Now I'm waiting for glue to dry again...
This is the set up I arrived at to drill the new dowel hole. I set everything by using a torpedo level. First I leveled the drill press then plumbed the table at 90*. I then clamped an angle to the table making sure it was plumb. Finally I clamped the wood to the angle. It should be close. Closer than eye-balling anyway!
The new dowel is a huge improvement over the 3/8" piece I used before! This one is 1" red oak. I had a 1" square laying around from some other project so I turned it down. This should be a decent platform for the next steps.
Now I'm waiting for glue to dry again...
- Joined
- Sep 7, 2019
- Messages
- 674
News! And Pictures!!!
I managed to complete the nose cone today! It went an order or magnitude better than my first attempt!
This is the beginnings of it. The 1" dowel made a HUGE difference in the stiffness of this set up. This was a roughing pass, it's still about 0.500" too big. Lotsa tear out on this super soft wood.

Here's the tool I settled for. I tried to make something with a lot of rake to kind of shear off material. It worked OK but not great. There may be no good way to turn balsa...


After some sanding. It's going in a good direction!

Test fit of the shoulder is a success! OD looks good too. I decided to leave a little bit of flat spot at the shoulder. I was afraid if I brought the OD of the cone to a sharp point at the shoulder that it would chip out badly.
View attachment 314459
My next issue was trying to figure out ow to get a smooth yet closely controlled finish. I didn't want to rely on hand sanding since you can't really have full control of your angles and such. And I couldn't use the lathe tool because tear out is very bad, even with very light cuts. What I needed was some way to very precisely control the sanding operation, so I made this...

It's just a HSS tool that's had all the edges rounded off. I then wrapped a small piece of 80 grit paper to it and taped it in place. The tape is mostly to protect the tool holder and its screws. It worked beautifully! I got a super smooth finish to an exact size and shape. I'm very pleased!
I ran this sand paper tool on the shoulder and it smoothed up very nicely. I kept taking light passes and test fitting in the tube. Since I was using the carriage to feed the sanding tool I ended up with a perfectly square and straight shoulder to an exact snug fit.

Fit to the tube is pretty darn good! I also ran the sanding tool up the tapered part to smooth it out. It's a pain on my machine since the compound only moves about 2". I had to reposition the carriage several times to make a pass on the whole taper.
Final final sanding was done with a sanding block and some 400 grit paper.

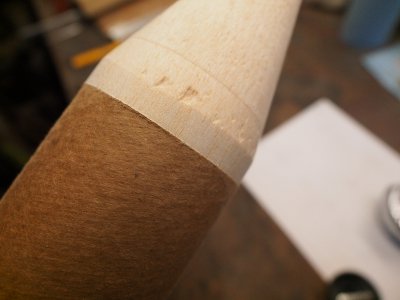
Here's just a few more shots of the completed cone. You can see the big dowel after the cut off.


Now this is a nose cone I can be proud of! I'm glad I had enough material to make a second attempt. Thanks for all the advice guys!
I managed to complete the nose cone today! It went an order or magnitude better than my first attempt!
This is the beginnings of it. The 1" dowel made a HUGE difference in the stiffness of this set up. This was a roughing pass, it's still about 0.500" too big. Lotsa tear out on this super soft wood.
Here's the tool I settled for. I tried to make something with a lot of rake to kind of shear off material. It worked OK but not great. There may be no good way to turn balsa...
After some sanding. It's going in a good direction!
Test fit of the shoulder is a success! OD looks good too. I decided to leave a little bit of flat spot at the shoulder. I was afraid if I brought the OD of the cone to a sharp point at the shoulder that it would chip out badly.
View attachment 314459
My next issue was trying to figure out ow to get a smooth yet closely controlled finish. I didn't want to rely on hand sanding since you can't really have full control of your angles and such. And I couldn't use the lathe tool because tear out is very bad, even with very light cuts. What I needed was some way to very precisely control the sanding operation, so I made this...
It's just a HSS tool that's had all the edges rounded off. I then wrapped a small piece of 80 grit paper to it and taped it in place. The tape is mostly to protect the tool holder and its screws. It worked beautifully! I got a super smooth finish to an exact size and shape. I'm very pleased!
I ran this sand paper tool on the shoulder and it smoothed up very nicely. I kept taking light passes and test fitting in the tube. Since I was using the carriage to feed the sanding tool I ended up with a perfectly square and straight shoulder to an exact snug fit.
Fit to the tube is pretty darn good! I also ran the sanding tool up the tapered part to smooth it out. It's a pain on my machine since the compound only moves about 2". I had to reposition the carriage several times to make a pass on the whole taper.
Final final sanding was done with a sanding block and some 400 grit paper.
Here's just a few more shots of the completed cone. You can see the big dowel after the cut off.
Now this is a nose cone I can be proud of! I'm glad I had enough material to make a second attempt. Thanks for all the advice guys!
Attachments
- Joined
- Mar 25, 2013
- Messages
- 4,626
Excellent work on this. The sandpaper tool is brilliant. If you want to fill in some of those tear outs and holes we use Durham Water Putty on foundry patterns. It would work well in this application. Next time I would fill the holes before the final sanding.
If you get to fiberglass, ideally the pattern would be an outside mold (where you put the glass and resin on the inside.) That gives you a smooth outer finish which is not in contact with air and therefore properly cured. Resin exposed to air can remain tacky.
Robert
If you get to fiberglass, ideally the pattern would be an outside mold (where you put the glass and resin on the inside.) That gives you a smooth outer finish which is not in contact with air and therefore properly cured. Resin exposed to air can remain tacky.
Robert
Last edited:
- Joined
- Jan 2, 2014
- Messages
- 8,854
What I needed was some way to very precisely control the sanding operation, so I made this...
.......
It's just a HSS tool that's had all the edges rounded off. I then wrapped a small piece of 80 grit paper to it and taped it in place. The tape is mostly to protect the tool holder and its screws. It worked beautifully! I got a super smooth finish to an exact size and shape. I'm very pleased!
Excellent work on this. The sandpaper tool is brilliant.
^ This x2.........I am definitely going to use that sandpaper-wrapped tool.....maybe just scrap steel or key-stock though.....
-brino
I'm not sure I want to go so far as doing fiberglass. I don't really know much about the whole process.
What's a recommended lightweight sealer? You mentioned Evercoat earlier, is that like a filler primer or like a body putty?
MInwax Sanding Sealer to seal the wood.
Evercoat to fill in the wood and provide a hard shell finish.
Then 1/2 oz Fiberglass cloth and finishing resin epoxy to cover the Evercoat.
Then paint to suit.