Erich's Steam Plant Build

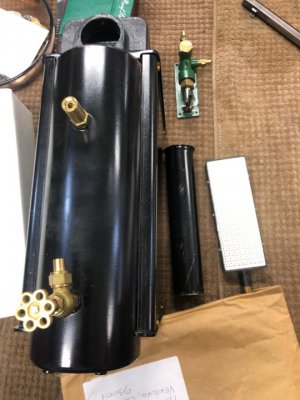
Two quick tasks today: oil cups for the #3, and assembling/touching up the water cup after paint! I'm quite happy with the way the oil cups came out!PXL_20220324_221251697.jpgPXL_20220324_221557866.jpg
 
So, I got the replacement casting in today for the boiler feed pump, got the bottom, top, and 1 of the 3 sides done (2 steps before last time!) and managed to wreck it again! This time an endmill grabbed it during a facing operation and chewed up the side of the casting. It is pretty unrecoverable :( Looks like I'm going to have to order a 3rd one and try again :(
 
A little bit more progress. I am waiting on a bunch of orders to continue, but made a little progress lately.

First, my boiler kit came! It's a super nice kit with all the fixings. I spent a while fettling the castings.
PXL_20220326_182010243.jpgThen today, I spent a while proving I watch too much Kieth Appleton. I made up some #5-40 fake stud bolts:
PXL_20220328_231220775.jpg

Two of them ended up being my first parts to bolt into the casting, along with the first gasket this engine has seen.PXL_20220328_234417670.jpg

I also made my shop-made oil cups fit in the crosshead bridges, and got them into the crankshaft holes:
PXL_20220328_231223509.jpg 
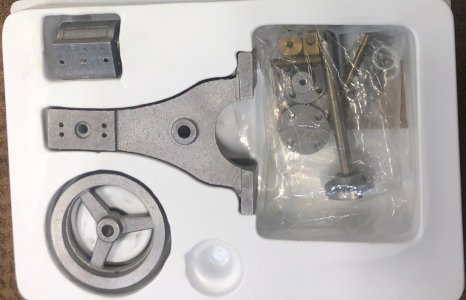
My crankshaft is pretty bad (when I used it to turn the flywheel, it spun and tore it up with a set screw), so unfortunately I have to wait for a replacement.
 
The boiler should be an interesting build. I cheated and have a Stuart 504 boiler on the way that a friend found for me. All I'l need to do is hook it up.

Eric
 
The boiler should be an interesting build. I cheated and have a Stuart 504 boiler on the way that a friend found for me. All I'l need to do is hook it up.

Eric
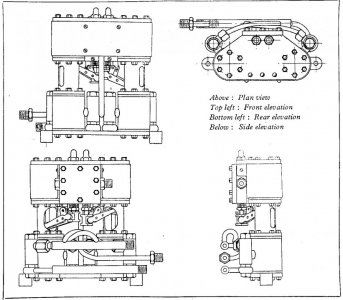
Awesome! Those Stuart boilers are pretty amazing. I considered shopping for one, but A: they are crazy-expensive it seems, and B: I thought building one would be fun! I REALLY tried to just find an electric boiler, since I don't want to make fire, but no one really sells one nor a kit.

I'm entertaining myself with trying to figure out what the 'next' component to this build is. I believe I want at least 2 engines (maybe 3 depending on size?), but haven't picked one yet. I also think I might pick up a generator-per-motor so that I can use it to power a small LED light bulb for each...

Are you going to use a handpump of some sort, or or some sort of steam powered pump? (or, just manually stop firing it!)?
 
The boiler haul comes with a hand pump, a gas burner, and a PMR #2 engine kit.

I'm also working on a PMR dynamo to give the engines something to do, and steam driven pump from a 1951 magazine just for kicks. I'm almost finished with the dynamo, and yes I made bolts to replace the machine screws too.

Eric
 

Attachments

  • IMG_3850.jpg
    IMG_3850.jpg
    80.1 KB · Views: 12
  • 2AM.jpg
    2AM.jpg
    182.5 KB · Views: 11
  • finished castings sm.jpg
    finished castings sm.jpg
    85.3 KB · Views: 11
  • elevation.jpg
    elevation.jpg
    112.9 KB · Views: 11
That is a pretty nice looking boiler and pump! It sounds like you got a really package there, I'm jealous!

Thats a pretty huge boiler for such a small engine, looks like you're going to need to do a few more engines for your plant to make up for the extra capacity :D
 
Another day in the shop! I spent the first bit getting the engine's last gasket cut and fitting the replacement bolts I made. It'll all need to come apart 1 more time for cleaning and final touchups, so I'm not particularly concerned about everything being back together right.

Since I'm still held up waiting for parts on the pump and engine, I started some easy parts for the boiler.

First I did the main tie rods, they are about 100 thou long from the factory (and sheared), so I turned a bit down from each end, then used a die on the last 1/4" per the plans on each end. However, the 1/8" shaft was too small for my chuck so the 5c collet got some work.

PXL_20220329_215458271.jpgPXL_20220329_215703562.jpg

Next, I figured I'd work on the flare nuts that are used to shape the fire tubes. They send you only slightly more than 2" of stock for 2 1" parts! It starts as hex stock, I drilled through then cut the 45 flare on each side, then used the bandsaw to cut as close down the middle as possible.
PXL_20220329_224941287.jpgPXL_20220329_225309730.jpg

In the 2nd photo there I am making sure the 45 goes inside the tube.

On the back there is a "squared" shoulder that you cut to turn the flares into 90 degree crimps. I screwed up 1 of them by cutting too small, so I turned it off and just ended up with a shorter tool. Worst case I'll have to use a deep socket :)

PXL_20220329_231957068.jpg
 
Got a little shop time yesterday and today! First was the anvil tool for riveting. This is just a hunk of steel with a reamed hole to hold a piece of hardened drill rod:

PXL_20220330_221921234.jpg

The cutout is so it can reach into the steam dome. Plans called for 3/4"x2" BUT I couldn't get anything but 5/8". I figured that was close enough, particularly because I'm clamping it in a 5 ton vise :D

Next I started on the rivet tools. The way this works is there is 1 on the anvil that holds the rivet head, and 3 tools that you hit with a hammer to progressively shape the other side.

I cut the pieces to length. I saw someone else do the grooves to tell between the three tools, so I copied! I also tried a knurl but this material (W1) wasn't having it.

PXL_20220330_230954618.jpg

For the rivet head and tool #3, you need a 7/64" radius. I figured I'd try this in the lathe with a ground tool:PXL_20220330_231818848.jpgPXL_20220330_232135152.jpg

Sadly, I had pretty bad luck, ruined the tool, and messed up the stock! So I spent the $10 and ordered a ball endmill so I can do this on the mill :)

Today I got a 10-32 tap/die set in, so I made the stay rods and nuts, which go inside the boiler for one reason or another. The rods are bronze and were just threading on both ends after turning to size.

The nuts came out of some hex brass stock, which worked... FINE. They are a little tiny for my lathe, so I found myself needing to waste a bunch of material on the 4th instead of being able to part it off.
PXL_20220331_215143282.jpg

Additionally, my 3rd water pump casting showed up. I did the bottom, mount holes, pivot hole, and started the main set of holes from the top. I have an endmill coming to make the square bottom hole I need for this part a little easier, so I'll continue tomorrow.

PXL_20220331_215941836.jpgPXL_20220331_220734653.jpgPXL_20220331_221425720.jpg
 
New casting came in yesterday, and some oddball 64ths endmills came in today, so I could do the final holes without worrying about the drill bits catching. First, finished up the top with a 25/64th EM and a tap:

PXL_20220401_203057070.jpg

Next, inlet/outlet got a 1/4" drill + 1/16NPT tap:
PXL_20220401_205419832.jpg

Finally the piston side got 3 diameters, a 1/8th drill bit (getting the reach was trouble!), A 25/64 bore and a 33/64 bore. Then, a 9/16-20 tap, and we are done!
PXL_20220401_214115262.jpg

PXL_20220401_215057865.jpg

A little deburring and some taping off, and I started the painting with some primer. It's going to be Matte black with some gold accents.

Next I figured I'd start on the fire tubes. They were all a little long, so I started by squaring up ends in the lathe, then facing to length:PXL_20220401_221031791.jpg

I tried to use my small propane torch to anneal them, but was unable to do so, I think the torch wasn't keeping up! So, I tossed it I to my heat treat oven at 1200F (target is 1000) to make sure we get it right!
 
Back
Top