Er 32 collet issue

yes i was keeping the half nuts engaged but problem was i needed to back the cross slide out and then reverse back past my starting point to pick up where i started the thread. works fine this way. i should have sourced some pins during my working career as we had them all sizes and lengths but never dawned on me i would have use for them. almost brings a tear to my eye when i think of all the buckets of bolts we threw away and now have to buy a few at a time !! i will have to look again at ebay but they seemed expensive to me for one at a time..
At Farm and Fleet and presumably Fleet Farm, you used to be able to buy nuts and bolts by the pound. You can mix and match so I would buy handfuls if the various sizes to build up an inventory. The price was better than DIY prepackaged selections too.
 
my latest measurement of my runout issue was to install the bearing nut onto holder empty and run up by till the movable ring firmed up. put an indicator on the id of the collet ring and it came out the same amount as od of holder and concentric with it .. both out about 3 1/2 thou. reached through to 8 degree holder section and ro bout a half. this is telling me the bearing nut is off around 3 1/2 compared to bore of collet holder.. i have taken two light thread chasing cuts on the threads but as yet have reduced the ro on the od. any ideas appreciated...
 
I must be missing something here. From what I can tell from reading through all of your posts you have yet to mount anything in the collet and then measure the run out on the piece held in the collet. And even if there is run out once you turn it there won't be any run out in the turned part.

What are you trying to make with your lathe that has you fixated on the run out on parts of the adapter that should not have any affect on something held in the collet. Are you looking for repeatability as you preform different operations on a part?

It might help us if you could tell us what you are trying to make with your lathe.
 
Have you procured a dowel pin and measured the TIR? If so, I missed it. I don't know, but the bearing nut might not be a problem. But the only way to know is to measure a known good dowel pin in the collet, properly torqued. If you have not measured a known good pin, then you are just guessing. I wouldn't alter tooling unless it was really necessary.
 
I must be missing something here. From what I can tell from reading through all of your posts you have yet to mount anything in the collet and then measure the run out on the piece held in the collet. And even if there is run out once you turn it there won't be any run out in the turned part.

What are you trying to make with your lathe that has you fixated on the run out on parts of the adapter that should not have any affect on something held in the collet. Are you looking for repeatability as you preform different operations on a part?

It might help us if you could tell us what you are trying to make with your lathe.
yes.. i have mounted tools in the collet and checked the runout. although i do not have any dowel pins i have used items as center drills and milling cutters which i imagine would be as close to being straight as any dowel. with these im getting ro about same as od of chuck .0035 .. if i just put the collet into the holder with tool in collet and no clamp nut ro goes down to around 001.. this is telling me the clamp nut is affecting the ro. what im aiming for is doing some refacing work on some valves. for this i will need the finished surface of the seat area to be concentric with the stem so i will need very little ro.. thanks bill
 
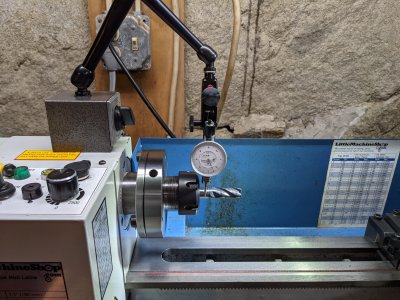
Can you post a picture of how you are measuring the runout? What measuring device are you using? Where and how is it mounted? This can matter. What holds the collet in without a nut? My collet would fall out. Is the collet chuck clean and dry? The collet? The nut? No crud, no oil, no burrs, no chips.

I just tried a random 1/2" end mill in my 1/2" collet. Just to see what it would look like. With the collet nut tight I get +0.0007" to -0.0004". If the collet nut is not tight - you are not testing the way a collet is used. So no matter how good that is (and it's probably a fluke) it doesn't count! A loose collet would slip and possibly ruin your work.

Here is my setup. Probably could measure it better, but this is how I did it. Didn't super clean anything, just pulled the end mill out of it's paper tube, put it in the collet, and tightened the nut using the nut wrench and a tommy bar. Made sure that the end mill was adequately pushed into the collet. You need over an inch inserted in the collet to get best performance.

It's not the lowest runout measurement that I have made with this chuck. Some of my other collets in my set are better. You could have a bad collet. Still, 0.0011" TIR isn't bad. You need to measure TIR near the chuck, it is worse further away. Honestly, I don't even know if this is a good end mill or not. Or if the cut out for the Weldon shank matters.
PXL_20210723_143953544.jpg
Like you, I don't have any dowel pins to test either. Found a link for 4 units, 3" long by 0.5" OD dowel pins for ~ $11 on Amazon, so that is an option. They are spec'd between 0.0001-0.0005". McMaster-Carr has some better ones (naturally) but they are more expensive. They have 3/8 and 1/2 diameter 3" long dowel pins in 18-8 stainless spec'd at 0.0000-0.0002" for $4.09 and $6.24 each. If you buy one, get one the same size as your valve stem, so you are testing the exact collet you would be using. Collets can vary.

The nut still could be the problem, but without describing your measurement technique (in detail) or some good pictures, it's hard to rule everything else out. Hope this is helpful.
 
Can you post a picture of how you are measuring the runout? What measuring device are you using? Where and how is it mounted? This can matter. What holds the collet in without a nut? My collet would fall out. Is the collet chuck clean and dry? The collet? The nut? No crud, no oil, no burrs, no chips.

I just tried a random 1/2" end mill in my 1/2" collet. Just to see what it would look like. With the collet nut tight I get +0.0007" to -0.0004". If the collet nut is not tight - you are not testing the way a collet is used. So no matter how good that is (and it's probably a fluke) it doesn't count! A loose collet would slip and possibly ruin your work.

Here is my setup. Probably could measure it better, but this is how I did it. Didn't super clean anything, just pulled the end mill out of it's paper tube, put it in the collet, and tightened the nut using the nut wrench and a tommy bar. Made sure that the end mill was adequately pushed into the collet. You need over an inch inserted in the collet to get best performance.

It's not the lowest runout measurement that I have made with this chuck. Some of my other collets in my set are better. You could have a bad collet. Still, 0.0011" TIR isn't bad. You need to measure TIR near the chuck, it is worse further away. Honestly, I don't even know if this is a good end mill or not. Or if the cut out for the Weldon shank matters.
View attachment 373104
Like you, I don't have any dowel pins to test either. Found a link for 4 units, 3" long by 0.5" OD dowel pins for ~ $11 on Amazon, so that is an option. They are spec'd between 0.0001-0.0005". McMaster-Carr has some better ones (naturally) but they are more expensive. They have 3/8 and 1/2 diameter 3" long dowel pins in 18-8 stainless spec'd at 0.0000-0.0002" for $4.09 and $6.24 each. If you buy one, get one the same size as your valve stem, so you are testing the exact collet you would be using. Collets can vary.

The nut still could be the problem, but without describing your measurement technique (in detail) or some good pictures, it's hard to rule everything else out. Hope this is helpful.
i will try to get a pic or two later on but my measuring setup is similar to yours only im setting my mag base on the closet way and using a federal C5M indicator graduated in .0005s for my readings. i have tried various bits or tools in the chuck and all have resulted with the same ro readings. i can insert the collet holding a test piece and it will stay in the holder.. i lapped the mt3 shank of the holder into my spindle and have good contact there.. put blueing on the id of the holder and pressed collet in.. good contact resulted ,, i need to check at home depot for dowels as i see they show them online.. thanks bill
 
When I used a Federal dial indicator I couldn't get very good results. Perhaps the contact force was too high, or my gauge was a little sticky. I had the C21 0.0001" indicator. My dial indicator works fine, but not for this application.

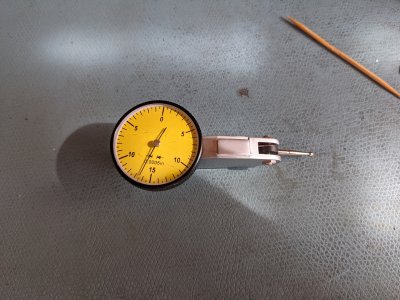
Some of the folks here on HM suggested using a dial test indicator instead and attaching the mag base to the head for a more accurate test result. All I had was a 0.0005" DTI at the time, but it worked great. I was able to measure spindle runout and collet runout accurately. You can buy these very inexpensively on eBay or Amazon for around $20. That's what this DTI cost. A DTI is a better choice for this kind of measurement in my experience.
PXL_20210724_132014423.jpg
 
I guess you will have to bring me up to speed on these indicators.. i also have a D21 which has the .0001 grads and is similar to a C21.. what the difference is i have no idea other than dial size or stem travel. ?? my D21 only has around .030 travel so its easy to bottom out setting up. i guess i cant grasp why the style indicator you have pictured would do a better job than a back or side mounted plunger. i have never used one of the lever type instruments. i have taken a couple pics of my setup but am waiting for help to get them from my phone to the puter. thanks bill
 
Full disclosure, I consider myself a beginner. So perhaps I can get others to correct me if I'm wrong. I think the lever style DTI's have (in general) lower force to move the arm than the plungers. The dial indicators have relatively high mass arms to move.

I was having unreliable measurements of the spindle and collet chuck runout using a dial indicator. In the case of the chuck runout, I could not position the plunger to be normal (perpendicular) to the collet chuck surface. So it was contacting on the side of the plunger not at the tip. This can create errors. If I took the measurement multiple times they were inconsistent - sometimes too good to be true and other times quite bad. I found the tip would exhibit some sticking (stiction?).

The tips of the DTI's are typically carbide and quite small in diameter. This reduces the contact surface some. DTI's can stick, and jump, especially when changing direction when tramming a mill vise, but I think they are a little better than the plunger types with their softer tips.

With all instrumentation you have to test it that it's working as expected. Sometimes that means preloading the tip a little more and confirming one gets the same reading again. If you don't, the measurement is suspect!

Using a DTI allowed me to get very consistent TIR readings. That's why I use them for this sort of measurement. I too started out using a dial indicator and have a thread on HM where I asked about TIR measurements. Learned that a DTI is the correct tool for the measurement. Hoping to pass that information forward. Seven months ago: my runout thread Hope it helps. I made most of the mistakes that were possible!
 
Back
Top