- Joined
- Feb 2, 2014
- Messages
- 1,068
I was just finishing up my Eagle engine rebuild and got to thinking about a fellow HM member that had built an Eagle engine about the time I was starting with mine 2 years ago.
 www.hobby-machinist.com
I didn't remember if he ever got it running so I sent him a pm and the answer was not yet. I asked if maybe another set of eyes on the engine would be helpful and he responded it would be and he sent the engine to me via USPS.
That engine made quite a trip from Oregon to Florida and a couple of side trips to Jacksonville and Orlando but I finally got it yesterday.
The engine was packed very well and there was no major damage to the outside of the box but the inside was a different story.
This is just some of the pieces that I found.

The bottom tray, gas tank support and one main bearing cap were damaged or found in the bottom of the box.

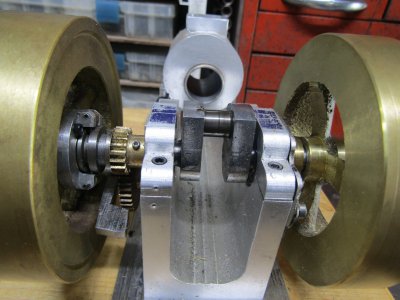
If you look closely at this picture you can see the entire crank shaft has been pushed to the right side. This caused the timing gears to bind and lockup. I think the box may have been dropped from some height and when it landed on its side the force from the heavy flywheels was great enough to shift everything over.

When I got the crank shaft aligned with the center of the frame and the bearing cap on the engine turns over smoothly with no apparent permanent damage.
I spent some time evaluating the engine and checking Erich's workmanship which I find to be very good and extremely accurate. He can be proud of his Eagle build and now to get it running.
Thanks for looking
Ray
Bob Shores Eagle Hit/Miss Engine Build Thread
So, I just finished a PM#3 steam engine and have an appetite for another engine. Sadly, the steam engine spends its time in my garage (near the air compressor) so I don't get to play with it/admire it as much as I'd like. SO, I'm motivated by fuel engines. PMResearch has a air cooled fuel...
www.hobby-machinist.com
I didn't remember if he ever got it running so I sent him a pm and the answer was not yet. I asked if maybe another set of eyes on the engine would be helpful and he responded it would be and he sent the engine to me via USPS.
That engine made quite a trip from Oregon to Florida and a couple of side trips to Jacksonville and Orlando but I finally got it yesterday.
The engine was packed very well and there was no major damage to the outside of the box but the inside was a different story.
This is just some of the pieces that I found.
The bottom tray, gas tank support and one main bearing cap were damaged or found in the bottom of the box.
If you look closely at this picture you can see the entire crank shaft has been pushed to the right side. This caused the timing gears to bind and lockup. I think the box may have been dropped from some height and when it landed on its side the force from the heavy flywheels was great enough to shift everything over.
When I got the crank shaft aligned with the center of the frame and the bearing cap on the engine turns over smoothly with no apparent permanent damage.
I spent some time evaluating the engine and checking Erich's workmanship which I find to be very good and extremely accurate. He can be proud of his Eagle build and now to get it running.
Thanks for looking
Ray