Clausing 5418 Lathe

Thanks Rbert - I did see your PM response to me but thought I'd address the issue in this thread for everyone's use. The cross slide stop is a South Bend part designed for a heavy 10 and modified by me to fit the Clausing dovetail. The concept of placing it on the front of the cross slide with a tapped hole in the corss slide is the South Bend design and is shown in the HTRAL manual. I intially thought all lathes used this front placeent concept but after your comments I decided to pull out my old version of the Atlas HTRAL and there it was - a cross slide stop placed at the rear. Seems like I learn someth9ng everyday with this lathe. In any event I couldn't find a true Clausing stop and was able to get the SB part relatively inexpensively.

My goal was to have a meansd of getting back to the correct tool position when threading without having to compensate for back las. I think this will work (at least it worked for me on a SB :)). With the taper attachment I don't have any access at the rear of the cross slide and would have to remove the laong chip guard when using the stop. To me, at least, the front placement is a little more convenient. Having said that - I will be keeping my eyes ut for a Clausing version of the stop - just to have the original and perhps to give me a little more flexibility.

Again thanks for your contribution to my education and don't give up on me - I'm getting there :). If you think thids was a deviation from norm - wait till you see what I am considering for a steady rest :)

Rick
 
OK. Normal SOP for OD threading is to run the cutter up to the OD of the part and zero the dial. After that, if you back the carriage out to return it to the starting position, you just run it back up to zero. That automatically takes care of any backlash.

Also, I meant to make this comment some time ago and forgot. I seriously doubt that Clausing intended or expected that if someone had a taper attachment, it would be a permanently installed. In a normal life, one doesn't cut a lot of long tapers. I have a taper attachment for my Atlas, and have never used it. I could sell it as brand new in the box (if I still had the box after 35 years). Mind you, it is a totally different design than the Clausing one. To install it, you first remove the cross feed nut. So you can't do normal operations with it installed. In the case of your machine, apparently you can. But lit seems to me that eaving it installed if nothing else must be causing needless wear on some parts.
 
Thanks Robert - I agree with your operational steps for threading but it starts to fall apar when you have to deal with backlash. Don't get me wrong - I understand backlash can be dealt with but the threading stop eliminates the need for this - more of a convenience factor.

I also see your point about the taper attachment. In my case I would need a completely different lead screw and nut. I'm assuming the dial and other screw attachments would be transferrable. If I came across one for a reasonable cost I would probably remove the taper attachment but I haven't found much that was "reasonable" in terms of cost for this lathe yet :). I don't anticpate cutting a lot of tapers and I don't think of myself as a high volume user so wear will probably not be an issue. Like I said though - if you come across a lead screw and nut - I'm in :)

Rick
 
OK. You probably mentioned back at the start that the machine came already partially set up for the taper attachment and therefore you didn't have the normal lead screw. I've slept several times since then. ;)
 
Robert's comments prompted me to do a little thinking about the practicality/usefulness of a taper attachment. The standard CF lead screw and nut for thos 5418 lathe are available from Clausing for $250 - not an outrageous price in my opinion - but signifcant. My motivation is to reduce the backlasdh (.025") and other related cross feed sloppiness resulting from the telescopic taper attachment connection points and to eliminte all of the stuff related to the tsaper attachment hanging off the lathe. I see my options as:
1. Get the new or used CF standard parts and install them. Keep the taper attachment for those rare times it is needed. I don't expect to have a lot, if any, need for turning tapers but I am a hoarder of stuff I "might" need someday.
2. Sell the taper attachment to finance the standard parts - this seems inherently wrong (see hoarding above). I wonder how often I would regret that sale.
3. Keep the taper attachment installed, forget the standard parts and learn to work with the cross feed sloppiness.

Any thoughts or opinions?
Thanks
Rick
 
Hi Rick,

I would tend to be the horder and at least hang onto the parts. I have a Grizzly G0709 14" x 40" lathe with a telescoping taper attachment and have less than 0.010" back lash, maybe 0.005" on a bad day. The paint is still wet on my machine so maybe I'll get comparable backlash at some time.

Can you isolate the lash between the cross feed handle, cross feed nut and the taper block on the attachment? I'm thinking if you tightened the taper block so it's solid, tighten the jam nut on the cross feed crank so it's locked, then measure the cross feed lash with an indicator. Repeat for each spot locking the other two solid and compare the numbers? If you find the slop at the taper block is 0.003" (for example), no sense taking off the attachment. You shouldn't have too much "chuck" in the splined cross feed shafts, might check that too.

Best regards, Bruce
 
Afte comments here and many similar on other forums and sleeping on it I've decided the taper attachment is staying. Its a nice accessory to have and I would not find another one at a reasonable price in the future.
I did a little more looking yesterday - I think I've changed my mind regarding the source of the backlash. I checked the free play between the two splined sections by "feel" - it is next to nothing. So I went back to the cross feed movement by pushing/pulling manually - it moves about .027". If I take up the backlash by turning the cross feed in then I can't pull the CF back towards me at all. Same is true in the opposite direction. This leads me to believe the backlash is mostly coming from the lead screw/nut interface. At this point I'm going to leave as is and try working with the backlash. If at some point I stumble across the standard CF screw and nut at a reasonable price I may replace it but still keep the taper attachment.
Thanks
Rick
 
its been a bit since I reported any progress - but there has been some.
Backlash - I bought a new CF nut from a guy on the auction site that manufactutres them. That solved about half the CF backlash. I still have some issues in both the crossfeed and compound but I've put them on the back burner for now. I'll work with the backlash until I have some time and cash to pursue other alternatives. I do realize that zero backlash is not an option without significant expense for technology (or actually a desireable condition) so if you always have to work around backlash then my current condition can wait awhile.
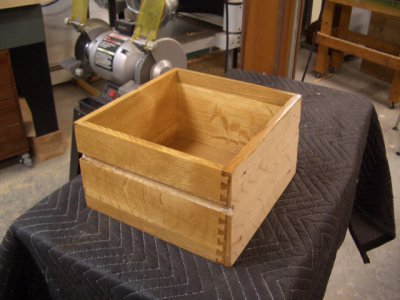
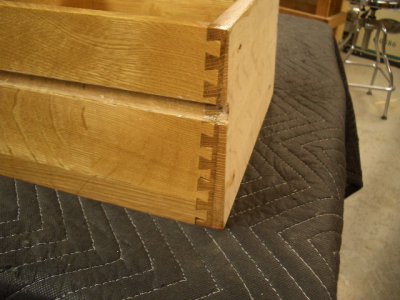
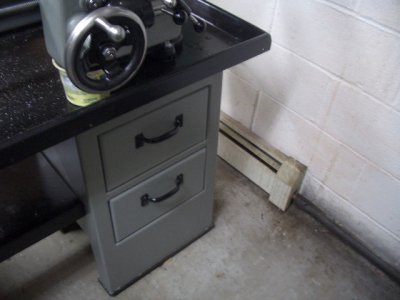
My next effort was to fill in the TS pedestal drawer holes. I did explore the possibility of finding metal drawers that would fit (either OEM or aftermarket) - as expected no luck. I decided to make them out of wood. I think they came out pretty good - although for the effort involved compared to the relatively minimum storage space I probably would have been better off just filling the holes with fake drawers.

After I had the boxes built I realized I hadn't compensated for the splay in the pedestal sides so I had to add a "wedge" on the front of each box. You can see that in thepictures below. I still need to add a stop to the drawer and some dividers after I decide what exactly is going in them - probably tool holders, centers, drill chuck, etc.

Overall WO Front.JPG

Wedge Compensation.JPG

Installed.JPG
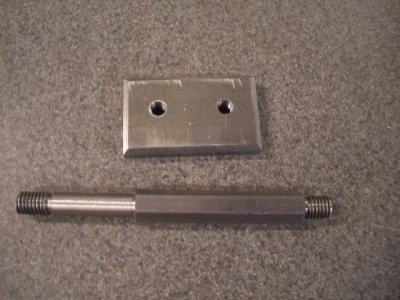
My next task was the taper attachment clamp - I decided to make the two easier parts (lower clamp and tie rod) - I have some ideas for the upper clamp but I'll put those in a different post. These two parts got me into face milling, tilting the mill head for chamfering, interrupted cut turning, turning to a given length and diamter and single point threading. I'll admit that I "got close" with the single point threading and then used a die to finish them up :)

Lower Clamp and Tie Rod.JPG

I also received A "project" steady rest - broke in two places, a little wide and a little high - none of this was a surprise and I think it is all fixable.
Thanks
Rick
 
Well, nice looking joinery, anyway.
 
Back
Top