2016 POTD Thread Archive

My hardware gets sorted in stages. Screws and bolts first go in a container when I'm in a hurry, and hardware in appropriate boxes or containers.
When that gets near full, I distribute them to generalized bins, labeled pan head, flat head, hex head, nuts, washers, metric and such. In those, they are mixed by size and thread pitch.
Often loose screws and such go straight to the sub bins.

When the mood strikes me, I sort the sub bins to their final bins, sorted by head style, size and pitch.
 
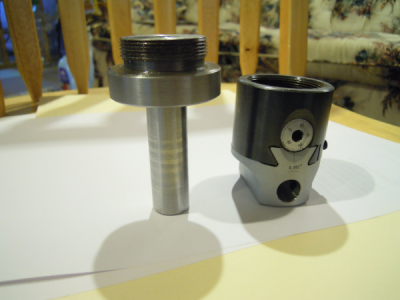
Here's what I made yesterday. I bought my first boring head and the store didn't have an R8 arbor for it. So I said to myself ..... I have a lathe, I can make that. Should be easy. Apparently I need to stop talking to myself because I was wrong. It took me all day to make this:dejected:. After reading some threads on this forum I decided it would be easier to just make a 3/4" stem and put that into a 3/4" R8 collet rather than make an R8 arbor.
I was having issues with the 3 jaw RO. Took it apart and cleaned up thoroughly but still getting 0.003" RO at the end of the jaws and more further out. So I put on the 4 jaw and chucked the round stock between it and the tails stock. The RO at the chuck was less than 0.001" and the same on the tailstock. I thought I had it licked then. But I was wrong again. When I flipped the round stock to finish cutting it to diameter I couldn't get the tailstock end closer than 0.003" RO. I believe my work schedule was part of the problem too. I have much to learn and need a lottttttt more experience.

I probably should have machined the whole thing out of one piece of 2" round stock instead of making the stem and the bottom from 2 different sizes of round stock and welding them together. At least it works and I have a little more experience under my belt.

upload_2016-5-2_14-37-2.png

My next machining project is intended to be making new pins and bushings for my worn out Bobcat attachment. I may have to rethink that. If it takes me a day to make this, it will take the rest of my life to make the pins and bushings.:eek:
 
Last edited:
HBilly -
Consider this as a possible approach ... remove as much of the hardware from the boring head as possible. Hold it in the 4-jaw, with the threaded hole outward, and indicate true. Then screw in the arbor and take a very shallow truing cut on it.

Of course, runout shouldn't really be a problem. True, if you remove the boring head from the mill and re-insert it, the cutter might not be at exactly the same position it was earlier, so you might have to reset it. But no matter where it's set or how much runout there is between the arbor and the body of the boring head, the cutting tool will move in a perfectly circular path, as determined by the mill's spindle bearings.
 
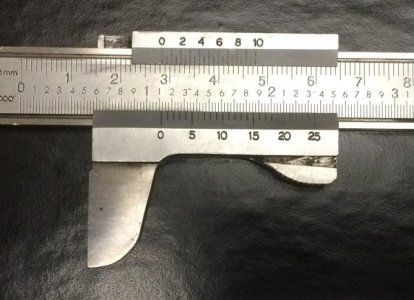
the chairs at the wifes work are always losing their lift so i always get split collars for her....finally got her to do her own measuring. i gave her one of my old calipers..she slaps in on there an texts my the reading..;-)

real easy to read on a 27" monitor too.

FullSizeRender 23.jpg
 
Actually yesterday I had to remove a broken off stainless bolt from an outboard motor lower unit. Unfortunately the owner also had broken off a tap inside the bolt!

To setup I clamped the mounting flange to an angle plate, shimming for alignment, and supported the skeg on a length of aluminum square tube held in the mill vise. First I located center and plunged a 4-flute 1/4" carbide end mill to just below the casting's machined surface, to true up the mangled bolt and tap end. Then I plunged a 3/16" carbide end mill, breaking one single and two double-ended end mills before finally getting through. Then I ran a tap drill through and finished with a 6mm x 1.0 tap, removing the remains of the bolt.

HB--I have a boring head with an arbor too large for any of my drill chucks. It is my intention to turn it down to Brown & Sharpe #9 to fit my ancient Index Super 55 mill.
 
Last edited:
I got home from work late, so I only spent a few minutes in the shop after dinner and before getting the kids to bed. Not sure if I'll get out again tonight. I ran another rapid pass over the chuck without adjusting anything. Not surprisingly it still sparked everywhere, but not heavily. I also did about 3/4" on the near side, VERY slowly, with small steps (1/2 crank; it's a narrow wheel) and multiple passes between steps, still without adjusting the wheel height at all. It basically sparked out completely. There's a definite improvement to the surface finish, which was all I was trying to verify.

When I can I'll re-dress the wheel and finish it up. I'm excited to finally put this thing to work. :)

d4a60932458e459a008341d34f31fcf8.jpg

d4a60932458e459a008341d34f31fcf8.jpg

d4a60932458e459a008341d34f31fcf8.jpg

d4a60932458e459a008341d34f31fcf8.jpg

d4a60932458e459a008341d34f31fcf8.jpg

d4a60932458e459a008341d34f31fcf8.jpg
 
After yesterday's adventure in arbor making, I decided to go to the shop and grind the 3 jaw. The thing that took the longest was trying to find a grinding wheel for my dremel that was long enough to reach the back end of the jaws without the dremel hitting the chuck jaws. I found a wheel that had a big enough diameter to get to the back of the jaws before the dremel chuck/body would contact the lathe chuck jaws. When I finally got it set up, it only took a minute or so to grind the jaws and now the RO is less than 0.001" at the jaws and there is no visible wobble 6" out.:cheerful: I also chucked the new boring head and arbor in a 3/4" R8 collet and ran it up in the mill/drill. It looked good. I didn't check with a DTI but there was no visible wobble.

Yesterday was a struggle and today everything fell into place. Life is good again. :)

I understand that you wanted zero run out on the boring head arbor, but no worries.
The boring head is adjustable for hole diameter and spun at relatively low RPM because it is intrinsically out of balance.
A little extra run out caused by the arbor will never be an issue.
Now, if it was a slitting saw arbor or shell mill arbor, run out would matter.

Good work on fixing the 3 jaw.
 
Very quickly knocked up this needle file handle for a mate as he's always bugging me about mine.
needle-file-handle.jpg
The steel is very gummy hot rolled steel and I'm rather pleased with the surface finish.
I ground a shear tool so had to make something for a test drive.
The knurls are the best I've ever managed (although they dont really show in this photo) so I might keep this and give him mine:laughing:
 
SPREAD OUT 40 BAGS OF MULCH :-/

I need to machine something to relax now

:beer bottles:


EXACTLY hah hah... Most people relaxed sitting down doing nothing. I also enjoy this type of relaxation, but I usually need to relax by doing something fun like making some chips first ha ha
 
Back
Top