1940 South Bend 11" 111B 105014 IQR Rebuild By Ulma Doctor

Re: 1940 South Bend 11" 111B 105014 IQR Rebuild By Ulma Doctor

I thoroughly clean any parts for painting with Acetone and haven't had a problem from this yet. I just looked at the first coat on the headstock I put on yesterday and it appears fine and normal. We'll see how it goes.

Well here's a test.. put on some acetome on the piece and scrub with a wire brush.. if black residue apperars, then more cleaning is needed. But then again Im sure your method has been done before with satisfactory results.. I guess it's the level you are aming for.
 
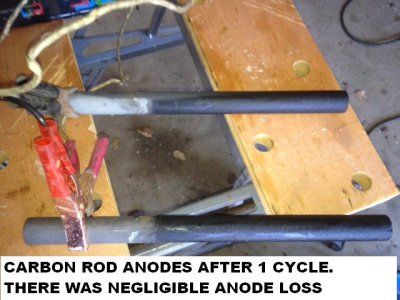
here is a picture of the Carbon Anodes after a cycle, there was little erosion of the anode.
carbonelectrolyticanode-jpg.52111


as always, thanks for your continued interest, as well as your comments and/or questions!

DerustedCRE1.JPG Carbonelectrolyticanode.JPG
 
Last edited:
i'll still post the pictures here first!


thanks for reading!
 
Last edited:
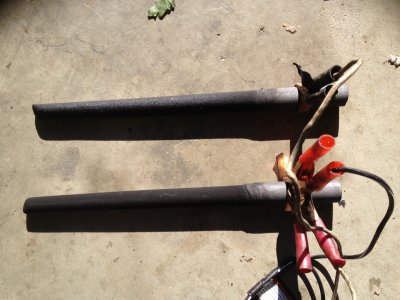
i have run my carbon anode electrolytic process for 10 cycles. my cycles varied between 8 and 12 hours.
here is the anode loss calculated average of 100 hours .

photo-6-jpg.52211


photo (6).JPG
 
Last edited:
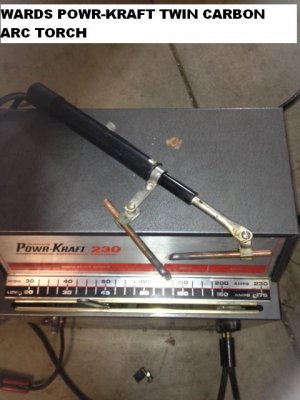
i got a new toy last week, a Twin carbon Arc Torch
pk230-2-jpg.52475


i'm going to attempt to make cast iron repairs on Henrietta.
I have taken a lot of welding schooling, but, this Twin Carbon Arc Welding/Brazing is new to me although it is an old process.
for some old school repairs for an old school lathe, seems fitting.
i'll be posing before, during, and after pictures.
maybe i can teach a process as i'm learning the process:thinking:.....
thanks for reading!

PK230(2).JPG
 
Last edited:
Good luck! I'll be keeping an eye on your progress as I am super leery of welding cast iron. I've been sitting on a personal project for many, many years waiting to get the technique learned before trying it.

-Ron
 
It's funny Ron,
I've never feared Cast Iron brazing, it's the welding of cast i'm leery of.
there are 2 schools of thought...
One school suggests keeping the iron cool and move around to different sections or stopping frequently to avoid over stressing the metal.
the other school suggests keeping the weldment hot and slowly cool until temperature equalizes .

i have used both schools and prefer the latter when possible. peening the welds is also recommended to stress relieve.

What it boils down at the end of the day....
here's my thought, if the item is already broken, the worst you can do is break it more.
If you break it again, you learned something(not to do that again)
If you do nothing... sure, you still have a broken part and it didn't get worse.
But , nothing was learned and the piece is still broken.
Inform, assess, and attack is my formula.
I'm not suggesting getting to far out of your personal comfort range, but the stuff is broke anyway.
worst that can happen is the nag of the unfulfilled worst scenario!

i hope the information helps someone or at least inspires thoughts as to how to repair cast iron.
i hope to wow us all!
Wish me luck!(i'm gonna need more than a little:lmao:)
 
Last edited:
I say weld it until it cracks, then throw it away and buy a new one cuz you needed a new one anyway! LOL
 
I say weld it until it cracks, then throw it away and buy a new one cuz you needed a new one anyway! LOL

Probably the smartest method! :lmao:

My "project" though is the skirt on an ancient (more so than me even) Franklin stove. I'd get some pics but it's so far down on my "to do" list that it would probably be a waste of effort.

-Ron
 
There are methods of welding cast iron that are not difficult, and with some nerve, and maybe just a little practice on something inconsequential should be well within the ability of any of you.

If you have a MIG, there is a wire for it. Not cheap, but very workable. Oxy/Acetylene will do it, but that's pretty challenging. And there is the old fashioned nickel rod for the stick-men among us.

I'm pretty much a believer in the pre and post heating of the work, and welding in short distances if it is a seam or crack, along with peening immediately after each short "stitch".
 
Back
Top