12" machinist level

Well, sounds like you've got one of those fine Starrett 199's (or the Chinese equivalent), congrats on that! They can be maddening. My only advise is to adjust slowly (very small tweaks) & let it settle between tries. Remember, you can't rush precision.
I once tried to use one to level a pool table & I watched it change reading as I walked from one end of the pool table to the other! And it was setting on 5" of concrete & 12 feet from an outside wall. I can't imagine using in a room with a wood floor!
Good Luck!

You should not be walking on the pool table
 
I bought the 8" version. The ends are just a plastic plug. When you remove the one, you can then get to the adjustment nuts to use that spanner wrench on.
To get the red screw to move, there is a jam set screw on the bottom.
Yes I agree that this thing is a PITA to adjust.
I have already been trying to figure out how to make some replacement parts to improve it.
Joe
 
As I was calibrating my machinist level for hours...crawling around on the floor to level the table my lathe is on, then checking the ways on my lathe, I was thinking. It's not that I haven't been down this same exact path before, I've done all these steps before and I always get back to the same road block. When I get things to some similarity to level, the ways are not. The tail stock end of ways are shimmed as to get the test bar collars even diameters when cutting. I would have to removed them, check for levelness and re-shimmed. I guess what I'm getting to is, I have this crazy sensitive level, spend hours getting everything zeroed out, level the table, level the lathe, but at the end, all will be sacrificed to make sure the lathe is cutting true over distances from the chuck. Maybe I'm just trying to make myself feel better for letting things pass that weren't perfect.
 
I seem to recall that just because it's level does not mean it is straight. One of the problems of being new to the "sport" is reading so much you forget some of the things you read. There are rabbit holes you go down, and there are rabbit warrens where you get lost.
 
OK, my adventure of chasing muthafubbles today. I brought in a leveling tray for scaling the car(4 corner scale) and put a board over the top, and used bullet levels to get it a semblance of level. I tried leveling from a marked spot, flipping back, and forth, trying to get a base line. Then forced the bubble to level, and flipping that back, and forth. My next procedure was turning the level slowly 360* to find a known level direction, and adjusting from there. here is the setup, and the same results all day. My previously leveled digital level from home tells me in every case with the bubble my table is out 0.3*-0.4*. My thinking is I should have been able to get the muthafubble to give me that indication. It will level in one direction, and bury the bubble when flipped, I counted lines, and fudged all kinds of ways with the same result. So is this still pilot error, I'll gladly accept responsibility if it is.


Guys, in order to check a precision level, you do not need a level surface. You just put it somewhere flat that allows the bubble to not peg on either end, then flip it 180 degrees. If the bubble ends up in the same position then the level is good to go.

BUT if you have to calibrate it, that is another thing.

These precision levels are super-sensitive and trying to mess with the leveling screws without knowing exactly what the procedure is will only lead to frustration. To do this without further loss of hair, allow me to shed some light on this. You are going to need a leveling table, a place to put that leveling table on that you will NOT lean on, and a room free of vibration from people walking around or machines running.

Here is my leveling table. It is just a 12" square piece of plywood with a very flat top and three adjustable screws in a tripod configuration - T-nuts and three 1/4-20 screws with nylon caps on the end. Not shown is a bulls eye level.
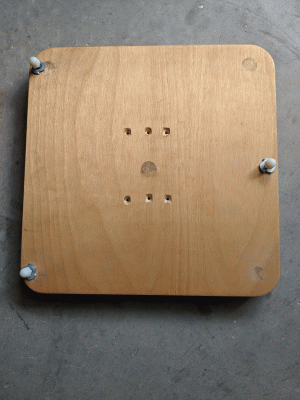
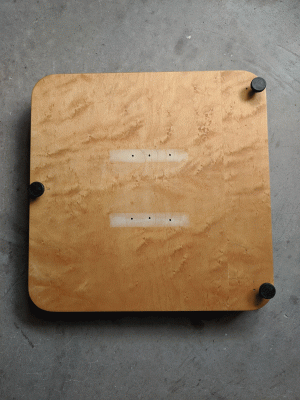
table1.giftable2.gif

I use a small aluminum framing square clamped to this tripod table with small clamps, then I level it with a bullseye level. The square allows me to butt the side and one end of the precision square into a corner, then flip it 180 degrees and get it back into the exact same position.

Now follow the instructions in the attached document and that will allow you to calibrate your level with a minimum of fuss.

Keep in mind that it may take up to a minute for the bubble to settle so wait until it fully stops before making further adjustments. With these levels, close enough is not good enough. Get the bubble exactly centered so you can trust it. Once this is done, all you need to do in the future is to set up your leveling table and check the bubble position. You will not usually need to re-calibrate it very often, if at all, unless something really throws it out of whack (like a trip to the floor).
 

Attachments

  • Engineers-Level-Calibration-Instructions.pdf
    38.8 KB · Views: 26
@Aukai Again, mine differs a bit, but are you trying to center between left and right markings? On mine, its more of using, say the right side hash markings, flip it 180* and now your using the opposite side hash marks. Yours is for sure balanced between the left and right side? I guess I'll have to post pictures of mine, but that's why I was chasing my tail. I was trying to balance between left and right side marks, couldn't be done, ran out of adjustment. Does this sound crazy? I really just assumed it was supposed to be centered, but only after I COULDN'T adjust that much I started poking around other things. Take all this with a grain of salt, I, by no means, think I'm 100% right about this!
 
I own an 8" master precision level from Shars. I have been able to get the bubble centered on my surface plate using the 180 degree flip method in about 3-4 minutes. The center was always in the range of the red adjusting screw. I build a fence on my surface plate with a right angle plate so I know my flip is exactly 180 degrees.

The beauty of the surface plate is even if it is not level to the floor, there is always one axis that is. By rotating the level on the surface plate, you should find an inflection point where the bubble jumps from one end to the other (assuming it is kinda close to being adjusted already). This point is where you should set up to do your calibration of the level. The closer the surface plate is to being level, the easier this is, but it is not imperative to have it done with anything better than a construction level.

These levels need to be adjusted and calibrated to the surface plate each and every time you plan on using it. I feel bad that you got one that isn't easily adjusted out of the box.
 
I picked up a Moore & Wright 12" machinist's (Engineers) level a couple weeks ago to compliment my Starrett 6" version. This morning after reading a few posts here I thought I should check the calibration. I looked up it on the Moore & Wright website and found it's supposed to be accurate to within .0035" per foot.

I gathered the tools necessary for calibration and headed to the shop. I decided to use the flat way on the bed of the Sheldon lathe as a leveling platform. Having last leveled the machine about 3 years ago with the 6" Starrett I wasn't sure what I would see. Fortunately I had a pleasant surprise.

Not only was the machine close enough level, the new Moore & Wright was also so close to perfect calibration I decided not to fool with it. According to the new (and old) level the machine is well within what I would consider acceptable limits. Placing the level in the same position on the way and turning it end to end, I found the machine dead nuts operators side to back side, and less that the width of a graduation line high on the tailstock end. If every graduation is actually .0035" per foot I would calculate that the machine is .0002" or less higher on the tailstock end.

I don't know if it was dumb luck or skill that I got it that close, and it still remains that close. If the old adage holds true "It's better to be lucky than good", I'll go with luck explaining how and why it worked.
 
I haven't even started at work today. Mine has a screw on top, that I deemed as just the top of the adjuster shaft. It didn't move anything I could tell. Mine does have access on the side, and an adjustment head with holes for a spanner. That adjustment works too well.

The adjustment on my 8" level may be different but here is how mine works.

Firstly, the screws on the side are not adjustment screws they hold thwe plastic insulating sides to the body. The red screw on the top is not an adjusting screw. The red is actually a red enamel called Glyptal that is commonly used to lock adustments on electronic and optical equipment. There is a similar screw on the bottom, actually the other end of the same screw.

Pulling the end cap will expose the adjustment mechanism. Basically, the adjustment is locked in place with two opposing nuts. To adjust, loosen one nut and tighten the opposite nut.. This is done with the spanner wrench that should have been included with the level. Both nuts should be tight when the adjustment is complete.

There is no adjustment for the side level.
 
Back
Top