[How-To] Things I have made

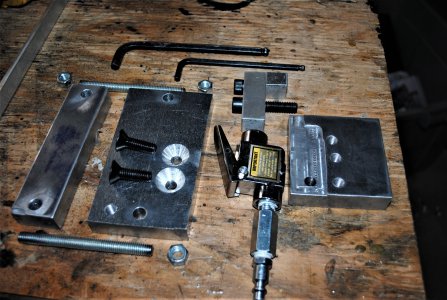
Some pictures of another saw accessory, and was made to be used on mills in shop too. A threaded hold down plate.

Basically found biggest piece of plate that could fit in saw vice, and drilled and tapped 1/2” and 3/8” holes in a square pattern. I usually use mill hold downs to hold parts that I need to orientate certain ways to saw. Has worked much better than a c-clamp like we used to use.

I also made holes that line up with both milling machine tables in the shop, so it can be used there to as needed. I think I’ve only used it one time on the milling machine, but nice that it can do several different jobs.
37902c3c887da922bbcece861107952e.jpg

b247a32e36ea351cba4fe9ee2b7e6eed.jpg

2a8126ba11f18631eebd8490b97d2693.jpg

114bfdd4d0a74c963c517b93f14a55e9.jpg

48f7d7d7b978d81df8df60a034b7f5fb.jpg
 
Just another idea. I picked up a scrap deep fryer from a friend. I took one of the stainless pans and basket into work to put coolant in so when I’m grinding something on the shop made sanding disc machine, I can put the part in the basket to cool it down and easily pick it back out without having to put entire hand in coolant.
8f13637a131fc99f9b68da014e3fbd05.jpg

170d978b15388bb55ef281a401bb15cb.jpg


Sent from my iPhone using Tapatalk
 
Some pictures of another saw accessory, and was made to be used on mills in shop too. A threaded hold down plate.

Basically found biggest piece of plate that could fit in saw vice, and drilled and tapped 1/2” and 3/8” holes in a square pattern. I usually use mill hold downs to hold parts that I need to orientate certain ways to saw. Has worked much better than a c-clamp like we used to use.

I also made holes that line up with both milling machine tables in the shop, so it can be used there to as needed. I think I’ve only used it one time on the milling machine, but nice that it can do several different jobs.
37902c3c887da922bbcece861107952e.jpg

b247a32e36ea351cba4fe9ee2b7e6eed.jpg

2a8126ba11f18631eebd8490b97d2693.jpg

114bfdd4d0a74c963c517b93f14a55e9.jpg

48f7d7d7b978d81df8df60a034b7f5fb.jpg

Just today, I was trying to figure out how to hold this odd-shaped part in my bandsaw. Now I know!
 
I found a good use for wood shims yesterday. I was making some alum rollers for local manufacturing plant we do a little bit of work for. The Alum tube fit thru my 4" lathe spindle easily being 3-1/2" diameter, but the other end was just sticking out of my lathe spindle. It was hard to keep running true with just the chuck jaws, so I made up some wood shims to true it in the bore.


I put an dial indicator on both sides and with the four jaw chuck and the wood shims, I was able to dial in both sides so I know the bearing bores I do will have the tube running as good as I can, without actually having to take a clean up cut across the entire 52" length. I could have run this in a steady rest, and maybe do it about as good, but this way here, I can run the RPMS much higher. The wood shims never moved, and it was running pretty vibration free.


I have made a piece that I can put in the spindle bore with 4 screws that allows me to do the same thing as the shims, but I think I can only fit 3-1/4" thru this piece, since it goes inside the lathe spindle bore for support. And with the wood, I don't have to worry about damaging the chrome on rods either.

30a1933a457a268a06f3c430ebb20ed3.jpg

c88a273f299122f0830b4369b95b7579.jpg


Sent from my iPhone using Tapatalk
 
I also made some modifications to a sanding rod I made up a couple of years ago. I had a piece of fiberglass round rod, that I cut a slit in one end for emery cloth. I roll a piece around the end, and then I can use this to sand out internal bores easier. It is long enough that I can put some leverage on it, and I can just rotate it a bit to get a fresh bit of sandpaper too.


But today, I cut a series of grooves every 1/2" on it, so that way I can judge how far I am going into the bore. Makes it easier to only go as deep as I need to. My engraver worked good for marking every inch line too.

466fff7c3705807a4c16d31e64ac29f7.jpg


Sent from my iPhone using Tapatalk
 
I made some handles today for a cart I am building at work in the free time I seldom have. I needed a 1/2”-20TPI mandrel for turning the taper more efficiently on the lathe.

I wanted the 1/2”-20 TPI mandrel as close to centered as possible, so I single pointed threaded it with a 1/4”- 20TPI tap held in the tool post holder. Always keep your old broken taps. You can always modify them for small lathe cutters.


I’ve even ground most of the threads away to use them, leaving just one row at the tip. Just rotate it so one thread is cutting on center.


Then are some pictures of the handles I made.

It might be a couple days before I get a chance to work on cart again. The boss put some paying work up on the job board that I should start tomorrow.

f7c9a4d369ac8a8ed1bf1ba403a31e4d.jpg


Sent from my iPhone using Tapatalk
f96f4720680eb0d56135dcd8b23bb6f2.jpg

09f24189134b81a174bc53282d045c3c.jpg

96e75d219134a0577c12e59cd722234a.jpg

cfb9ca2eca54fcca6a5b74fce8262fe3.jpg

b18980eb19b468607436677d8ed06322.jpg

079a6d64f17cbdb03af738afdfd7b77e.jpg

0f0b87e004bf28dfd37fff57056e4cc7.jpg

ba111c7a5f1ffd90c73ffe74e59d0be7.jpg


Sent from my iPhone using Tapatalk
 
Made a few things for my own tools today for a change. Made a set of plates to clamp smaller pieces closer to band saw blade to cut off. Hopefully you can see how done in picture.

I did this to cut out a piece of aluminum to fix broken handle for fence on table saw in main shop. Ended using both mills in shop for this build. I will say having a DRO is handy on the mill. Using the radius function, It was easy to make the round radius 3/4 of the way around the handle. Only took a little bit of sanding to get it smooth.

Then made a leg pin for a DEWALT miter stand I got from a junk yard yesterday. Then cleaned up the stand, and made some hold downs to mount a free to me Hitachi miter saw. Just need to make the extension table blocks to support longer boards now.

Was a good rainy day in the shop today!

0044a66859ab30740680b6c67d3a53f8.jpg

004833eab595190a022553e301446223.jpg

31ee31d570a9ff222496cda9eadf098b.jpg

13ed448bbd0ceb7cafe85a21bb5851df.jpg

ec50e08fcdf6461574d2ce1401c0632f.jpg

4938445c566e4d74d0ff6c6bb984cf6f.jpg

01542c0202a272fa5b021d74dd414225.jpg

d7076550f211cf7c2b2003649a9905e8.jpg

24cb45b9c5a8e248ae8d2f7b65597fb8.jpg


Sent from my iPhone using Tapatalk
 
Made a custom carbide cutter the other day.

I needed to drill out a couple of set screws to disassemble a part to rebuild. Usually set screws are a bit on the hard side, and I wanted to not mess up the threads, so I could reuse the holes on reassembly.

The set screws were 8mmx 1.25pitch. So only about 5/16” diameter, .265” pilot hole size.

I managed to drill thru the set screw with a regular drill bit, about 3/16” diameter, keeping RPMs on the slow side. I had part clamped in the mill so it was secure and I could make small adjustments as needed.

I figured I would just use a 1/4” carbide end mill to enlarge the hole, and then move the table couple thousands each way til I see the threads show up. But the endmills caught and broke very quickly plunging down.

I went and resharpened the tip by hand. Got the corners sharp enough to cut again.

After getting the first screw out as much as I could, I chased the threads with a tap and removed the remaining screw threads. One hole done. One to go.

Next one, I changed things up a bit. Here after drilling thru the screw with regular drill bit, I got an old broken 1/4” dia carbide center drill that I saved. I reground one end into a left hand cutting tool. I figured that running in reverse, as I plunged the piloted set screw, it might just catch the screw just right as it was relieved of pressure and then back itself out. Wanted that to happen if possible. It didn’t.

But fresh hand ground cutter did work nice. It was really short and stiff, so no flex like the longer end mill. I was able to cut the set screw out, moving the table till I seen the threads appear, then chased the hole with a tap. Two holes saved, and new set screws went in easy.

Moral of story, save old broken mills and cutters. Never know when a piece of “trash” might save the day. There is knowledge and power in learning how to hand sharpen tool bits, and it does not have to be perfect to work as needed.

fb6c9333ecc5916370de3e7a93b358f8.jpg


14e6e8a625013d9c4c8086552630ccf3.jpg

6ae549572811b101249a64c2d82b0292.jpg

3fb60b79b4e77819852b646284c8dc81.jpg

1e546c50bd52f280ffa84a1b686701cd.jpg


Sent from my iPhone using Tapatalk
 
Had a few shop projects at work that I finally had time to work on this past week.

Put the small shop drill press on wheels, so it can move around from its new home in the shop. It moves very nicely. I did cut the wheel gussets out with my arc droid, cutting in shops initials, to add some bling to it.

Then today I got a jib crane done that I started a year ago. Had a job, that could really use it on, so pushed forward with finishing it. Still have a couple little things like cord supports, but it’s usable like it is. Was really handy in loading these short heavy cylinder barrels into the big Libby lathe. For the record, I was machining the cart iron head gland out, taking a .250”DOC at a time. I probably could have pushed it harder.

And yes, that jib crane is mounted to the turret on the lathe. Since the lathe weighs in at 20,000#s, I don’t think it’s going to go anywhere. Right now, the chain fall is only rated for 300#s. I was planning on about 1,000 capacity, so we will see how this does.

IMG_6757.jpg
IMG_6759.jpg
IMG_6843.jpg
IMG_6846.jpg
IMG_6849.jpg
IMG_6850.jpg


Sent from my iPhone using Tapatalk
 
Back
Top