The never-ending saga of the Hurco that's "ready to make parts"

Re: Code issue, please help. This stopped being fun a few days ago.

I'll give that a try when I get home. I think the thing that bothers me most is that it worked great once and not since then. I can't remember what I've changed, if anything. I checked everything but can't find any differences.

What it looks like to my untrained eye is that the arc is being broken into segments (that can be confirmed by looking at the code) and the segments do not start where the previous one ended. Let's say one arc completes at the 12 o'clock position and another one starts at the same position. It looks like the Y position shifts a few thousandths between the start and end points. Same thing with the 6 o'clock position. If I had a way to confirm the coordinates of the code I could verify weather my shifting occurs at the segment joints or not.

Now that I think about it, I had the same issue on my small machine running Mach3 but I just assumed the problem was a sloppy thrust bearing on the Y axis. It never made sense to me as the square corners always lined up but the circles/arcs had the problem. The problem was not as pronounced as it is on the Hurco, but there none the less.

I thought I might have a problem with my vector art so I went into CamBam and just made a circle and tried it. Same problem.

Wierd. I'm not sure what to think now. Two different posts, two different machines and the same problem (different degrees of severity). Wonder if it's CamBam itself?
 
Re: Code issue, please help. This stopped being fun a few days ago.

N10 G70 G17 G40 G90
N20 T1 M6
N30 G0 Z0.125
N40 S2500 M3
N50 G0 X0.5707 Y1.6711
N60 G0 Z0.0625


N50 G0 X0.5707 Y1.6711 Start point of the circle

N60 G0 Z0.0625

----- coordinates for circle cut are here -----
N70 G1 Z-0.06 F6.0
N80 G2 X1.9965 Y1.9547 I1.3118 J1.6711 F17.0 X & Y are the endpoint of the first arc
N90 G2 X1.5954 Y0.9864 I1.3118 J1.6711 X & Y are the endpoint of the second arc
N100 G2 X0.5707 Y1.6711 I1.3118 J1.6711 X & Y are the endpoint of the third arc, and are exactly the same as the start point.

So this code should work just fine. G90 says it's in Absolute mode. That should be correct, but in looking at the Hurco code I could find, it may not use a G90 code.

You might try the following line of code in place of the 3 arc segments in the above code. I don't know it it will work or not, but worth a try. This should cut the entire circle rather than arc segments.
N80 G2 X0.5707 Y1.6711 I1.3118 J1.6711 F17.0


What happened to my machine, was the encoders got flakey and it would not cut a correct circle and it would lose position on straight X and Y moves. I just built a new controller for mine, and used mag scales for the input. Ended that problem.

Good luck.
 
Re: Code issue, please help. This stopped being fun a few days ago.

Forgive my Ignorance, but the code you've supplied looks like it's the same as my line 80 with the exception of the x and y coordinates being replaced by the x and y from line 50. Is that the way to make it do a 360º? If so, and it works, that's easy enough. A pain to do it that way but better than not doing it at all.

The NC manual that came with the book has a G 75 code for "Multiquadrant circular interpolation" and specifically says it's for generating an arc in 1 line of code up to 360º. I'll have to replace the G2 with a G75 but OK, whatever, no big deal.

The manual also references G90 as being correct for absolute.

I did a pen plot on graph paper and the arc points are roughly at 2, 5 and 9 o'clock. That screws up my earlier theory about different start and stop points.


Eventually I'd like to make some parts on this thing.


Oh yea, thanks again for your help.
 
Re: Code issue, please help. This stopped being fun a few days ago.

Forgive my Ignorance, but the code you've supplied looks like it's the same as my line 80 with the exception of the x and y coordinates being replaced by the x and y from line 50. Is that the way to make it do a 360º? If so, and it works, that's easy enough. A pain to do it that way but better than not doing it at all.

The NC manual that came with the book has a G 75 code for "Multiquadrant circular interpolation" and specifically says it's for generating an arc in 1 line of code up to 360º. I'll have to replace the G2 with a G75 but OK, whatever, no big deal.

The manual also references G90 as being correct for absolute.

That is true, I'm not sure that will actually work, your controller may just see the end point and decide it is done. On my old Anilam, it would work.
 
Re: Code issue, please help. This stopped being fun a few days ago.

As I went out to the shop this morning something told me to check the belt to see if it was loose or worn. Take the cover off and belt looks good. I figured while the belt cover was off I might as well see what I can see. Check out the video below.


https://www.youtube.com/watch?v=EtId1WdyK0g&feature=youtu.be

In the video you will see that when I change directions on the Y axis, the motor makes a partial revolution in the reverse direction and then goes correctly. After you let off the feed, the motor continues to walk for a partial revolution. :nuts: OK, this is good to know, but what is causing it?

There is a sensor on the x and y axis that detects the limit of the table travel. I took the housing off to see if there was any interference. Same thing happens. Unit looks to operate via magnets so I put a small piece of metal in front of each sensor and they appear to work as the metal sets off the sensor and the axis walks slowly off the sensor. I was thinking about disconnecting the sensors to see if they are the source of the drift but was unsure of the result of running it with these disconnected. Any ideas if this will cause a problem?


While I was at it I decided to run the program that we've been beating around here for the last few days and see what I could see. I ran it at a feedrate of 1 so I could keep an eye on the y position while it was running. Movement got to the position where it changed directions and sure enough the y jumped .01-.015 or so. It appears as though the controller picks up on this position change and corrects it but by then the damage is done. If nothing else, this tells us the machine is reading the travel correctly and correcting but why does it allow the y axis to wonder?

Anyone run into something like this or know where to go from here?
 
Re: Code issue, please help. This stopped being fun a few days ago.

This is starting to sound like a zero-offset problem, at the drive level. The clue is that the end-of-travel limit should shut off the motor, but the motor continues to drift. Apparently on end-of-travel limit, the drives are not disabled by the controller, but rather the command signal is set to zero by the controller.

If there is a backlash compensation parameter in the controller, try setting that to zero and look at the result.


I am going to go out on a limb here and assume that your mill has DC Servo motors that are driven by a +/- 10 V command signal from the controller. The drive has some provision for adjusting the zero-offset. On many of the older drives this is accomplished by adjusting a pot on the drive board, on the newer drives this is normally done via a parameter in the setup. The motor should not turn when the command signal is at zero. If it does, then the zero-offset needs to be adjusted.


If you have some electrical documentation for your machine it would be helpful, Fenner drives were popular when your machine was made, and documentation is available for them and I may have that in my archives.


Where are the encoders your system, and how much backlash do you have in the leadscrews? Is the table ‘’sticky’’? It might be useful to shut all power down, put a dial indicator on the table, and rotate the leadscrew by hand and try to get a reading on the backlash.
 
Re: Code issue, please help. This stopped being fun a few days ago.

Let me clarify to be sure we are on the same page. When the table hits the limit switch, it stops. I have to do a process when I start the machine and one item is to calibrate the axes (all 3). When the table hits the limit switches the movement stops and the table backs off a partial revolution. This happens on all axes. I could not get to the X axis motor cover this morning before I had to be at work but I did check the Z and it does not walk. I checked the X axis and it did not feel like it was walking but I forgot to check the readout to see if it was or not. The X axis did not appear to jump while running the test program. At this point, I believe the trouble lies in the Y axis only. I took the limit switch assembly off to see if it was gummed up or shorting out somehow but visually it is fine. I wasn't sure how it worked so my experiment with the piece of metal was simply to check to see if it was magnetic or not.

I'll have to check into the backlash compensation in the controller.

The motor does not turn all by itself. Only after having pushed the feed button does it continue to drift (excluding the jumping while running the program) almost like the button is sticky. That would not explain the backward turn before correcting though.

I have a set of electrical schematics that came in the manual but I have limited electrical knowhow.

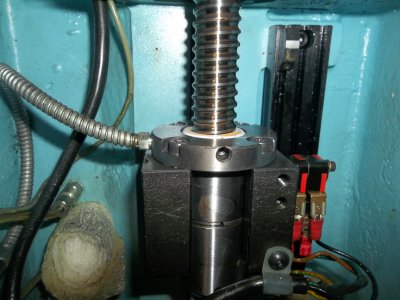
Encoder is right on the ballscrew; took the picture below before work this morning just in case. The picture is of the Z axis. Parts list calls it a "Litton" encoder. Not sure of the backlash, I'll have to check that. Table is neither sticky or sloppy.

The limit switch on the Z axis is different from the ones on the X and Y so don't let that picture confuse you.

100_0876.JPG


Do you think there would be an issue with running the machine with the Y limit switches disconnected just to eliminate them as a source of trouble? After the initial calibration I mean. I'd have to disconnect after I ran through the startup process.

100_0876.JPG
 
Re: Code issue, please help. This stopped being fun a few days ago.

Let me clarify to be sure we are on the same page. When the table hits the limit switch, it stops.


When the table hits the limit switches the movement stops and the table backs off a partial revolution. This happens on all axes. I suspect this is designed in to the system.


At this point, I believe the trouble lies in the Y axis only.


I'll have to check into the backlash compensation in the controller.


The motor does not turn all by itself. Only after having pushed the feed button does it continue to drift (excluding the jumping while running the program) almost like the button is sticky. That would not explain the backward turn before correcting though.


I have a set of electrical schematics that came in the manual but I have limited electrical knowhow.


Not sure of the backlash, I'll have to check that. Table is neither sticky or sloppy.


I don't think there is a limit switch problem. The key statement you make above is: ''That would not explain the backward turn before correcting though.'' You are correct.


What would explain this is the zero offset on the y axis. I will try to explain what I think is happening, I hope it makes sense.


I am going to use the terms Forward and Reverse here just to define a change of direction for ease of explanation, and also when I say ‘’More Voltage’’ this means a greater deviation from 0 volts, up to a maximum deviation of + or – 10 Volts. The greater the deviation from 0 the higher the torque the motor produces. Let’s assume that Forward = + deviation and Reverse = - deviation.


When the controller is outputting 0 volts, the motor should not move if the zero offset is adjusted correctly. When the encoder has reached the commanded position the controller should be outputting 0 volts. The controller does this by reading the encoder position and comparing the actual position to the commanded position. The controller will apply enough voltage to move to and/or hold the commanded position. If you were to grab hold of the motor shaft and attempt to turn it, the controller would send more voltage to correct the position.


I think there is a battle going on between the controller and the drive. Let's start with the case shown in your video where the motor turns Reverse before moving Forward. The motor is being held in position by the controller. If the zero offset is not correct, then the controller has to provide More Voltage to keep the motor in position.


Now you command the motor Forward, the controller starts changing the voltage to the Forward direction, but the drive is still telling the motor to run in reverse. Due to the acceleration ramp, it takes a while for the controller to catch up to the error and apply More Voltage to the drive, when it does catch up, then the motor runs Forward.


This is a bit hard for me to put into words, so I hope it makes some sense. If you have trouble understanding what I said, I'll try to explain it better.


The best way to set the zero offset, is to put a good voltmeter across the command signal terminals and adjust the zero offset until the controller outputs 0 volts when the motor is in it’s commanded position. I say good voltmeter because a few mili-volts can make the difference. You need to be able to read the voltmeter to at least 2 decimal places and preferably 3 decimal places. There is probably a dead-band of +/- 25 mili-volts (0.025 volts) or so that is equivalent to 0 volts


''Do you think there would be an issue with running the machine with the Y limit switches disconnected just to eliminate them as a source of trouble? After the initial calibration I mean. I'd have to disconnect after I ran through the startup process.''

I try never to run a fixed travel machine with the limits disconnected. If you lose control of the motors, things can get ugly in a hurry.
 
Re: Code issue, please help. This stopped being fun a few days ago.

Thanks for the explanation. I think I got the concept and it all seems to make sense. Now the question of how to check and adjust.

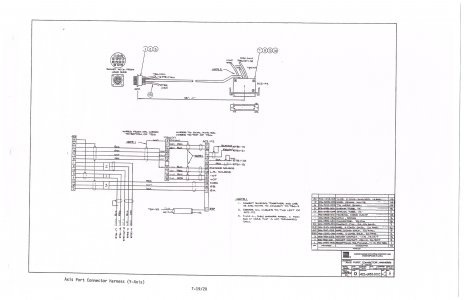
I've attached what I believe is the correct diagram for the task you are explaining. If not, I've got the manual. Which pins should I be checking for voltage on? I've got a fluke meter and I think it's 3 digit so I should be good there.

y axis wiring.jpg


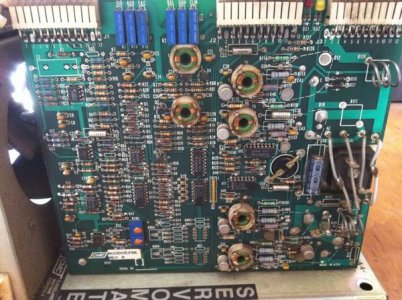
Here's a picture of one of the drive boards I found online. I had a picture but it wasn't this good. Unless I'm missing it I don't see a pot.

$T2eC16hHJFoE9nh6qTBQBQYNQY,SOw~~60_57.JPG

I've looked briefly through the manual for instructions on adjusting the 0 offset using the controller but I'm at work so I'm doing this between waves of work. I have yet to see anything but I'll keep digging as time permits until I get home.


I agree with you about running the machine without the limit switches. I wasn't thinking clearly, just desperate to find a solution.


Not to fawn over you but you have no idea how much I appreciate you spending your time helping me (a total stranger) with this problem. I'm serious about those drinks!

y axis wiring.jpg
 
Re: Code issue, please help. This stopped being fun a few days ago.

Would the two "blue squares with orange paint" near the white label on the bottom left, be the pots? They look like a pot to me.
Pierre
 
Back
Top