Surface Finish

Okay, now you have adequate relief on both the side and end - very good!

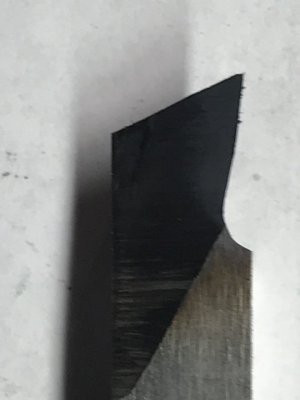
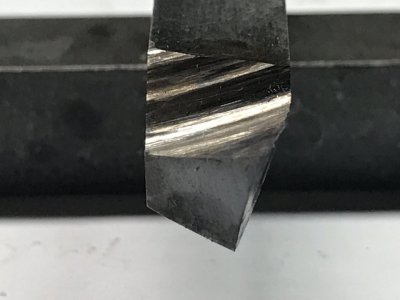
I suggest you pay attention to flattening to top of the tool. You need to choose how much back rake you want and draw a line on your tool rest; 10-15 degrees works good. Push the tool straight into the wheel while holding the bit at the angle of the line until the top is flat. You see how the tip of the tool droops down to the end when viewed from the side? It isn't supposed to droop like that.

Please fix the top of the tool and don't grind anything else. Then let's take a look again when you're done.
 
Please fix the top of the tool and don't grind anything else. Then let's take a look again when you're done.

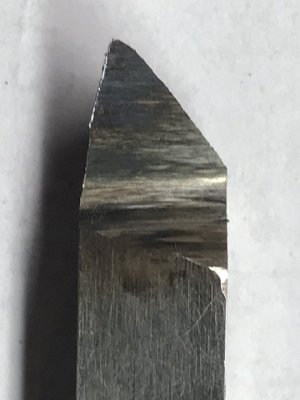
How does this look? I only adjusted the top. No appreciable change on angle, only depth. I probably should have justIMG-1136.jpgIMG-1137.jpgIMG-1138.jpg started over instead of regrinding the original bit. Not sure if it saved me anything or not. Lots of grinding.
 
No, that looks a lot better. You now have good relief angles on the side and end, good side and back rake. If you haven't done it yet, hone each flat with a stone and then put a really tiny nose radius on it. I normally just put a 1/64" flat across the nose where the side and end flats meet. Keep that flat even top to bottom, then blend or round each side of the flat into the side and end. Make it round and then go back to the top of the tool and give it one or two light honing strokes to clean it all up.

Now you can use the tool.

For most turning, try using the tool with the shank of the tool perpendicular to the work. It should allow you to rough and do finer cutting with the tool in this position. However, if you need a really fine finish then you can turn the tool tip counterclockwise and do a very light shearing cut with the area just behind the nose radius. You are using the end cutting edge just back of the nose. That edge is capable of both fine and heavy cuts but it will surprise you at how nicely it finishes. Give it a try.
 
You'll also get a better finish with a finely honed surface on your tools. Use a diamond plate, or an India oil stone to finish them.

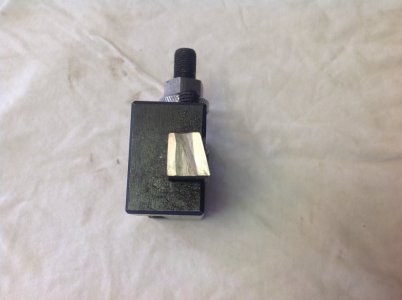
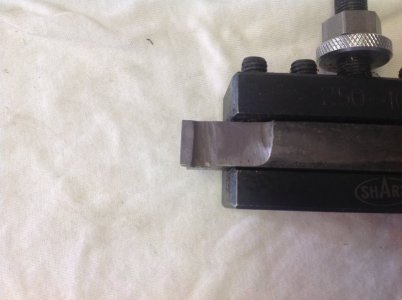
It has been mentions that a shear tool will give you a good finish on many hard to machine metals. Here is my shear tool:

IMG_0011.JPG

IMG_0012.JPG

The front is recessed in the middle to make honing the edge quicker - same with the side relief. There is about a 5º relief (not critical) on the very front. The cutting edge itself is vertical (no relief). To use it, take no more than 0.001" off the radius per pass - I aim for 0.0005" per pass. I find that if I just touch the work, that is just about right. Set the tool so that the middle of the tool is on the centerline. I usually use oil, but I have run it without also. I believe that the oil helps preserve the edge from excessive wear. This tool is subject to more wear than usual tools, so keep an eye on the edge. If it looks ragged, then take it over to your stones and spruce it up.

The swarf that comes off the tool should be almost gossamer like and will actually float in the air. Take care not to breath in the swarf.

This grind of the tool is for a right to left feed only. Mirror the grind for a left to right feed.
 
I tried a .005, .010, and .015 DOC. .001 gives me the smoothest surface, and thee still appears to be stripes on the steel. For roughing, I guess I can try a .020 DOC, but i would hate to ruin a good thing. Also, I am getting a lot of long tight curly chips. Some of which a wrapping around the tool and tool post. Suggestions to alleviate this?

if you need a really fine finish then you can turn the tool tip counterclockwise and do a very light shearing cut with the area just behind the nose radius

Please clarify. Would I rotate the tool from a perpendicular shank position to a position almost 75 degrees counter-clockwise?

Thanks to Mikey for all the help and patience.
 
Last edited:
It has been mentions that a shear tool will give you a good finish on many hard to machine metals. Here is my shear tool:

SLK, take a look at post #9. I tried successfully with the shear tool. Next I'll give the recess on the shear tool a try.
 
Please clarify. Would I rotate the tool from a perpendicular shank position to a position almost 75 degrees counter-clockwise?
Yes, turn the tool CCW and cut with the end edge, just behind the nose radius. Take very light cuts, increase speed a little and slow down feed a little and it should produce a nice finish.
 
Also, I am getting a lot of long tight curly chips. Some of which a wrapping around the tool and tool post. Suggestions to alleviate this?
Increasing the feed rate is the best answer. However, when playing around like this I would just accept the stringing while you learn what depth of cut, feed and speed works best for you.
 
Increasing the feed rate is the best answer. However, when playing around like this I would just accept the stringing while you learn what depth of cut, feed and speed works best for you.
C's and 6's are only going to apply to inserts, correct ?
I do not see how it is possible to grind a true chip breaker in a small (3/8) size HSS tool.
 
Also, I am getting a lot of long tight curly chips. Some of which a wrapping around the tool and tool post. Suggestions to alleviate this?

Here's where a chip-breaker helps (see comment below). I also use a 12" piece of ~3/4 x 1/4" oak to stick into the curls coming right off the tool to break them up. These can be dangerous to have flopping around, so break them up as soon as you can. The stick will get hot and occasionally catch fire, but just dunk it into oil to keep the inferno to a minimum!

C's and 6's are only going to apply to inserts, correct ?
I do not see how it is possible to grind a true chip breaker in a small (3/8) size HSS tool.

It is, but is difficult. I use a Dremel tool with a small abrasive disk to cut the groove just behind the edge.
 
Back
Top