Suggestions For An Arc Welder For Up To 1/2" Steel?

E350 either one run a little with one till you feel comfortable, then run a few of the other and see how each acts. 6010 will start easier so that may be a good place to start. One thing I liked doing and still do when dialing a machine in is run your first set of stringers about an 1/8" apart. Keep ruing them till you have a few, then come back and fill in the valleys between the welds. This will give you guides to weld by, practice filling a V joint, practice tying in the edges of the welds, and a feel for filling up the joint to a good crown. Once you can do these you will be good at watching the puddle (not the arc) and controlling the puddle.

Really it sounds harder than it really is. just stick a rod in the holder and let it rip. post some pics and myself and others will be better able to help you make adjustments to what you are doing.
Mark
 
Fomogo,
E350 is right very nice place. As for the bridge pretty cool. but in the second pic. the tractor wheel the farthest away looks like it has a welding bb on it. or is that a small bug?:laughing:
 
You know, I am a little grumpy with my local welding supplies retailer.

Looking up the amperage range for 6010 5/32 diam. in the Miller Thunderbolt XL Owner's Manual, the recommended amperage is 125A to 175A.

Looking at the chart on the unopened 5/32" box of Radnor 6010 electrodes, the recommended amperage is 100A to 175A.

Although I see on the Miller website that the normal stick is consumed in less than two minutes.

I need seat time, running bead after bead after bead on scrap making pads of beads.

At the amperage required for the 6010 5/32" diam. rod, the Miller Thunderbolt XL will be in the 20%-15% duty cycle range.

Which means that I will sit two minutes running a bead, then have to do nothing for 8 minutes to wait for the welder to cool down so as not to damage the welder or not to detrimentally affect my welds. (There is nothing worse than thinking it is me that is screwing up when it is really the machine that is screwing up because the machine is being pushed beyond its limits...)

In contrast, the amperage for a 6010 3/32" diam rod. is only 50A to 75A. 60A puts the Miller Thunderbolt XL into the 90%-100% duty cycle which will facilitate some serious seat time.

So the 5/32" 6010 is going back and I am buying some 3/32" 6010, for practice at least. According to the chart, 1/8" should be fine for actual work.

The 7018 1/8" is also going back, because it needs even more amps than the 6010. It will be replaced with 7018 3/32".

Now, I haven't even burned one electrode yet. But I know how to read. But I also know that experience may be more important than what I am reading, so if you guys think something different or think that I am missing something, please let me know.
 
Fomogo,
E350 is right very nice place. As for the bridge pretty cool. but in the second pic. the tractor wheel the farthest away looks like it has a welding bb on it. or is that a small bug?:laughing:

Yeah, but those wheels are cast steel mower wheels (late 1800's to early 1900's), and that is brazing, not welding. Even preheated with a big rosebud it was a *****. Have taken to welding stops to the angle iron the wheels sit on to hold them in place. Much easier than welding to those wheels. By far the toughest thing I've yet run across to weld to. Mike
 
Fomogo,
Yes the old steel from the turn of the century does not weld that good either. On several occasions I have had to reinforce beams and columns in old building in Chicago and man is it a pain. it welds like cheep cast iron. I would like to try oxy acetylene on it some time but can never get a welding torch and rod brought out. Did you try NI rod on the wheels? on one of the above mentioned jobs we ran Ni rod on the old steel the tied the new steel into the NI rod. It helped.

E350,
I looked at millers chart and I have to question the heat range they call for on the 7018 1/8. I put the question to the rest of the guys here but does anyone here run this rod at over 130 amps? much less the 160ish amps the chart calls for? at that heat the flux burns off the rod. I run around 100-120 when doing certs. with a 8' ground and stinger. 3/8 V grove 1/4 gap with backer vert up and overhead. That is still in your 30-40 % duty cycle so yes there will be some down time. using 3/32 would be a way to get some more time under the hood but if you are going to be welding 1/2 steel IMHO you would do well to learn to weld with 1/8 rod. Not to say you can't do your learning on the 3/32 then just a little time with 1/8 to adjust. that would work fine.
So what do others think about 1/8" 7018 at over 130Anps? I just looked back at the miller chart and it is actually saying close to 170amps. starting at 115-120amps.
Mark
 
Fomogo,
Yes the old steel from the turn of the century does not weld that good either. On several occasions I have had to reinforce beams and columns in old building in Chicago and man is it a pain. it welds like cheep cast iron. I would like to try oxy acetylene on it some time but can never get a welding torch and rod brought out. Did you try NI rod on the wheels? on one of the above mentioned jobs we ran Ni rod on the old steel the tied the new steel into the NI rod. It helped.

Haven't tried the Ni rod on those wheels, but have tried it on other jobs. Used it to repair a broken axle end (cast steel) on a backhoe I had years ago and it worked well in that application. Getting ready to try it on a sway bar repair. Mike
 
Mark I am no pro welder, as I have stated, but if memory serves, I agree completely with you. I can never recall using more than 120-130 amps on 7018. Usually much less than that, regardless of the thickness of the joint. You might make a case of building up a work surface in a hurry with higher current in the instance of a large, quickly cooling mass, but preheat would be the way to go if possible. And that is only supposition on my part. I have done my share of buildup, but it's been a long time ago. I think maybe the charts are wrong on this one. I never start with the middle or higher when I do consult charts, which is rare anyway. My guesswork has proven adequate thus far. I've not burned rods in a while anyway, due to the little welding I have to do these days, and using a wire machine or TIG when I do weld.
 
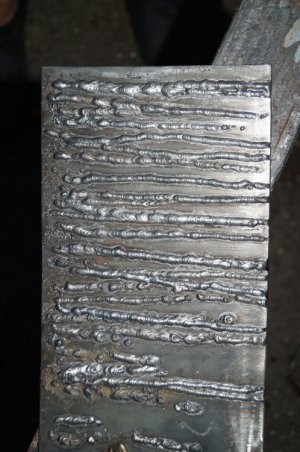
Well installed the circuit breaker, the EMT, the wiring, dryer and range recepticals and plugged in the Miller Thunderbolt XL today. And tried to stick weld for the first time. And below is the ugly truth.

1/8" ASTM A36
3/32" E7018 DCEP playing with amperage 65-120 Miller welding calculator says 65-100
I started on the bottom and went up. Went left to right and you can see my arc strikes and many many sticks on the left.
One thing that was interesting and I don't know if it is wrong or right, but on my later beads about half way across I would just push the rod into the metal and it stayed lit and just moved along, and the bead got narrower.
My helmet is letting light in from the back which is making it harder to see than I would like.

Any suggestions would be appreciated.DSC01453 correct.jpg

And then I thought I would try some 3/32" E6010 DCEP 40-85. Nothing but stick sticks. Couldn't even get it started...
 
Last edited:
https://www.facebook.com/charles.mulvihill1/videos/vb.1482033768/10204548045009410/?type=2&theater

I don't know if you will be able to see the above video of me welding with washington wire brand 3/32 6010 rods. I am using a harbor freight 200 dollar stick welder that is not rated for use with 6010 rods, it is inverter based. 1/8 inch 1020 steel.

If you can see the video, look how slowly I carefully position the rod before I start welding.
Both hands on the stinger. Rock solid stance.

I get the electrode stuck also. Most inverter welders cause this to happen with 6010 rods. In addition, washington wire electrodes and most electrodes sold in small packages at welding suppliers are not as good at striking the arc as the premium rods sold by lincoln electric. I consider hobart, washington, radnor and welding supplier house brands to be poor in quality when striking the arc.

Not all 7018 rods are the same. Some have more iron powder in the coating. Quality 7018 rods can be touching the metal as you weld and can be lightly dragged on the metal if they have enough iron in the coating. Secondly, 7018 rods do not light up well with restrikes. Slag covers the tip on 7018 rods that must be removed before restriking.

I am going to suggest that you purchase 6011 rods to learn with. They strike and maintain the arc better than 6010 and 7018's.

If you are welding left to right start the arc just to the right about a half an inch from the left side of the plate. Maintain a longish arc and bring the rod over to the left edge of the plate, lower the rod and start welding. You will be welding over your arc strike, this is standard welding practice and should be done with all smaw rods.

Think about keeping your head away from the weld, it is counter intuitive, but, you will be able to see better the farther away your head is from the weld arc. After awhile you will start to understand the puddle, you will start seeing two puddles, one is molten metal and one is molten slag. Then you will use rod angle to see the effect on the slag, more rod angle pushes the slag away from the rod. Not enough angle and the slag gets under the rod.

You will need to use up a lot of rods, many pounds, practicing before you are ready to weld a nice bead, have patience and it will come.

Hope this helps,

Chuck
 
Last edited:
E350, Glad you got all hooked up. Now lets talk about those um, welds? No really you are not that bad you just need a little fine tuning and a lot of practice. I suggest you to try a few things, each on there own and then combining them. Before I that look at what seems to be the 7th and 8th welds from the top these welds look pretty good for a 3/32 rod on 1/8 steel. you are a little shaky but the weld looks pretty good from here. One thing I want you to try on all welds is when you strike the arc hold the rod with your free hand about 1/2 way down the rod. only hold it a short time as it will get hot soon.

first tighten up the arc length

next try just running stringer beads use a move pause motion like 1,2, move. watch the crater and the puddle while doing this you should see the base metal crater then fill in when it fills move. you are only moving about the diameter of the rod so 3/32.

Try 75-85 amps on this thin steel and small rod be sure to clap the ground to the work or the work to what you are grounded to. You are pulling the weld right? it looks like it but some times it is hard to tell what someone is doing wrong with out watching them weld. Be sure you are comfortable, rest your elbow on something. (but not the hot stuff) As stated above use both hands. I like to hold the rod with my free hand at the start once the puddle is started I move it up to the bottom of the other hand to help support and steady it. (well when I don't need it to hold on to the steel or ladder I do)

The welds look either cold, fast or long arc keep this in mind. Correct each thing one at a time so you see what each one is doing. This can help out a lot as you learn more and more. I have apprentices that I work with run what I know is hot, then what I know is cold. Long an short arcs so they see what each do to the weld.

You are closer than you think to good welds Watch so respected you tubers like welding tips and tricks I will post some of what I think are good guys.

Mark
 
Back
Top